If you run paid Facebook ads for a Shopify store, you know your analytics rarely match. The data mismatch can make scaling your ad budget incredibly difficult. This discrepancy between Facebook ads and Shopify reports happens because the two platforms use different methods to track and count conversions.
A 100% perfect match between your marketing dashboard and your shopping cart is not possible today. However, allowing a large data gap to go uncorrected can lead to poor optimization choices and wasted ad spend. This guide covers why your data is broken and provides straightforward steps to fix it.
💡 Key Takeaways
- Why do the two platforms count sales on different days? Meta attributes a purchase back to the day the user clicked or viewed an ad, while Shopify logs it at the moment the financial transaction clears.
- How do you bypass modern browser privacy blocks? Turning on the Meta Conversions API inside Shopify and use server-side tracking tools for Shopify.
- How to build a consistent reporting for multiple ad platforms? Centralize your numbers using a dedicated marketing attribution tool for Shopify such as NestAds and Triple Whale.
The Primary Causes of Facebook and Shopify Tracking Mismatches
To fix a broken data line, you must first understand how the platforms work.
Meta and Shopify are separate systems built for different functions. Meta is an advertising network that tracks how people interact with your ads across its apps. Shopify is an e-commerce platform that logs real-time financial transactions and inventory updates. Because they look at the customer journey differently, they rarely record sales identically.
Different Attribution Windows Explained Simply
The main cause of a data discrepancy is the difference in attribution windows. Meta tracks conversions based on when a user interacts with an ad. By default, Meta uses a 7-day click and 1-day view attribution setting. This means if a user clicks your ad on Monday but returns to buy on Thursday, Meta attributes that sale to Monday.
Shopify uses a last-interaction model. It logs a sale at the exact day and time the transaction occurs. In the example above, Shopify records the sale on Thursday and credits it to direct or organic traffic. When you compare your daily metrics, Monday and Thursday will show conflicting totals.
| Platform | Tracking Focus | Default Calculation Model |
|---|---|---|
| Meta Ads Manager | Ad Interactivity | Credits the day of the ad click or ad view |
| Shopify Dashboard | Financial Transaction | Credits the day the credit card clears |
Timezone and Currency Differences Between Dashboards
A simple mismatch in basic account settings causes a surprising number of data discrepancies. One of them is different time zone settings. If your Meta Ads Manager is set to Eastern Standard Time (EST) but your Shopify store backend operates on Pacific Standard Time (PST), you have an automatic three-hour data shift built into your daily reporting.
The same logic applies to mismatched currencies. If your ads run globally and Meta attempts to convert Pounds or Euros into US Dollars using an internal daily exchange rate estimation, it will rarely align perfectly with the precise financial conversion rate that Shopify processed through your payment gateway.
Modern Privacy Settings, iOS Tracking, and Ad Blockers
The technical landscape of modern web browsers is hostile toward traditional tracking methods.
Many consumers now use privacy-focused browsers, ad-blocking extensions, or mobile operating systems with strict app tracking settings like Apple’s iOS platform. These tools block third-party tracking scripts before they can load on your Shopify checkout page.
The standard Meta Pixel relies on browser-based tracking code. When a user loads your store, this pixel attempts to drop a cookie to track their actions. If these privacy tools block the script from executing, however, those user actions are never recorded or sent back to Facebook. Because this data is lost in transit, conversions like purchases or add-to-carts go completely unnoticed. This causes Meta to underreport your actual performance.
💡 How big of a mismatch is normal?
As a general benchmark for modern ecommerce operations, a data discrepancy of 10% to 15% is acceptable. You do not need to spend hours trying to close that small gap. However, things can get really messy if you use another ad platforms such as TikTok and Google.
Because each platform uses its own proprietary tracking model, they will often claim credit for the exact same sale.
This ‘double-counting’ can inflate your reported revenue by 30% or more over your actual Shopify dashboard, making it incredibly difficult to know which channel is truly driving your ROI.
Practical Steps to Fix and Reduce the Tracking Discrepancy
Now that we know exactly what causes these data gaps, let us move into troubleshooting mode. You cannot achieve a 100% perfect match, but you can significantly close the gap and build an incredibly accurate system. Follow these four practical steps to secure your data pipeline.
Step 1: Align Your Timezone and Reporting Settings
Before doing anything advanced, you should check your account settings.
Check your Shopify and Meta timezone. If the two platforms do not match, you must update them to use the same regional clock. If you cannot change your historical Meta ad account timezone due to active billing setups, adjust your Shopify dashboard filters when exporting data so that you are evaluating identical 24-hour periods. You can review the step-by-step account configuration guides on Shopify.
Step 2: Set Up the Facebook Conversions API (CAPI) inside Shopify
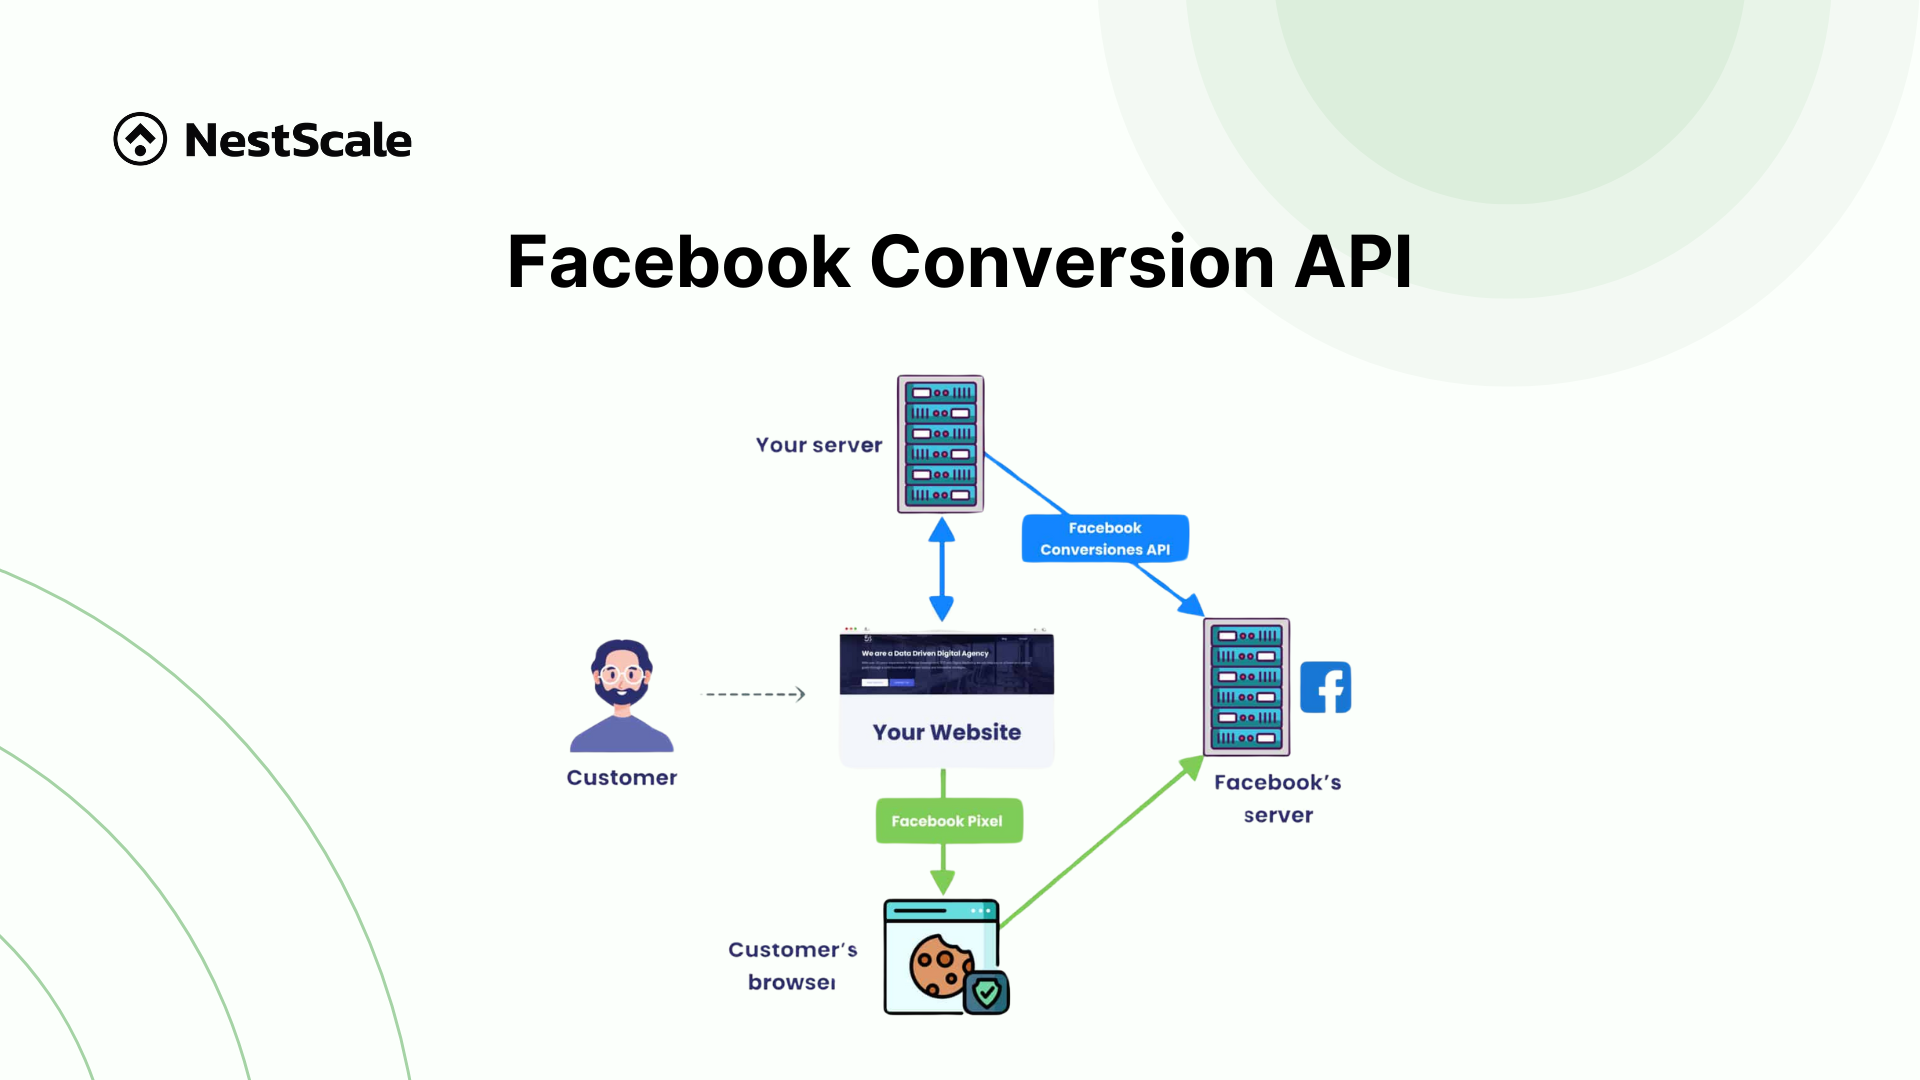
Because modern web browsers regularly block traditional pixel tracking scripts, you must implement a server-side solution. The Facebook Conversions API creates a direct, secure connection between Shopify’s backend servers and Meta’s data servers.
When a customer buys a product, Shopify sends a secure conversion signal directly from its server to Facebook. This process completely bypasses browser blocks, ad blockers, and mobile privacy restrictions. If the browser pixel is blocked, the server message ensures Meta still counts the sale.
You can see step-by-step guide on how to set up Facebook CAPI in Shopify.
Furthermore, using a Facebook ads app for Shopify is highly recommended if you don’t want to get bogged down with the technical setup.
Step 3: Implement Standard UTM Tracking Links
Never rely solely on automated platform pixels to identify your traffic sources. You should always use manual Urchin Tracking Module (UTM) parameters on every single ad link inside your campaigns. UTM parameters are simple text extensions added to the end of your website URL that tell Shopify analytics exactly where a visitor came from.
When you use a clear, standardized naming system, Shopify’s internal tracking can read the URL tags and correctly categorize the traffic inside your store sessions reports.
If you are running ads on multiple platforms, UTM parameter mapping becomes even more important. It allows you to see exactly which specific campaign, ad set, and creative actually triggered the final purchase, giving you an objective, uninflated view of where to scale your budget.
Step 4: Building a Single Consistent Report for Ads Performance
Once you have aligned your settings, turned on the Conversions API, and added UTM tracking tags to your links, you need to change how you analyze your business performance. Looking at Meta Ads Manager in isolation or looking only at your Shopify dashboard will always give you an incomplete view of your marketing efforts.
To scale a modern brand successfully, you need a single source of truth that bridges the data gap. Many scaling ecommerce brands use dedicated marketing attribution platforms like Triple Whale, NestAds, or Google Analytics 4 to organize their numbers. These reporting tools do not take sides. Instead, they use proprietary first-party tracking scripts that collect data across your entire marketing funnel, matching your ad spend directly against real Shopify order numbers.
By monitoring your total store revenue relative to your total ad spend, you eliminate the constant anxiety of trying to figure out which individual dashboard is completely correct. It allows you to focus on the numbers that actually matter: your overall profitability and business cash flow.
The Bottom Line: Unifying Your Ad Data
Data mismatch between your ad channels and your sales reports is one of the most frustrating problems for Shopify merchants relying on paid ads, but it is almost always a solvable one.
The permanent fix requires addressing your data collection at the root. By implementing server-side tracking, you bypass unstable browser limitations to capture every single purchase event securely. When you combine this server-side data with a multi-touch attribution model, you can map the complete customer journey across all your active channels, including Meta, Google, and TikTok. This gives you undeniable performance proof for your campaigns, showing you exactly how a customer interacted with a top-of-funnel Facebook video ad before ultimately checking out days later through a Google search link.
NestAds is a dedicated Shopify attribution tool built specifically to solve this data fragmentation problems. NestAds connects your various ad networks, first-party cookie data, and true Shopify revenue events into one central dashboard. When your data is unified, your marketing team and agency partners can finally agree on which creative assets are moving the needle, which campaigns are driving true customer acquisition, and where your budget should go next.
Moving to a unified, first-party data system removes the guesswork from your marketing strategies. Get started for free or get a live demo to see NestAds in action.
Frequently Asked Questions
An outbound click is recorded the millisecond a user taps your ad, whereas Shopify only counts a session after your storefront completely loads in their browser. If a user clicks by mistake and immediately exits, or if your site takes too long to load on a mobile device, Meta logs a click but Shopify never registers a visitor.
I do not recommend doing this because Meta’s optimization algorithm needs the broader default window to find your target customers effectively. Restricting Meta to a strict last-click setting will shrink the data your campaigns use for learning, which often lowers your overall ad performance. Instead, keep Meta’s settings at their default values and use a third-party reporting tool to compare your platforms fairly.
While server-side tracking is highly effective at capturing checkouts, it still cannot track users who explicitly opt out via your regional compliance privacy banners. If a customer declines cookies on your Shopify consent banner, your system must legally respect that choice and block both browser and server data sharing. It fixes technical data loss caused by ad blockers, but it always respects consumer privacy choices.
When you run ads on Meta, Google, and TikTok simultaneously, each platform will try to claim full credit for the exact same sale if a user interacts with all three. Multi-touch attribution solves this by tracking the entire customer journey and distributing fractional credit to each touchpoint. This stops individual platforms from inflating your numbers and shows you exactly which channel started the journey and which one closed it.