
Welcome back to our server-side tracking series. In our previous post, we delved into the differences between server-side tracking vs client-side tracking. As we discovered, server-side tracking offers significant advantages in terms of data security, privacy compliance, and site performance. Now, we turn our attention specifically to Shopify, exploring how to set up server-side tracking on a hosted SaaS solution.
Shopify, with its unique ecosystem and extensive API capabilities, presents distinct challenges and opportunities when implementing server-side tracking. This blog will guide you through a step-by-step process to set up Shopify server-side tracking. Whether you’re looking to refine your marketing efforts, enhance user privacy, or simply gain more accurate data, this guide will provide you with all the necessary insights to make server-side tracking a powerful component of your Shopify strategy. Explore right now!
How to set up server-side tracking on Shopify
Setting up server-side tracking on Shopify involves understanding its unique SaaS architecture, which differs significantly from self-hosted platforms like Magento or WordPress. Shopify’s hosted environment offers a secure and maintained system but with less flexibility in server configurations. This contrast impacts how you can implement server-side tracking, requiring you to work within Shopify’s constraints to optimize data handling and integration.
After understanding what is server-side tracking, in this section, we’ll explore how to effectively set up server-side tracking on Shopify.
Step 1: Choose your server-side tracking solution
The first step on how to set up Shopify server-side tracking is to assess what you need from server-side tracking and decide which tool fits best with your Shopify environment. Popular server-side tracking tools include:
- Google Tag Manager (GTM) server-side: GTM is a versatile tool that allows you to manage your tags without adding extra code to your site, improving loading times and data accuracy. It requires setting up a server container specifically for server-side tracking.
- Managed solutions like NestAds: These platforms offer end-to-end solutions that are particularly optimized for Shopify stores, and easier to implement ensuring accurate data collection and compliance with data privacy regulations.
Each of these tool has its strengths, and the right choice depends on your specific needs, such as the type of data you need to track and your budget. One of the best choices is NestAds – an integrated tool designed for marketing attribution and advertising management. With user-friendly, easy-to-set-up, and affordable prices suitable for all sizes of Shopify businesses, NestAds simplifies the transition to server-side tracking.
NestAds utilizes first-party data effectively, ensuring that your advertising efforts remain effective even as traditional tracking methods become obsolete due to regulatory changes. With our comprehensive solution, businesses can overcome the technical barriers of setting up server-side tracking and stay ahead in a cookieless world.
Step 2: Set up the server environment
Integrating your chosen server-side tracking tool with Shopify can be complex, involving adjustments both in the Shopify admin panel and potentially on the server side.
For GTM server-side
Google Cloud Platform (GCP) is a common choice for hosting GTM server-side containers. If you’re setting up the tracking yourself using GTM, configure a server-side container that can handle incoming data from your Shopify site. This involves accessing the Shopify admin, going to Online Store > Themes > Actions > Edit code, and inserting your GTM snippet in the theme files.
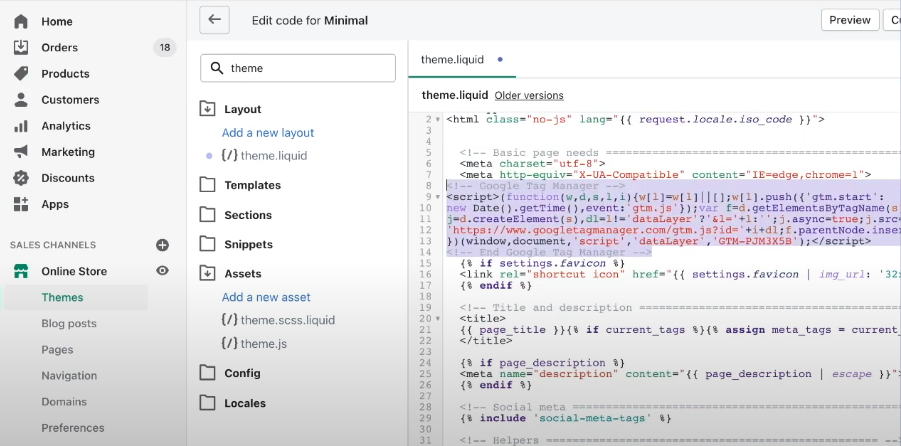
Next, for each event (like add to cart, initiate checkout), configure GA4 tags in GTM that include all necessary variables from your unified data schema. Make sure to test these tags to ensure they capture and send data accurately to your server-side container.
For managed solutions
Register for the service and follow their specific Shopify integration guide, which usually involves installing an app or adding a snippet of code to your Shopify store. If using NestAds, you can check our guide on how to connect NestAds with your Shopify store here.
Step 3: Configure Shopify to send data to your server
Establish API connections to ensure that Shopify can send data to your server-side tool. This often involves generating API keys in Shopify and configuring API settings in your tracking tool to accept data.
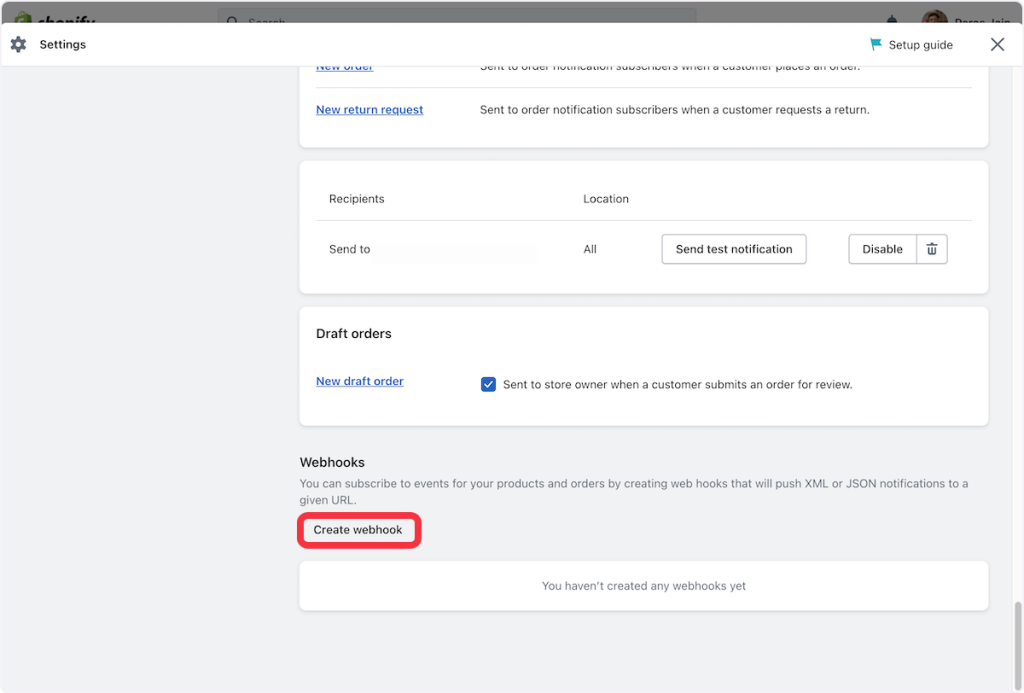
Shopify can send data via webhooks for events like orders created, products added, or customer updates. If your server-side tool requires webhooks (e.g., for real-time data tracking), you’ll need to set these up in Shopify under Settings > Notifications > Webhooks, specifying which events to send to your server.
For events not covered by Shopify’s webhooks, it’s crucial to route this data through a first-party context (i.e., under your primary domain URL). This ensures you have full control over the data collection process, enhancing privacy and data integrity.
Step 4: Implement data collection on your server
Once your server can receive data from Shopify, you need to configure how this data is collected and processed. Define rules for how data should be handled once it reaches your server. This could include validation, formatting, and determining which data should be forwarded to other platforms.
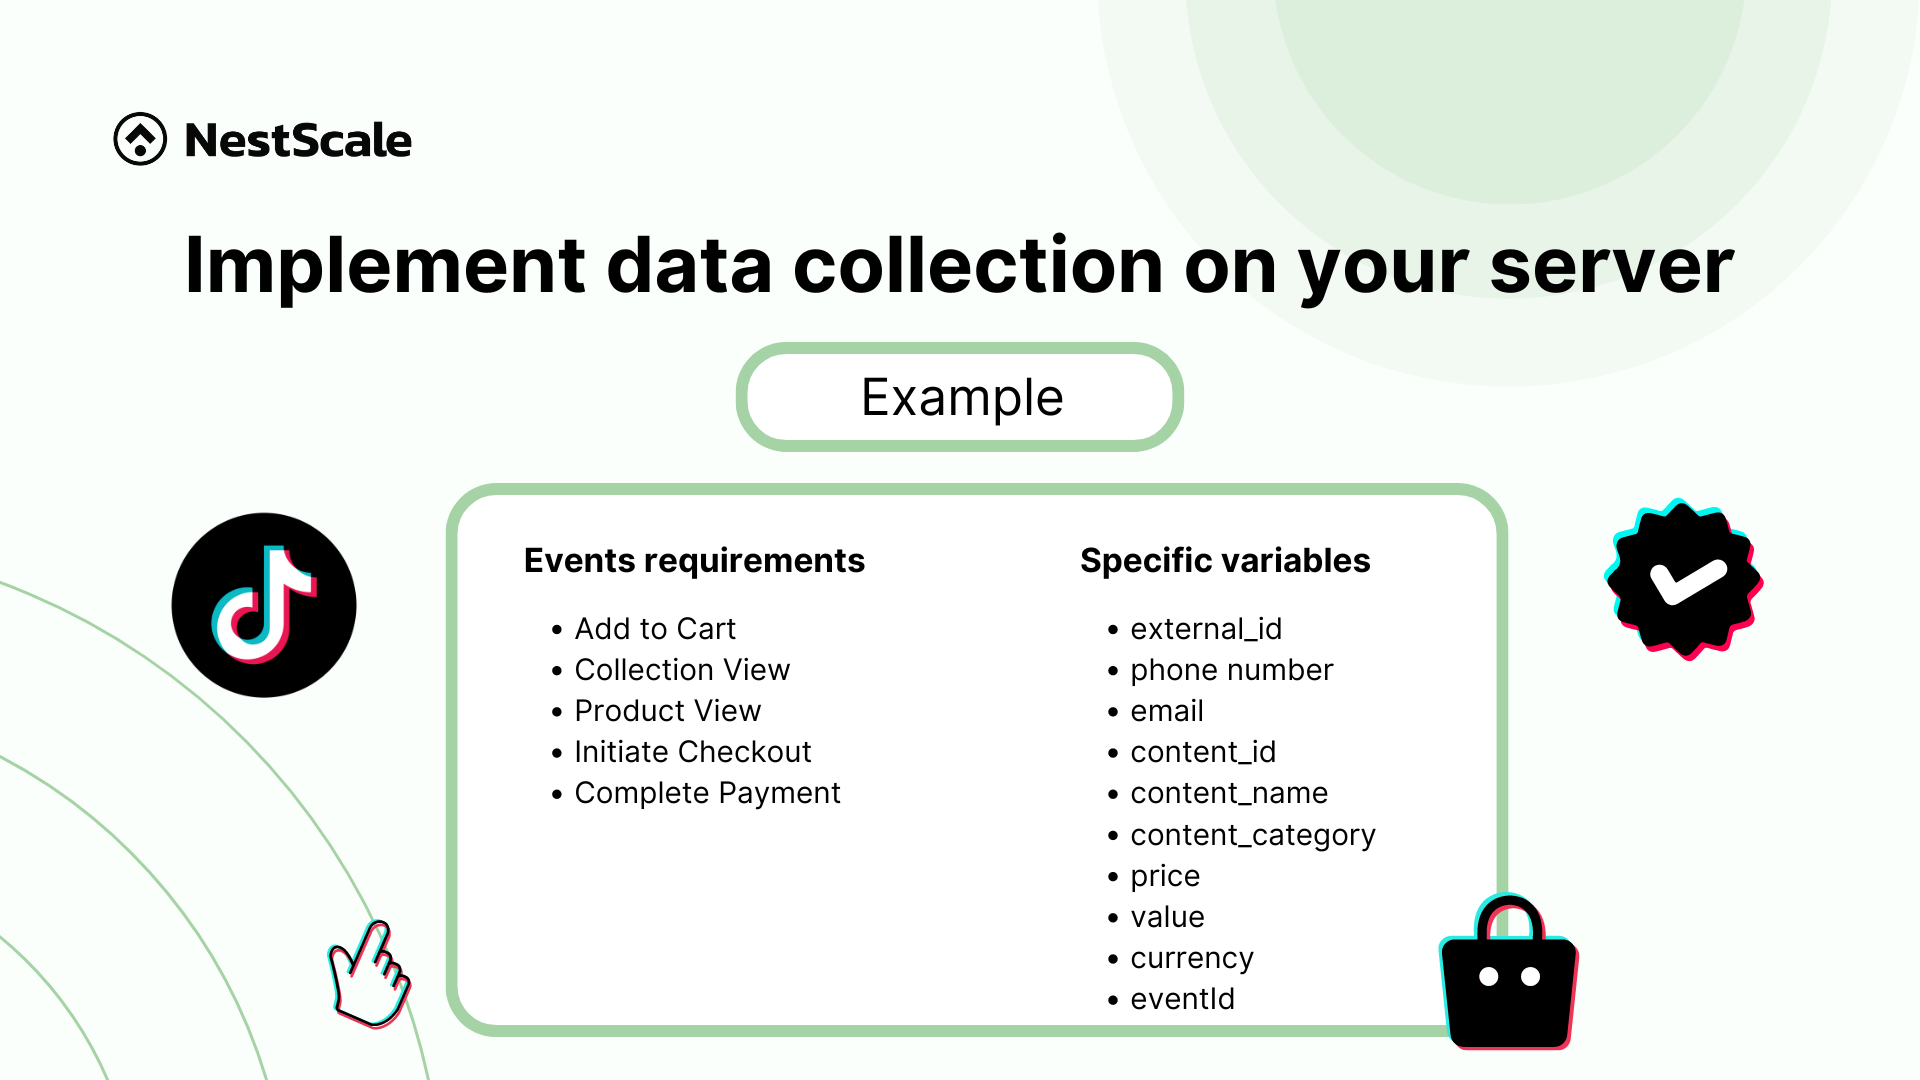
List out all the events and data requirements like revenue, order ID, customer information, and attribution metrics for each platform. Evaluate the distinct data requirements for each endpoint, like the Facebook Conversion API, Google Analytics, or TikTok Events API. This will help in creating a unified schema that can cater to all needs.
For example, on TikTok, you might need data points like Add to Cart, Initiate Checkout, etc., with specific variables such as external_id, price, and currency.
Note: Ensure you encrypt all data transmitted to and from your server and secure access to prevent unauthorized data breaches.
Step 5: Set up data routing to analytics and marketing platforms
After processing the data on your server, the next step is to route it to your analytics and marketing platforms:
- Configure Destination APIs: Each platform like user-built analytics platforms, Google Analytics, or any other tool will have its API or method for receiving data from your server. Configure these connections carefully to ensure accurate data mapping and transmission.
- Consent management: If you operate in regions governed by GDPR or similar regulations, integrate consent management solutions to respect user privacy choices in data handling.
Step 6: Testing and validation
Before launching your server-side tracking Shopify, conducting a comprehensive testing and validation phase is essential. This phase helps catch any issues that could impact data accuracy or result in data loss. Follow these steps to confirm the accuracy and reliability of your system:
- Conduct test transactions: Execute test transactions either from your website or directly through the Shopify admin panel to confirm that events are correctly routed to the predetermined destinations.
- Analyze API responses: Keep an eye on the responses from the destination APIs. Ensure you receive success messages and carefully review any failure notifications or error codes to identify potential issues.
- Cross-platform verification: Test the setup across various platforms such as Facebook, Google Analytics, and others. This helps to verify that not only do these platforms receive the data, but they also accurately record it.
Step 7: Monitor and optimize
After Shopify server-side tracking deployment, continuous monitoring is essential to ensure everything works as expected. Regularly review your tracking setup to ensure it continues to meet your needs, monitor the performance of your server, and make necessary adjustments to handle increased traffic or data volume.
Shopify server-side tracking best practices
Shopify server-side tracking is a robust approach for managing customer data more securely and efficiently. It shifts data processing from the client’s browser to the server, enhancing data integrity and compliance with privacy laws. Here are best practices to optimize server-side tracking for Shopify stores within the realms of data integrity, security compliance, and ongoing system management.
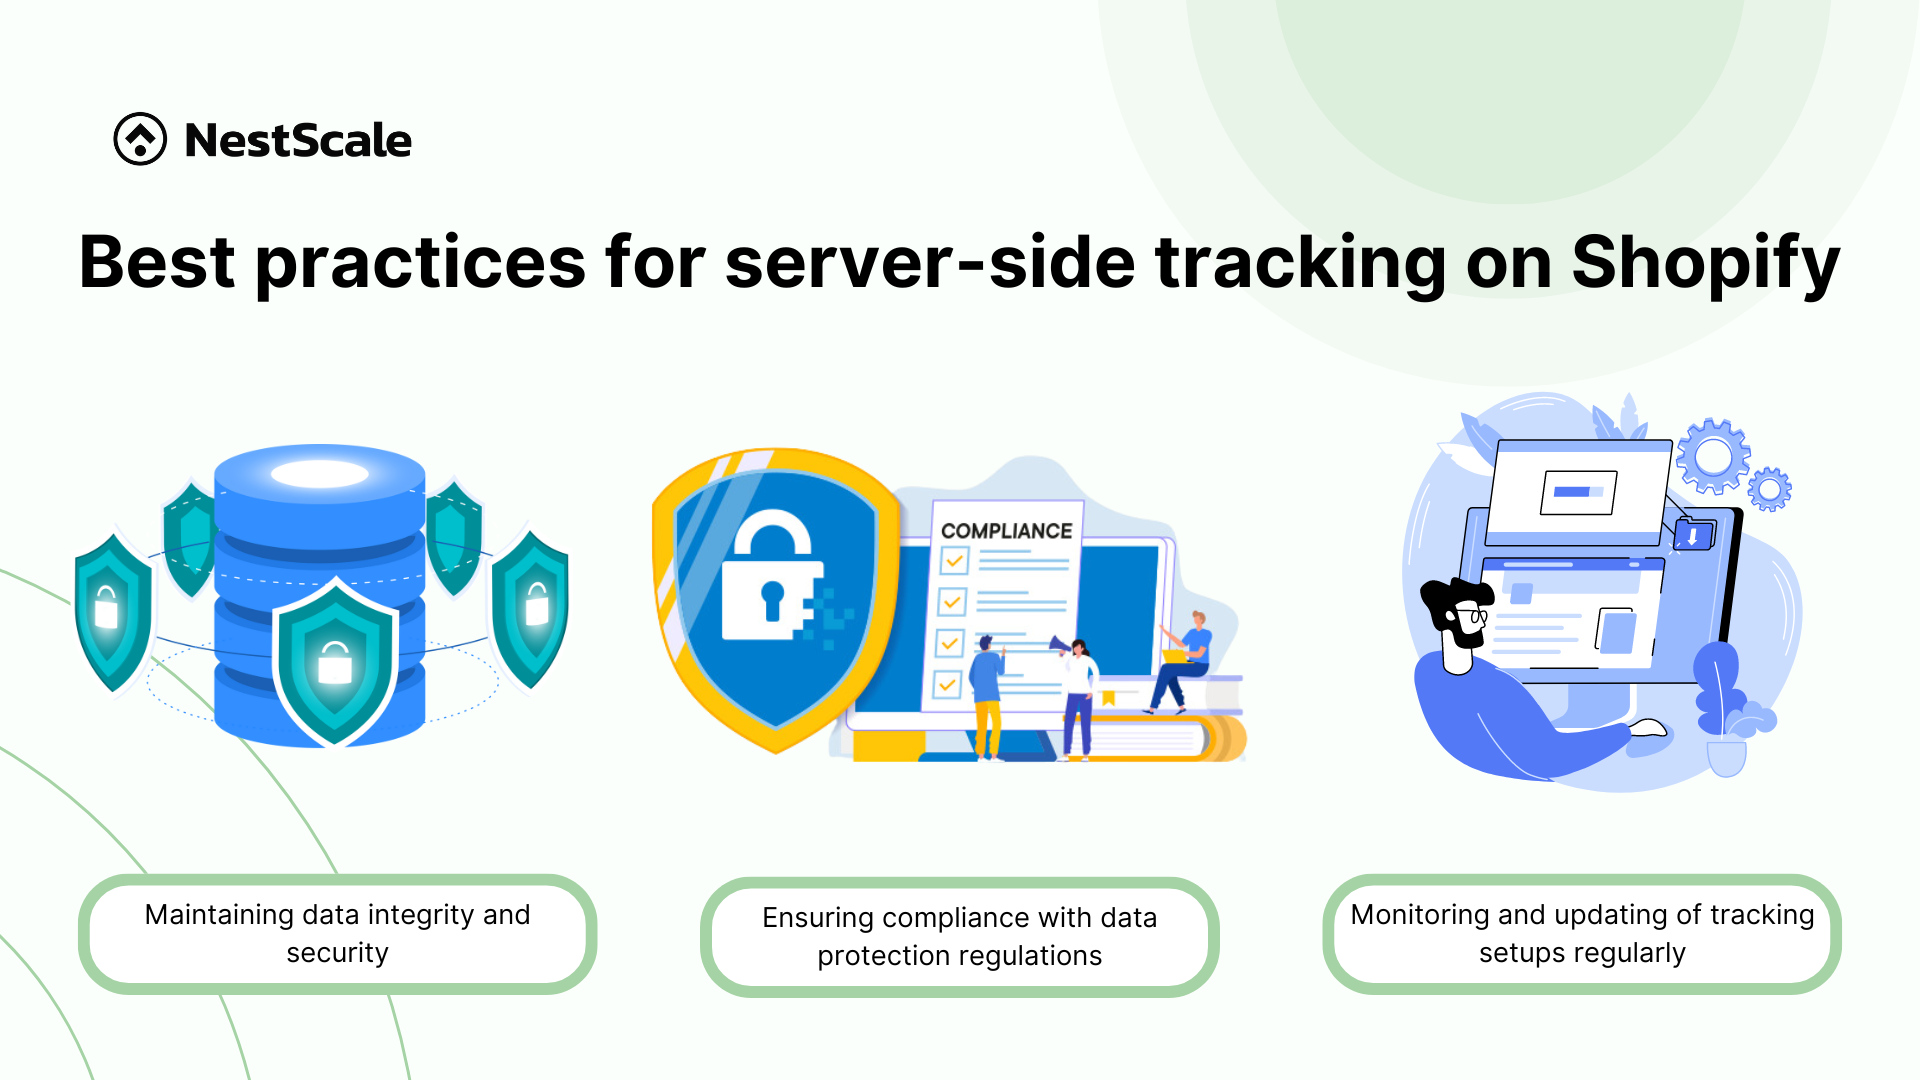
Maintaining data integrity and security
- Ensure that all data transmitted between your Shopify store, server, and external platforms is encrypted using HTTPS. This protects the data from being intercepted during transmission.
- Implement strict access controls on your server. Use roles and permissions to restrict who can view or manipulate data. Regularly update these permissions to reflect changes in team structure or responsibilities
- Apply robust data validation techniques to ensure the accuracy and format of the data being collected. Scrubbing data for errors before it’s processed helps prevent corruption and ensures the data’s utility in analytics.
Ensuring compliance with data protection regulations
- Compliance starts with understanding the specific requirements of data protection laws relevant to your business, such as the GDPR or CCPA. These regulations often dictate how you should handle personal data, including how it’s collected, stored, and shared.
- Collect only the data you need for processing purposes. This practice not only aligns with GDPR principles but also reduces the risk of handling sensitive information that could potentially be breached.
Monitoring and updating of tracking setups regularly
- Use monitoring tools to regularly check the health and performance of your server-side tracking setup. Look for anomalies in data transmission or processing that could indicate system failures or potential security breaches.
- Keep your server and its software updated with the latest security patches and updates. This includes your server operating system, any applications you are using for data processing, and the Shopify platform itself.
- Regularly review the performance of your tracking setups to ensure they are capturing the necessary data efficiently. As your store grows, you may need to scale your infrastructure or optimize configurations to handle increased data volumes.
- Maintain thorough documentation of your tracking and data handling processes. This is crucial not only for internal use and training but also for demonstrating compliance in case of audits.
Options to implement server-side tracking
As we mentioned, implementing server-side tracking is a crucial strategy for enhancing data accuracy, privacy, and compliance, particularly when managing advertising campaigns across various platforms. Here, we explore the 3 main options for server-side tracking: Facebook Conversion API, TikTok Events API, and Google Ads server-side tracking.
In this section, we’ve provided an overview of the various server-side tracking options available for major advertising platforms. For a more comprehensive guide on how to implement these options, be sure to stay tuned for our next blog posts.
Facebook Conversion API
The Facebook Conversion API allows advertisers to send events directly from their servers to Facebook. This method bypasses the need for client-side tracking, which can be unreliable due to browser restrictions on cookies and ad blockers.
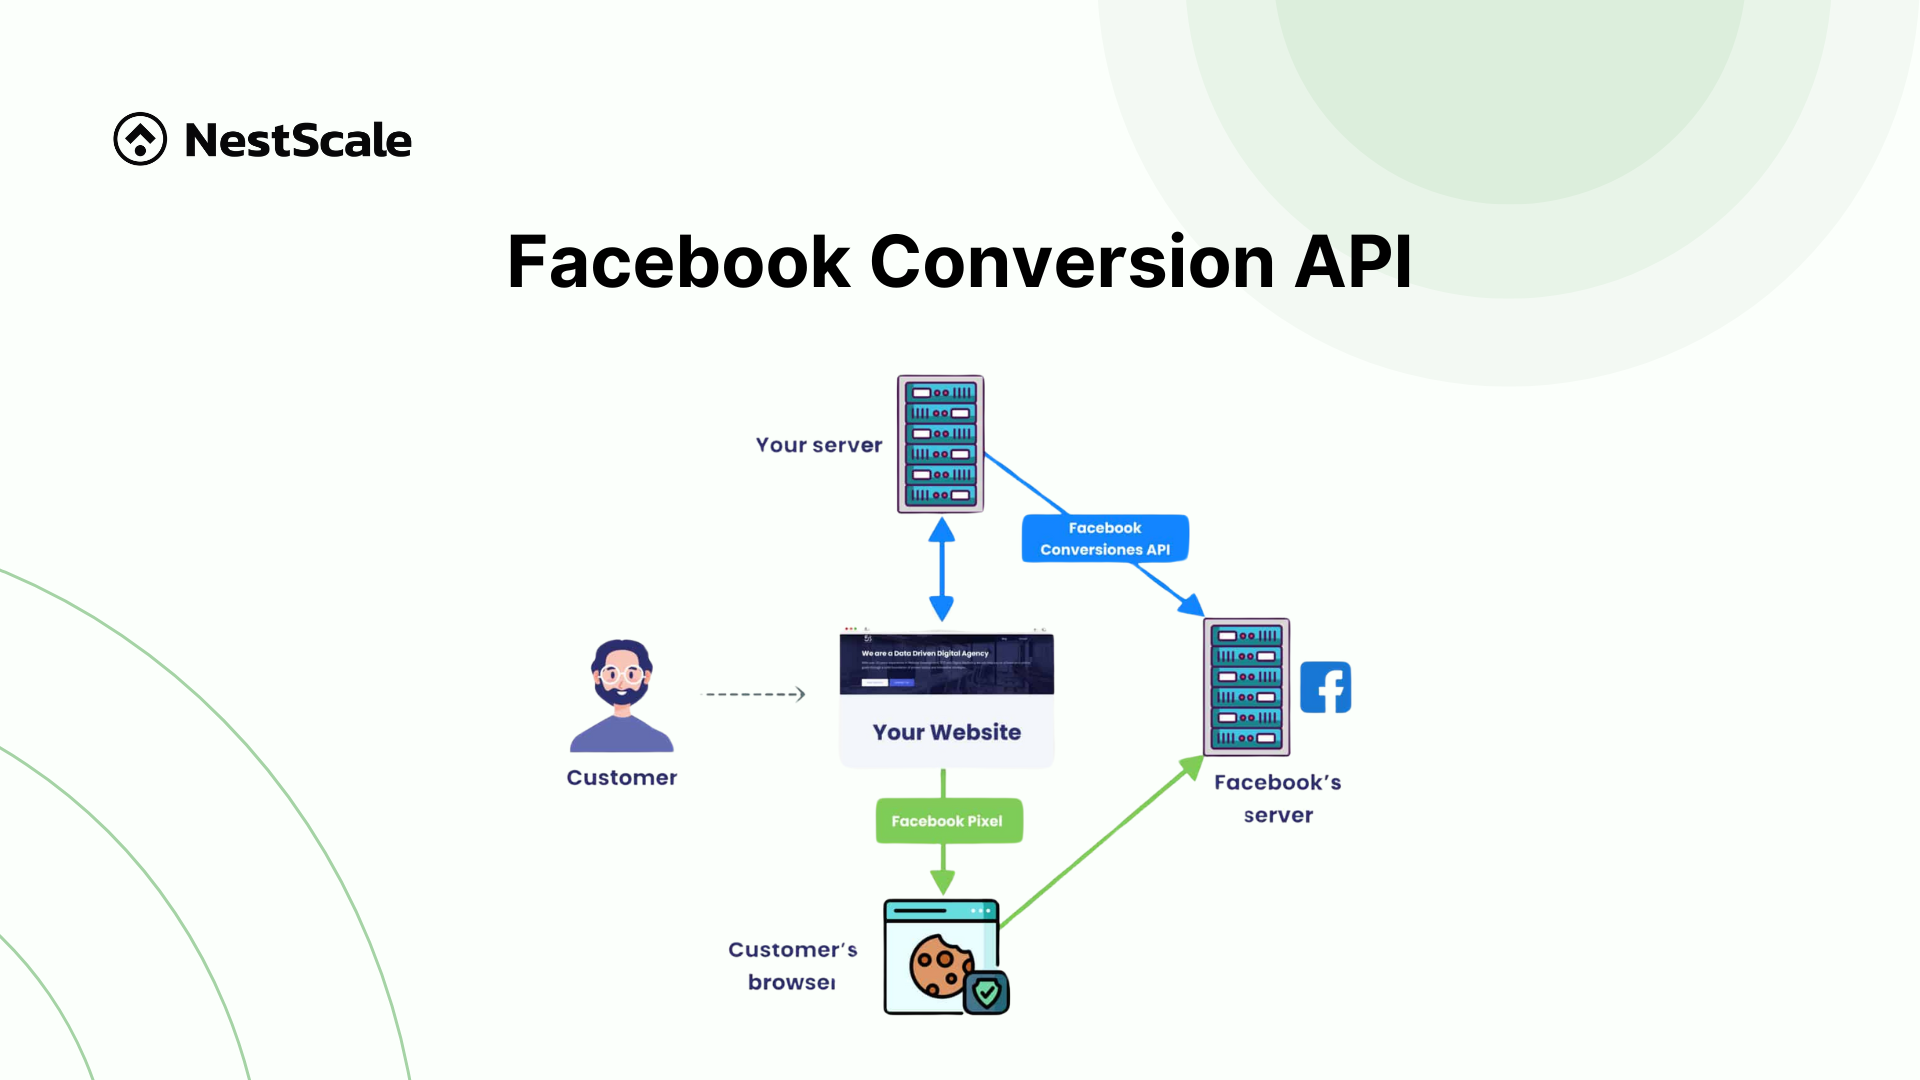
Server-side tracking with Facebook Conversion API offers several benefits:
- Improved data privacy: By processing data on the server, you minimize the amount of personal user data exposed on the client-side.
- Increased accuracy: Server-side tracking mitigates issues related to lost data from ad blockers and browser restrictions.
- Better optimization: The API supports more precise event matching, which can improve the optimization of ad campaigns and retargeting efforts.
TikTok Events API
TikTok Events API enables advertisers to track and measure the effectiveness of their advertising campaigns directly from their servers. This approach particularly benefits capturing data in environments where traditional browser-based tracking is restricted.
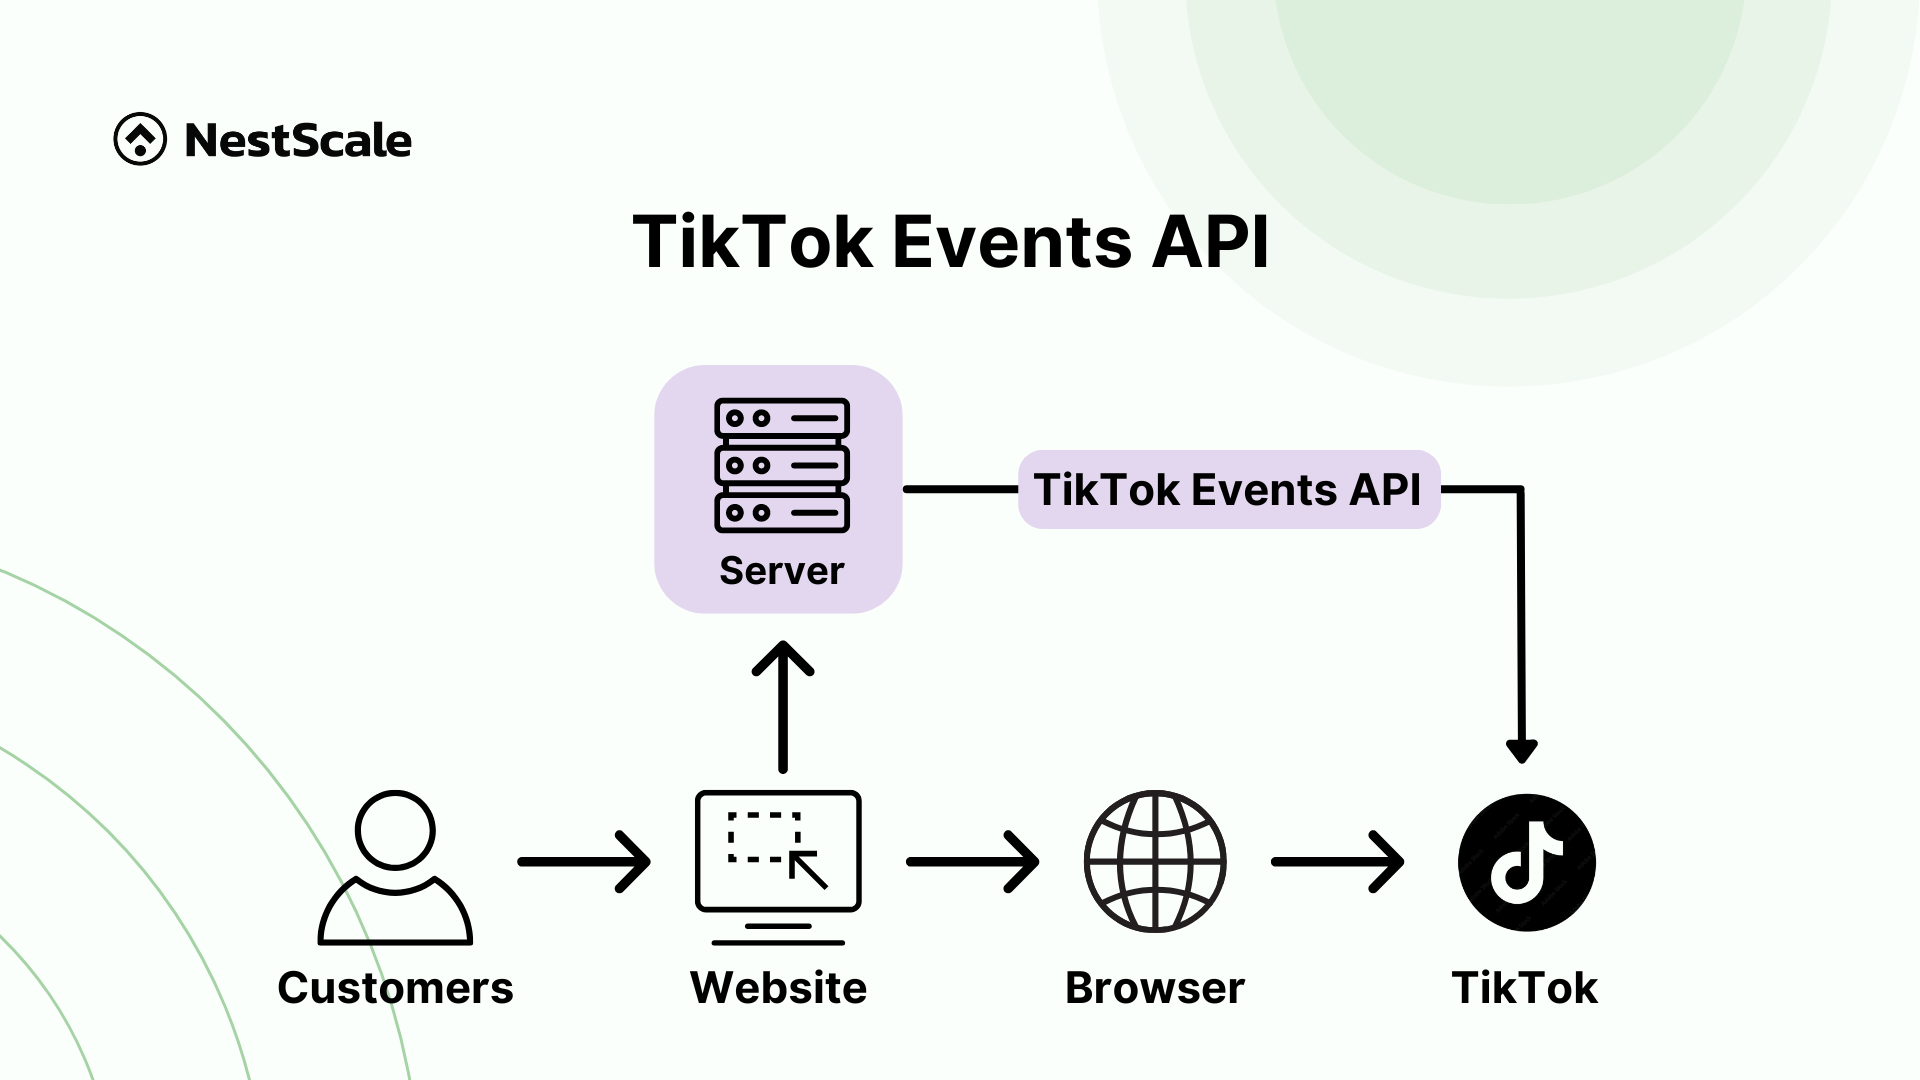
Key advantages of using TikTok Events API include:
- Enhanced measurement: Direct server-to-server connections ensure more reliable data capture, especially in restricted browser environments.
- User privacy compliance: Server-side tracking eliminates the need to expose or handle sensitive data in the client’s browser, aligning with privacy-first advertising strategies.
- Customization and flexibility: The API allows for the sending of custom events and attributes, providing flexibility in how data is tracked and reported.
Google Ads server-side tracking
Google Ads server-side tracking is a sophisticated approach to monitor user conversions that result from Google Ads campaigns. Unlike traditional client-side tracking that uses code directly on your website, server-side tracking relies on your server to send conversion data directly to Google Ads.
Benefits of Google Ads server-side tracking include:
- Improved data accuracy: It reduces discrepancies in conversion tracking caused by issues like cookie blocking.
- Enhanced security: Your server securely transmits data, thereby reducing exposure to potential client-side vulnerabilities.
- Greater control over data: This method provides greater control over the data sent and its processing, enabling more customized tracking setups.
Wrap up
Setting up Shopify server-side tracking is a critical step for any store owner looking to enhance their data accuracy, and optimize site performance. As we move towards a cookieless future, the ability to reliably track user interactions directly from the server becomes increasingly important. This method not only helps in navigating the challenges posed by new privacy regulations but also provides a robust framework for capturing valuable customer insights.
Don’t miss our upcoming blog where we’ll guide you through setting up the Facebook Conversion API, an essential tool for boosting your ad performance and enhancing measurement accuracy directly from your server.