Setting up Google Analytics 4 for e-commerce tracking on Shopify is essential for optimizing your sales strategies. In this guide, we’ll break down the integration process between GA4 with Shopify, show you which e-commerce events to track, and highlight how to leverage these insights for better decision-making. So, without any ado, let’s get started!
Understanding Shopify GA4 e-commerce tracking
Setting up Shopify GA4 e-commerce tracking involves integrating GA4 to monitor all interactions that your customers have with your site. This system is built around the concept of events rather than sessions like the previous Universal Analytics (UA). This shift allows for a more adaptable way to collect data, offering deeper insights into customer behavior through detailed tracking setups.
With GA4, every interaction—be it viewing products, adding items to the cart, or making purchases—is recorded as a distinct event. This granular view lets you capture more activities and understand the subtleties of how customers engage with your site. It’s a significant upgrade that enhances your ability to track and analyze e-commerce-specific actions more effectively.
Moreover, integrating GA4 with your Shopify store not only lets you track these key e-commerce actions but also helps you see the customer journey. This comprehensive view of your customers’ behaviors and preferences is invaluable. It empowers you to tailor your strategies more effectively, improving the user experience and ultimately boosting conversions. By embracing GA4 e-commerce tracking, you’re equipped to make informed decisions that can lead to better performance and deeper customer connections.
How to set up Ga4 e-commerce tracking on Shopify
You have 2 approaches to set up GA4 e-commerce tracking on Shopify. The first method involves setting up through the Google & Youtube app. This process is incredibly straightforward—even those with no prior experience in setting up analytics tools can easily manage it. However, while this method is user-friendly, it primarily tracks only basic, key events. This could be somewhat limiting if you’re looking to monitor a wide range of sales-related activities.
The second option is to set up e-commerce tracking through Google Tag Manager (GTM). This approach requires a bit more technical skill and effort but offers significant flexibility. With GTM, you can customize and track a broader array of events based on your specific needs. This makes it ideal if you need to monitor events that aren’t automatically tracked by GA4, allowing for a deeper dive into your data.
In this guide, we’ll walk you through both methods, helping you decide which setup best suits your needs:
Method 1: Setting up via Google & Youtube app
Before setting up, make sure that you already have a GA4 property to connect to your Shopify. If you haven’t had GA4 property yet, log in to your GA4 account, then go to the Admin section. Under the property column, click Create Property. Then, you just need to follow the prompts to set up your new GA4 property.
Step 1: Install the Google & Youtube app in your store.
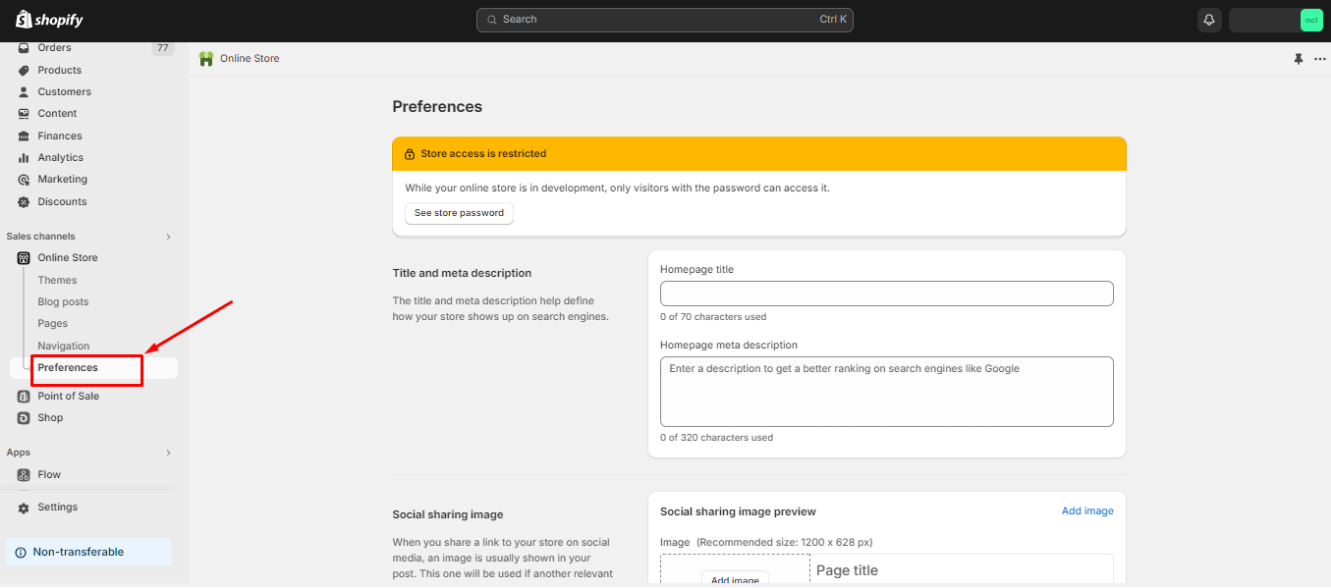
- First, navigate to the Online Store section and click on Preferences
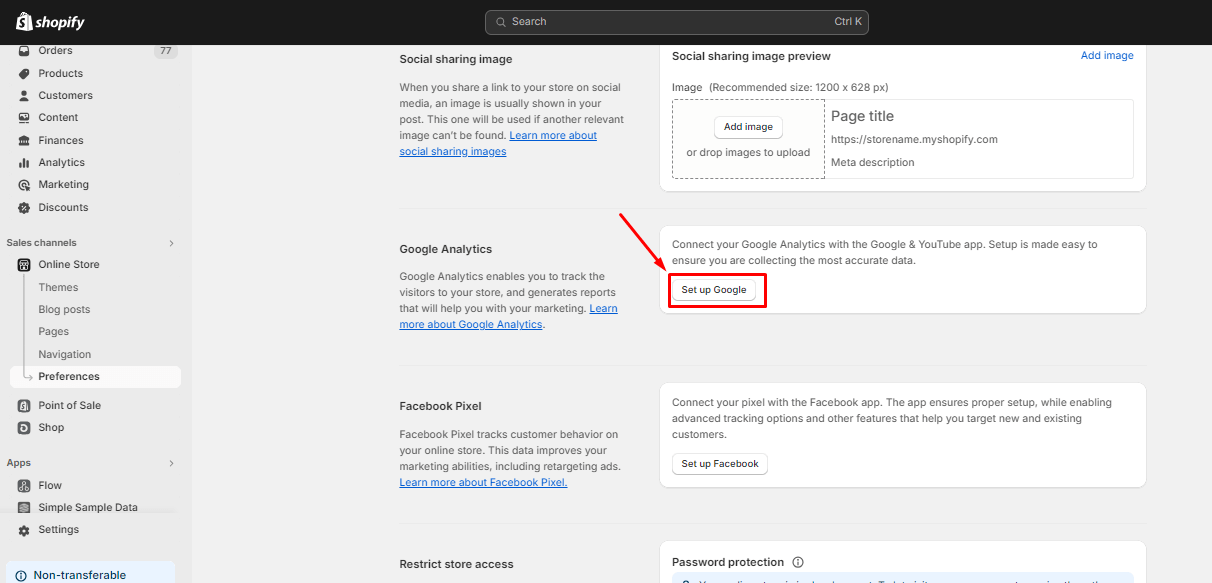
- Scroll down to the Google Analytics section and click on the Set up Google button. Shopify will then direct you to the installation page.
- Here, simply click on Install to proceed.
Step 2: Connect your Shopify store to your Google account
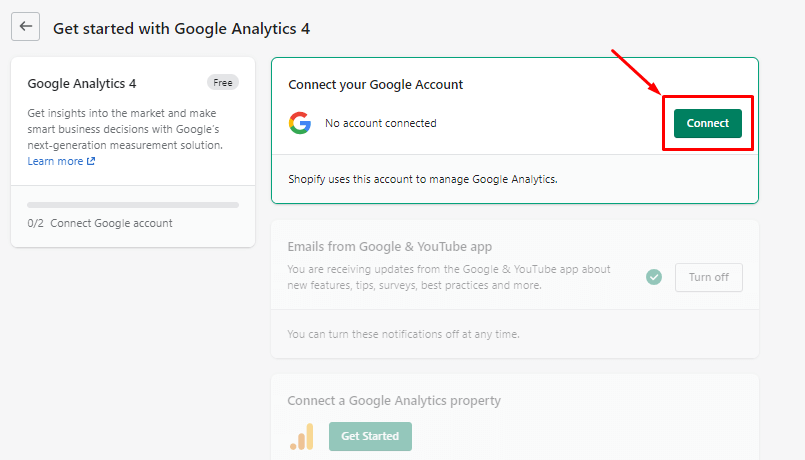
- After installing the Google & YouTube app, you will need to connect your store to your Google Account. Click on Connect, and then follow Google’s guide to complete the connection process.
Step 3: Select Google Analytics property to connect
- If you have multiple GA4 properties, select one in the Connect a Google Analytics Property section.
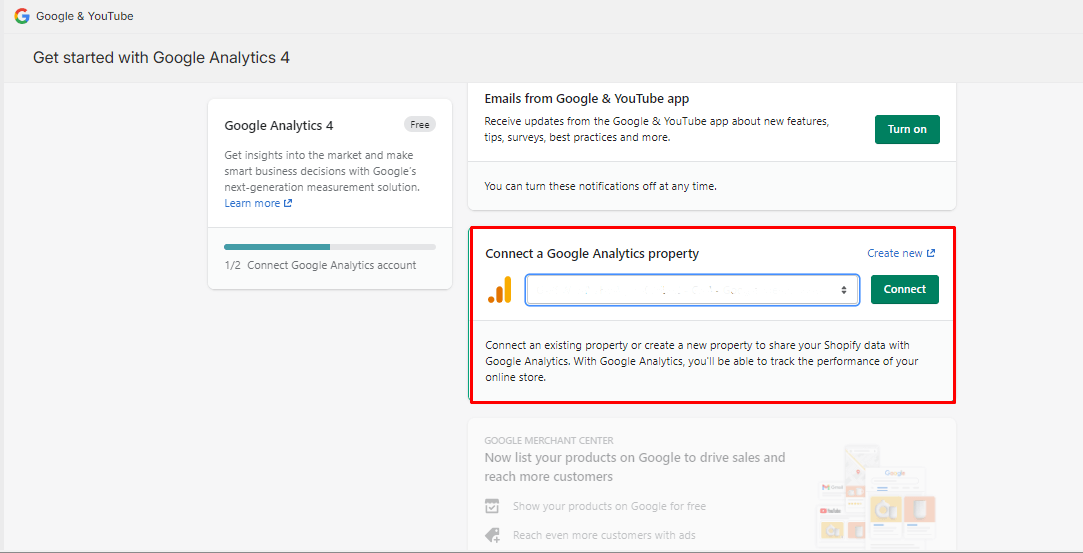
- Once you complete this step, you will be able to start tracking your store within GA4 immediately.
Method 2: Setting up via Google Tag Manager
Depending on the e-commerce event you want to set up, different requirements and actions are needed. Therefore, we recommend reading Google Analytics’ guide for each event before starting your setup. In this guide, we will demonstrate how to set up the ‘view_item_list’ event.
Step 1: Copy the GTM container code to your store
- In your GTM account, click on your account ID and copy the provided code; you’ll use this for later setup.
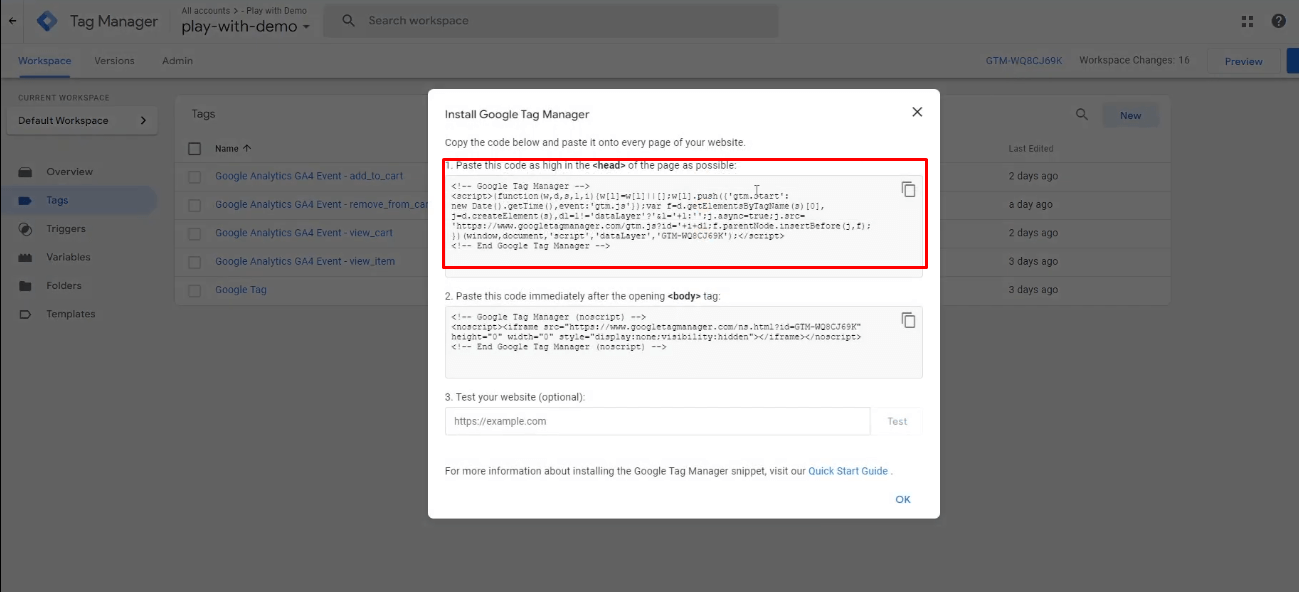
- Then, return to your Shopify store and navigate to Online > Themes > Actions > Edit code. Paste the GTM container code you copied earlier into the theme.liquid file.

Step 2: Connect GTM account to Shopify store
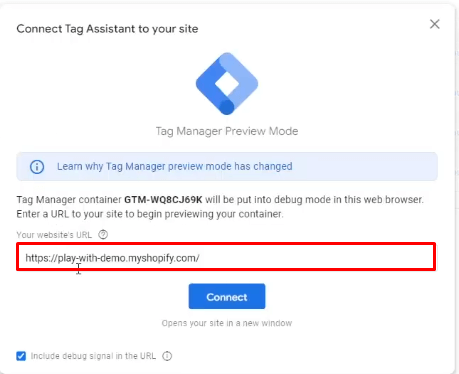
- After adding the code, return to your GTM account and click on Preview. GTM will open a popup box where you should paste the URL of your website.
- Click Connect and your Shopify store will be linked to GTM. Once connected, you will be able to see the events being tracked within GTM.
Step 3: Configure events to Google Analytics
- Create a new tag and select Google Analytics: GA4 Configuration.
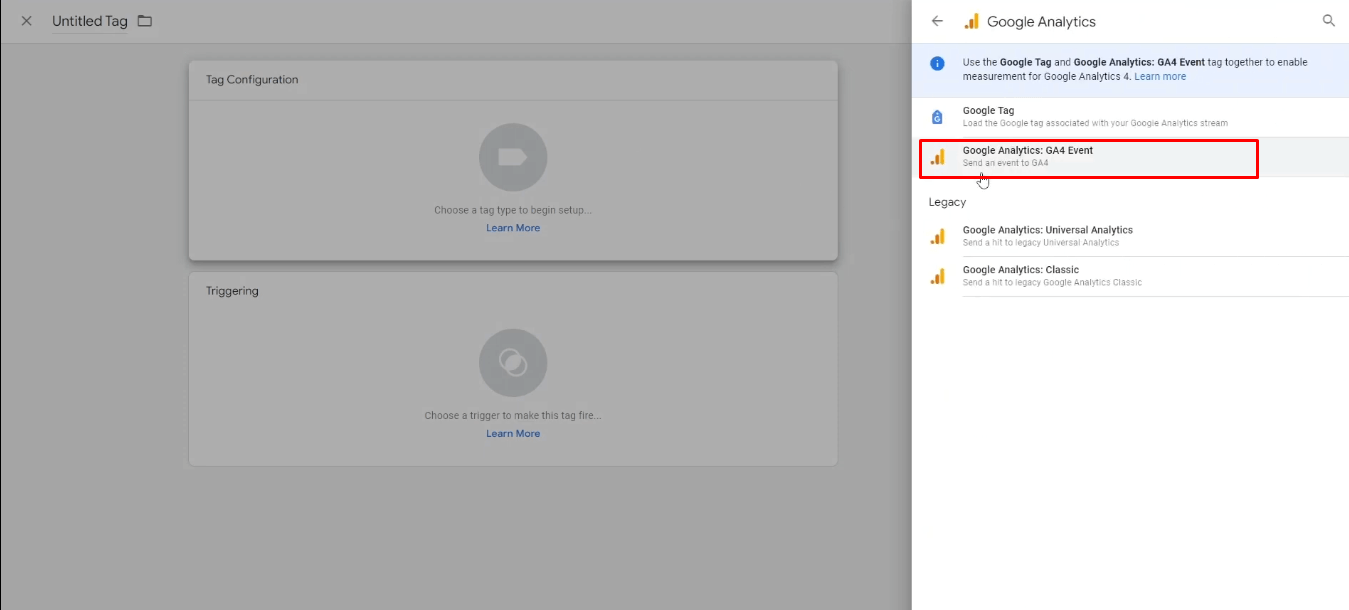
- Enter your GA4 measurement ID, which you can find by navigating to Google Analytics Admin > Data collection and modification > Data Streams.
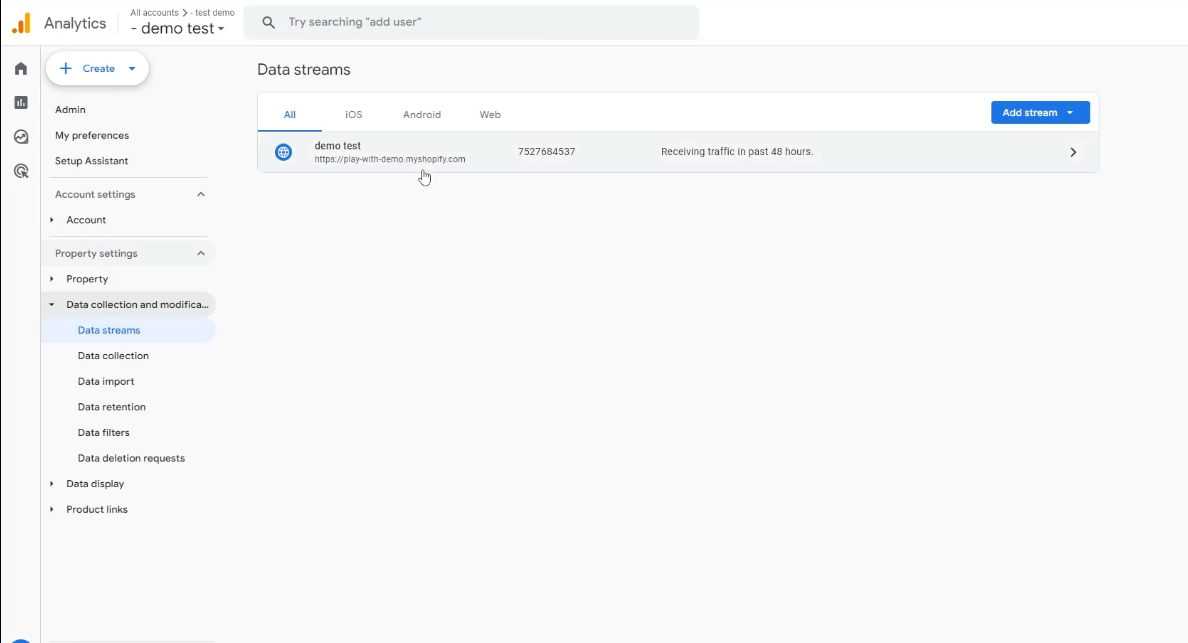
- Next, add the event name. Once these steps are completed, you’re all set.
Key Shopify events to track in GA4
By integrating e-commerce purchase tracking between GA4 and Shopify, you can monitor key events essential for understanding your customers’ behaviors. It’s important to know which events GA4 can capture and report once you connect it directly to Shopify through the Google & Youtube app.
However, tracking some metrics might require additional setup in Google Tag Manager (GTM). To help you manage your tracking effectively, here’s a list of crucial events you should be monitoring:
| Events | Description | Track automatically |
|---|---|---|
| page_view | When customers visit one of your pages or your online store | Yes |
| search | When customers search for a product from your store | Yes |
| add_payment_info | When customers enter their payment details at checkout | Yes |
| add_shipping_info | When customers provide their shipping details during checkout | No |
| add_to_wishlist | When customers add products to their wishlist | No |
| add_to_cart | When customers add products to their shopping cart | Yes |
| begin_checkout | When customers initiate the checkout process | Yes |
| purchase | When customers complete a purchase | Yes |
| refund | When your store receives a refund | No |
| remove_from_cart | When items are removed from customers’ shopping carts | No |
| select_item | When customers choose an item from a list of offerings | No |
| select_promotion | When customers select a promotion | No |
| view_cart | When customers look at their shopping cart | No |
| view_item | When customers view an item | Yes |
| view_item_list | When customers browse a list of items or offerings | No |
| view_promotion | When customers see a promotion on your website or app | No |
How to use GA4 e-commerce reports for your Shopify Store?
After successfully setting up Shopify GA4 e-commerce tracking, you can now begin monitoring your e-commerce performance with precision. GA4 offers a variety of reports, each designed to provide specific insights into your store’s operations and customer behaviors. For e-commerce, we recommend focusing on the following key reports:
- Monetization Overview report: Let you see overall sales performance, detailing your revenue and transaction numbers.
- E-commerce Purchases report: Let you dive into each transaction and analyze product-level performance.
- Purchase Journey report: Outlines the entire customer journey, from the moment they view a product to the completion of a purchase.
- User Attribute report: Provides key demographic and psychographic information.
Understand customer behavior
Understanding your customers’ behavior is crucial for optimizing your Shopify store, and GA4 e-commerce reports are tailor-made for this purpose. There are two main ways to use GA4 to gain deeper insights into your customers: examining their characteristics and analyzing their interactions with your store.
Start by exploring the User Attributes report to understand key customer characteristics such as age, gender, location, and the devices they use. This data helps you pinpoint which customer segments are most responsive to your marketing efforts, allowing you to tailor your strategies more effectively and delve deeper into their preferences.
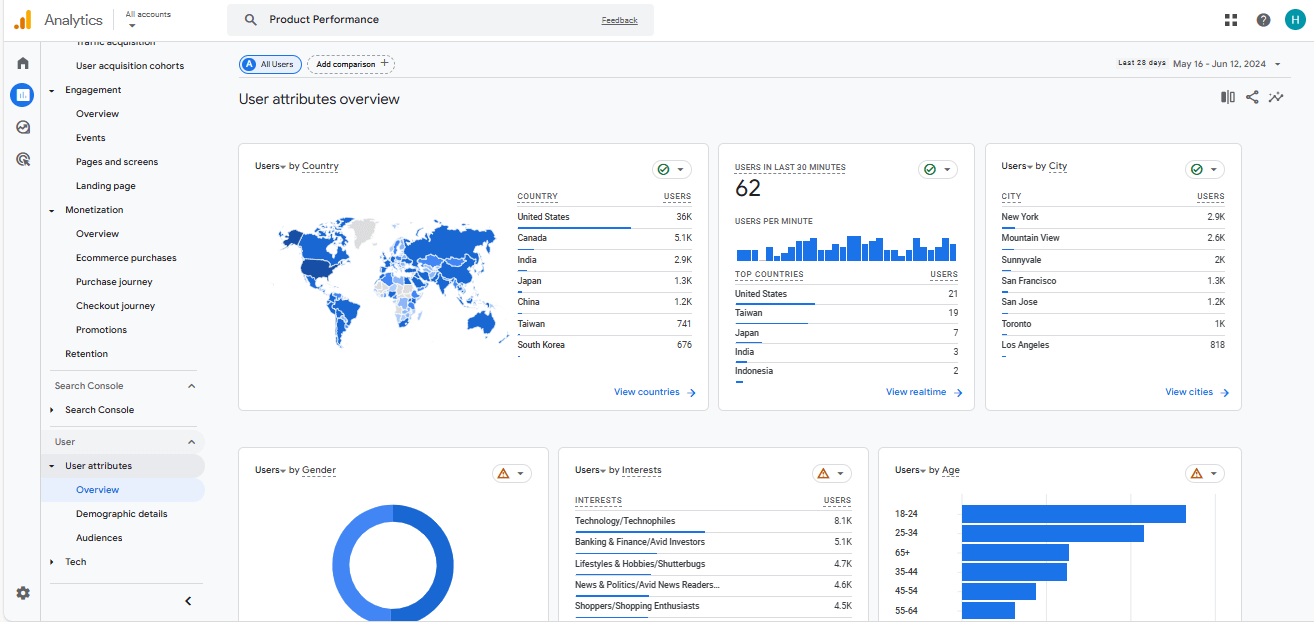
Next, shift your focus to how customers interact with your store by examining the Purchase Journey report. This report provides a detailed look at the customer’s path from purchasing to checkout, highlighting where they engage most and where potential drop-offs occur. With this comprehensive overview, you can make informed decisions to enhance the overall shopping experience for your customers.
Monitor the sales performance
To truly enhance your Shopify store’s performance, understanding your sales performance is crucial. Monitoring sales helps you grasp how different strategies impact your revenue, enabling you to identify what works and what doesn’t.
With GA4, you can tap into detailed analytics through reports like the Monetization Overview Report, which provides a high-level snapshot of revenue, transaction numbers, and average order values. This overview is instrumental in gauging the effectiveness of marketing campaigns and seasonal variations in sales.
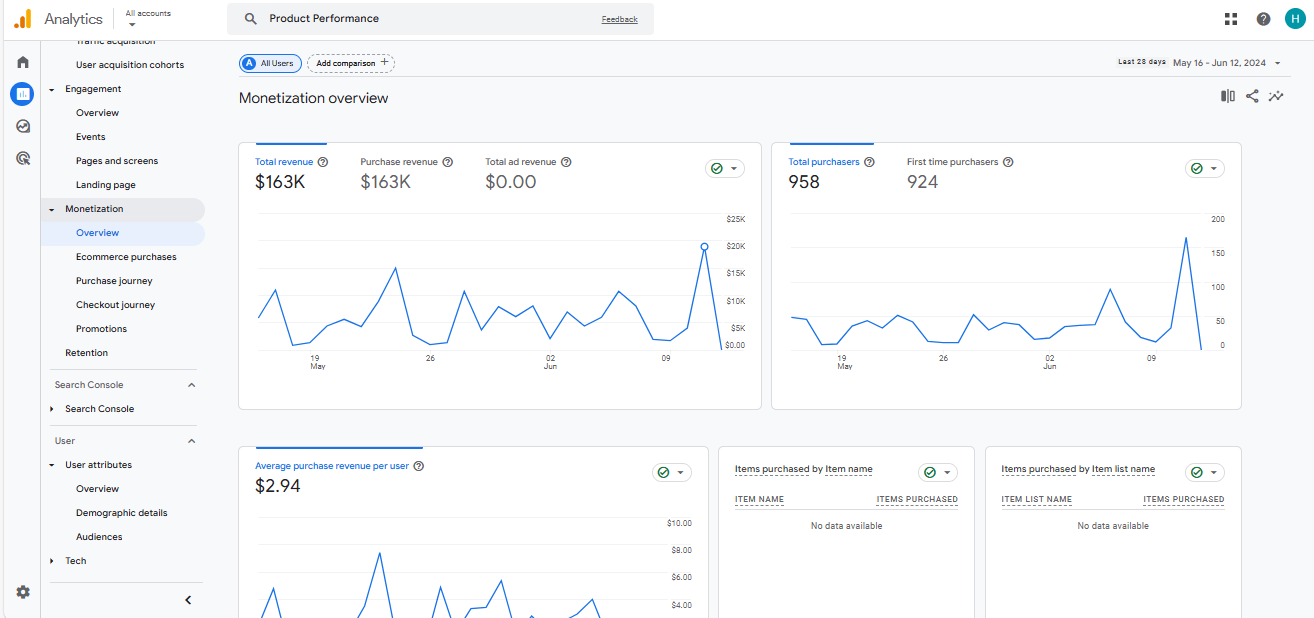
Additionally, for a deeper dive, the E-commerce Purchases Report details product-level performance, allowing you to pinpoint which products are popular and which may need additional marketing or pricing adjustments. Using these insights from GA4, you can strategically refine your approach to maximize profitability and adapt to evolving consumer trends.
Optimize your store
To fully optimize your Shopify store, it’s essential to harness the insights provided by GA4’s detailed analytics.
Start by focusing on the Purchase Journey report to analyze the entire customer pathway and identify any friction points. For example, if you notice a high cart abandonment rate at the payment stage, streamline the payment process or introduce more diverse payment options to keep customers engaged. Additionally, use the E-commerce Purchases Reports to tailor your product offerings and store layout. If certain products get a lot of views but few sales, explore reasons such as pricing or perceived value and adjust accordingly.

Lastly don’t forget to do A/B testing continuously across different store elements to leverage real-time data from GA4. This approach ensures that every change is data-driven, enhancing user experience and boosting your store’s conversion rates effectively.
Challenges in tracking Shopify stores with GA4
While GA4 offers powerful tracking capabilities, there are some challenges you might encounter when using it for your Shopify store:
Delays in data processing
In GA4, data processing and report generation can take up to 24 to 48 hours, which is not always immediate. While GA4 offers real-time reports, these only cover visitor activities from the last 30 minutes.
For Shopify merchants who rely on up-to-the-minute data to fine-tune marketing tactics, manage inventory, and boost customer engagement, especially during busy periods, this delay can be a significant limitation. Timely adjustments are critical for merchants, and any lag in data can hinder the ability to make effective decisions during key moments. Consequently, this can potentially affect the overall efficiency of their business operations.
Data discrepancies
Users frequently encounter discrepancies between Shopify’s analytics and GA4’s reports. These variances often stem from the different ways each platform tracks and attributes sales, sessions, and other user interactions. This mismatch can cause confusion for merchants as they attempt to reconcile the conflicting data across both systems.
Customization and advanced tracking needs
GA4 offers a wide range of customization options for tracking different user interactions on your site. However, fully leveraging these features can be quite challenging. For example, setting up advanced tracking for specific events beyond the basic configurations requires a solid grasp of GA4 settings and GTM. Even with the right setup, a lack of technical expertise can lead to errors in tracking.
Similarly, implementing enhanced e-commerce tracking demands a high level of detail, as it captures every interaction with your products, from views to clicks to purchases. This kind of tracking requires meticulous scripting and precise configuration to mesh seamlessly with Shopify’s framework, ensuring data is recorded both accurately and consistently.
Alternatives to GA4 for Shopify e-commerce tracking: Introducing NestAds
If you find GA4 too complex and are looking for a more integrated solution for Shopify merchants, consider NestAds – our ad tracking and marketing attribution solution.
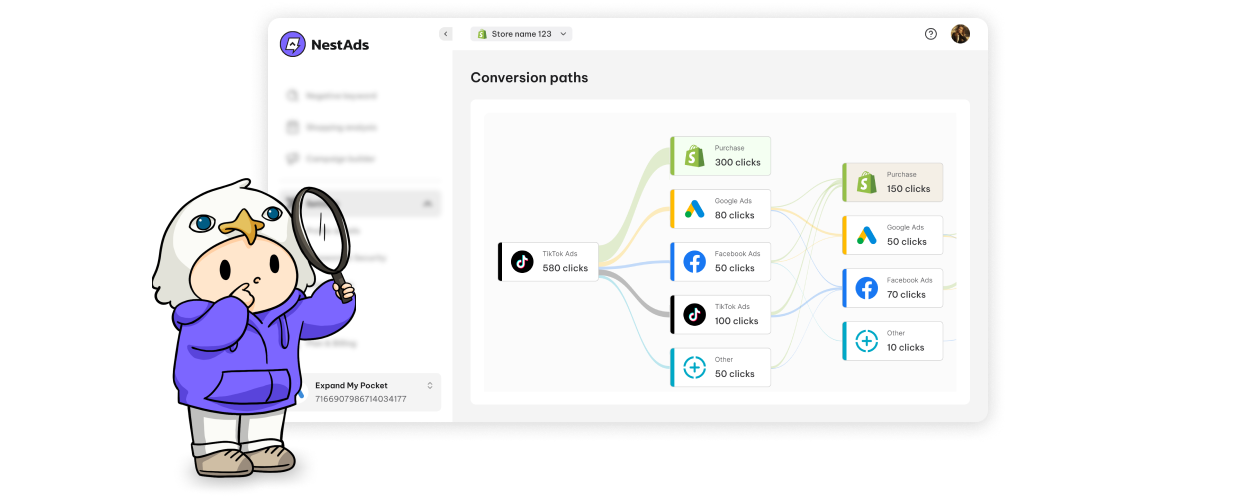
NestAds centralizes data from platforms like TikTok, Facebook, and Google, offering a comprehensive view of your strategies across online channels. It’s easy to integrate with Shopify, even for those with limited technical skills, ensuring seamless data flow. Additionally, NestAds offers holistic customer journey views, and detailed metrics like ROAS and CPA, all while ensuring data integrity with 1st-party data. By leveraging NestAds, you can upgrade your marketing efforts, and eventually drive more sales with reliable data insights.
