Ever since its introduction in 2016, Google Tag Manager (GTM) has forever changed online tracking for the better. Now, businesses don’t necessarily need to have a strong in-house developer team or deal with complicated coding to efficiently track user interactions on their website. However, the landscape of online advertising is constantly changing. In recent years, there has been a wave of policies and regulations regarding user data privacy. Alongside restrictions on third-party cookies, this has prompted businesses to seek alternative solutions, leading to the introduction of GTM server-side. So, in today’s blog post, we’ll explore GTM server-side, and its significance, and provide a comprehensive guide on setting it up. Let’s dive right in!
What is Google Tag Manager Server-side tagging?
Before we jump right into this guide, I believe there’s one thing that we can all agree on. It’s that just the name itself “Google Tag Manager Server Side Tagging” already sounds complicated. What exactly does it mean? So, to fully grasp this concept, we’ll start by dissecting the definition of each component.
Google Tag Manager (GTM) & how it usually works
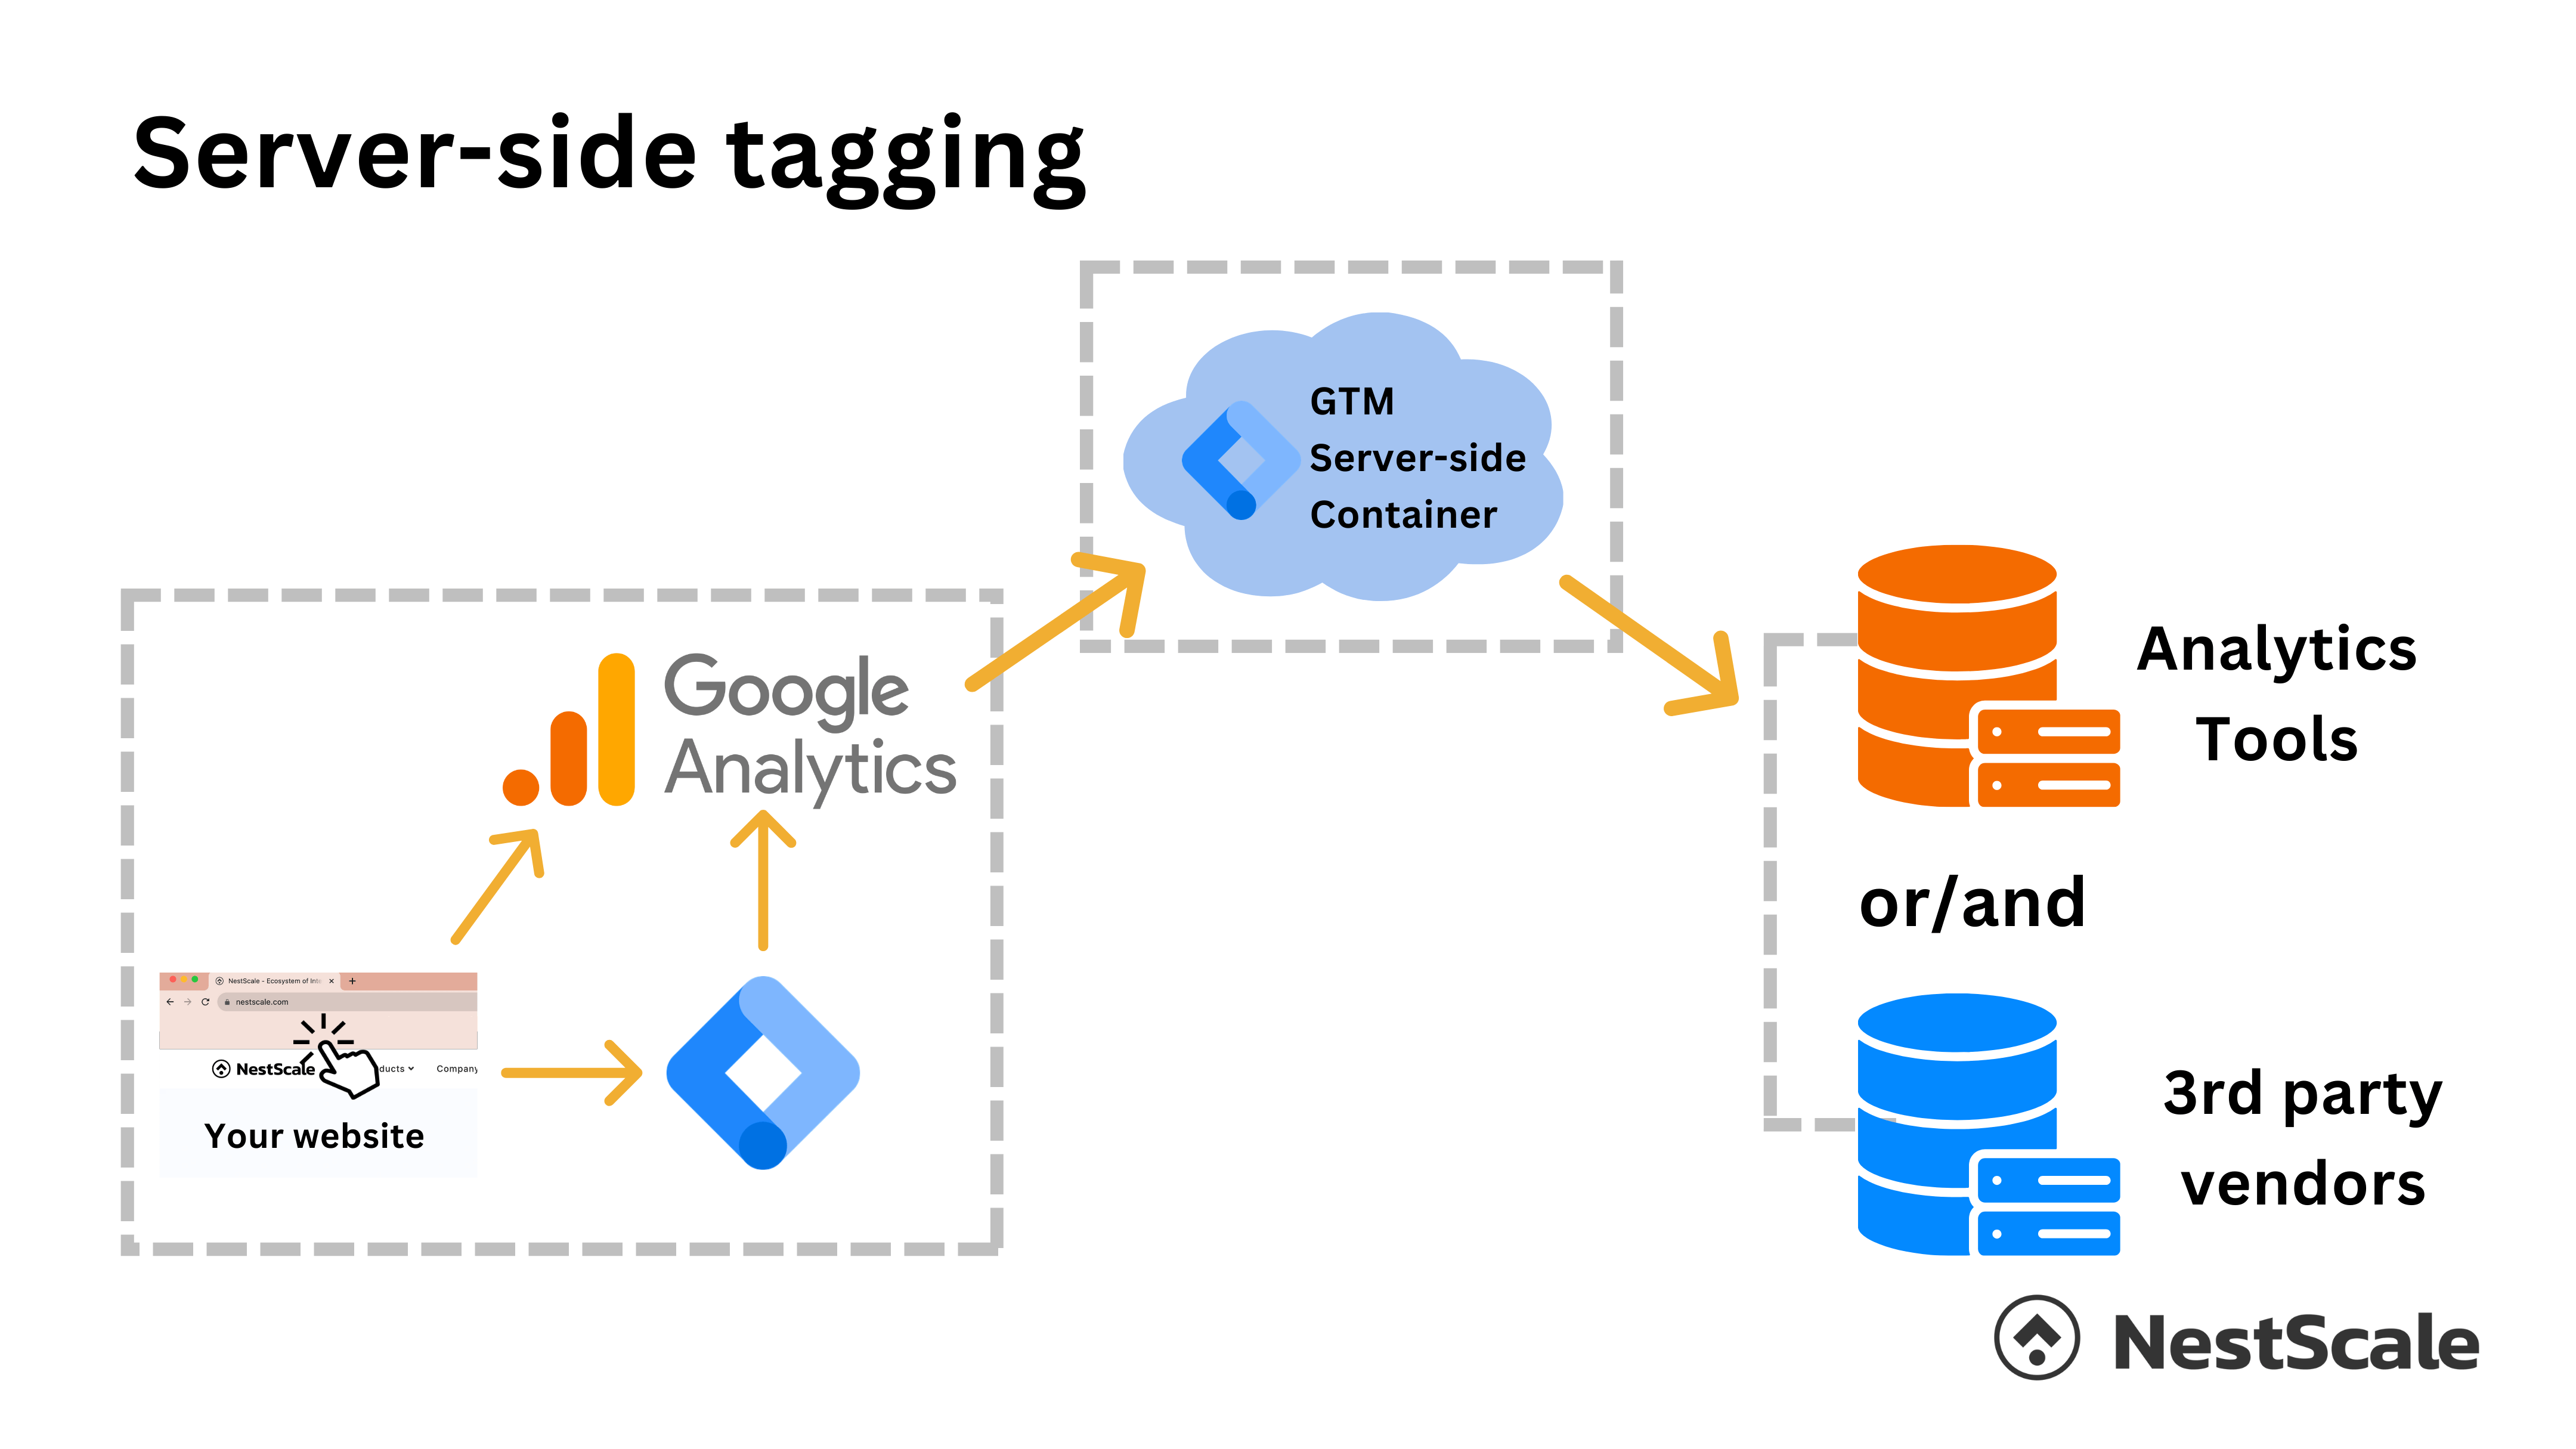
So, Google Tag Manager or GTM is essentially a tag management system (TMS) that allows you to install, store, and manage the measurement & tracking codes on your website or mobile application. Once these tracking codes (also called Google Tags) are added to your website, you can collect data on on-site user’s behaviors, purchasing patterns, and any other personal information that they provided.
A typical Google Tag will look like this in Google Tag Manager:
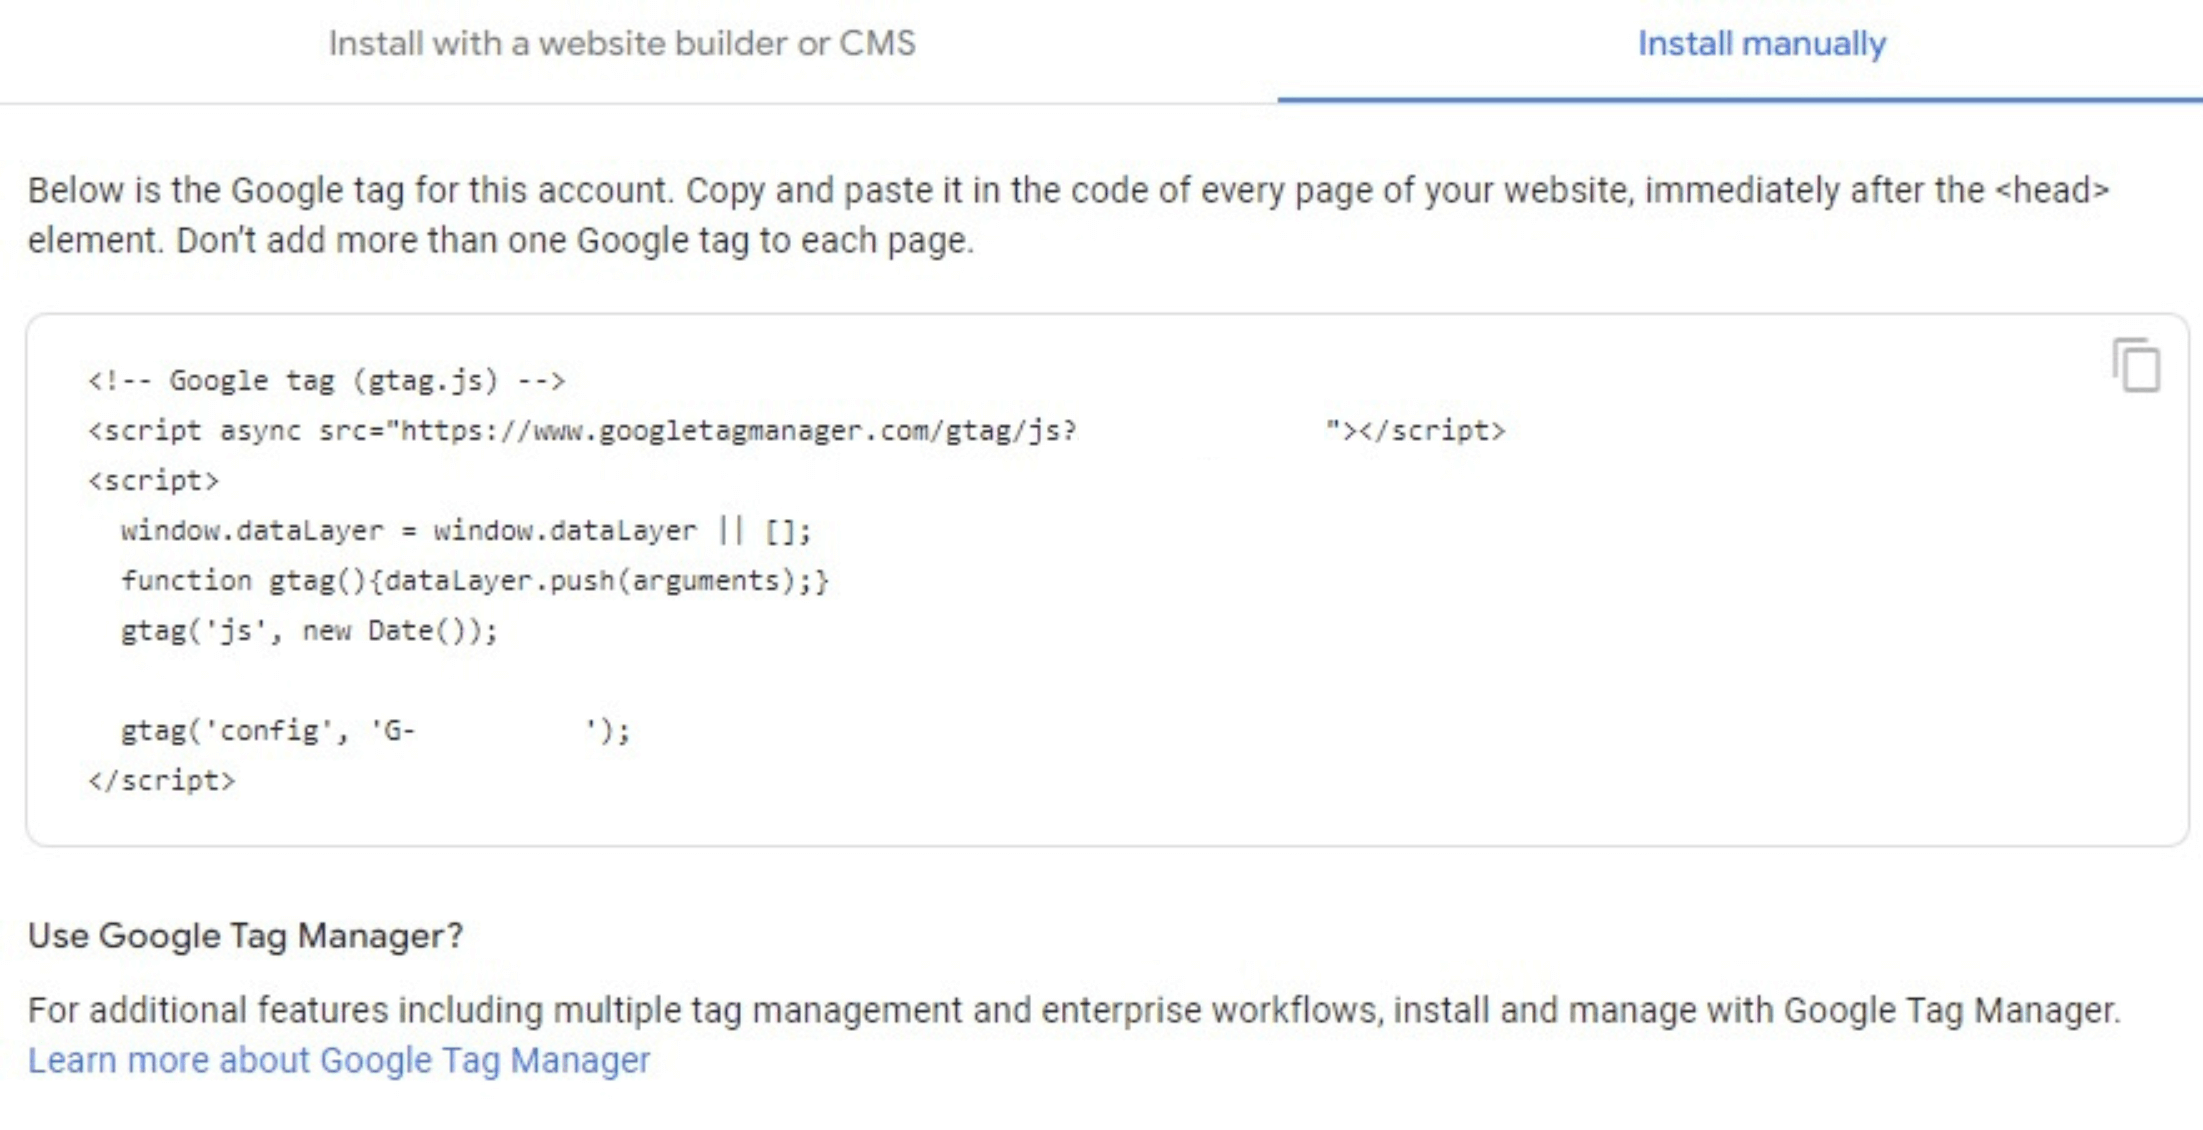
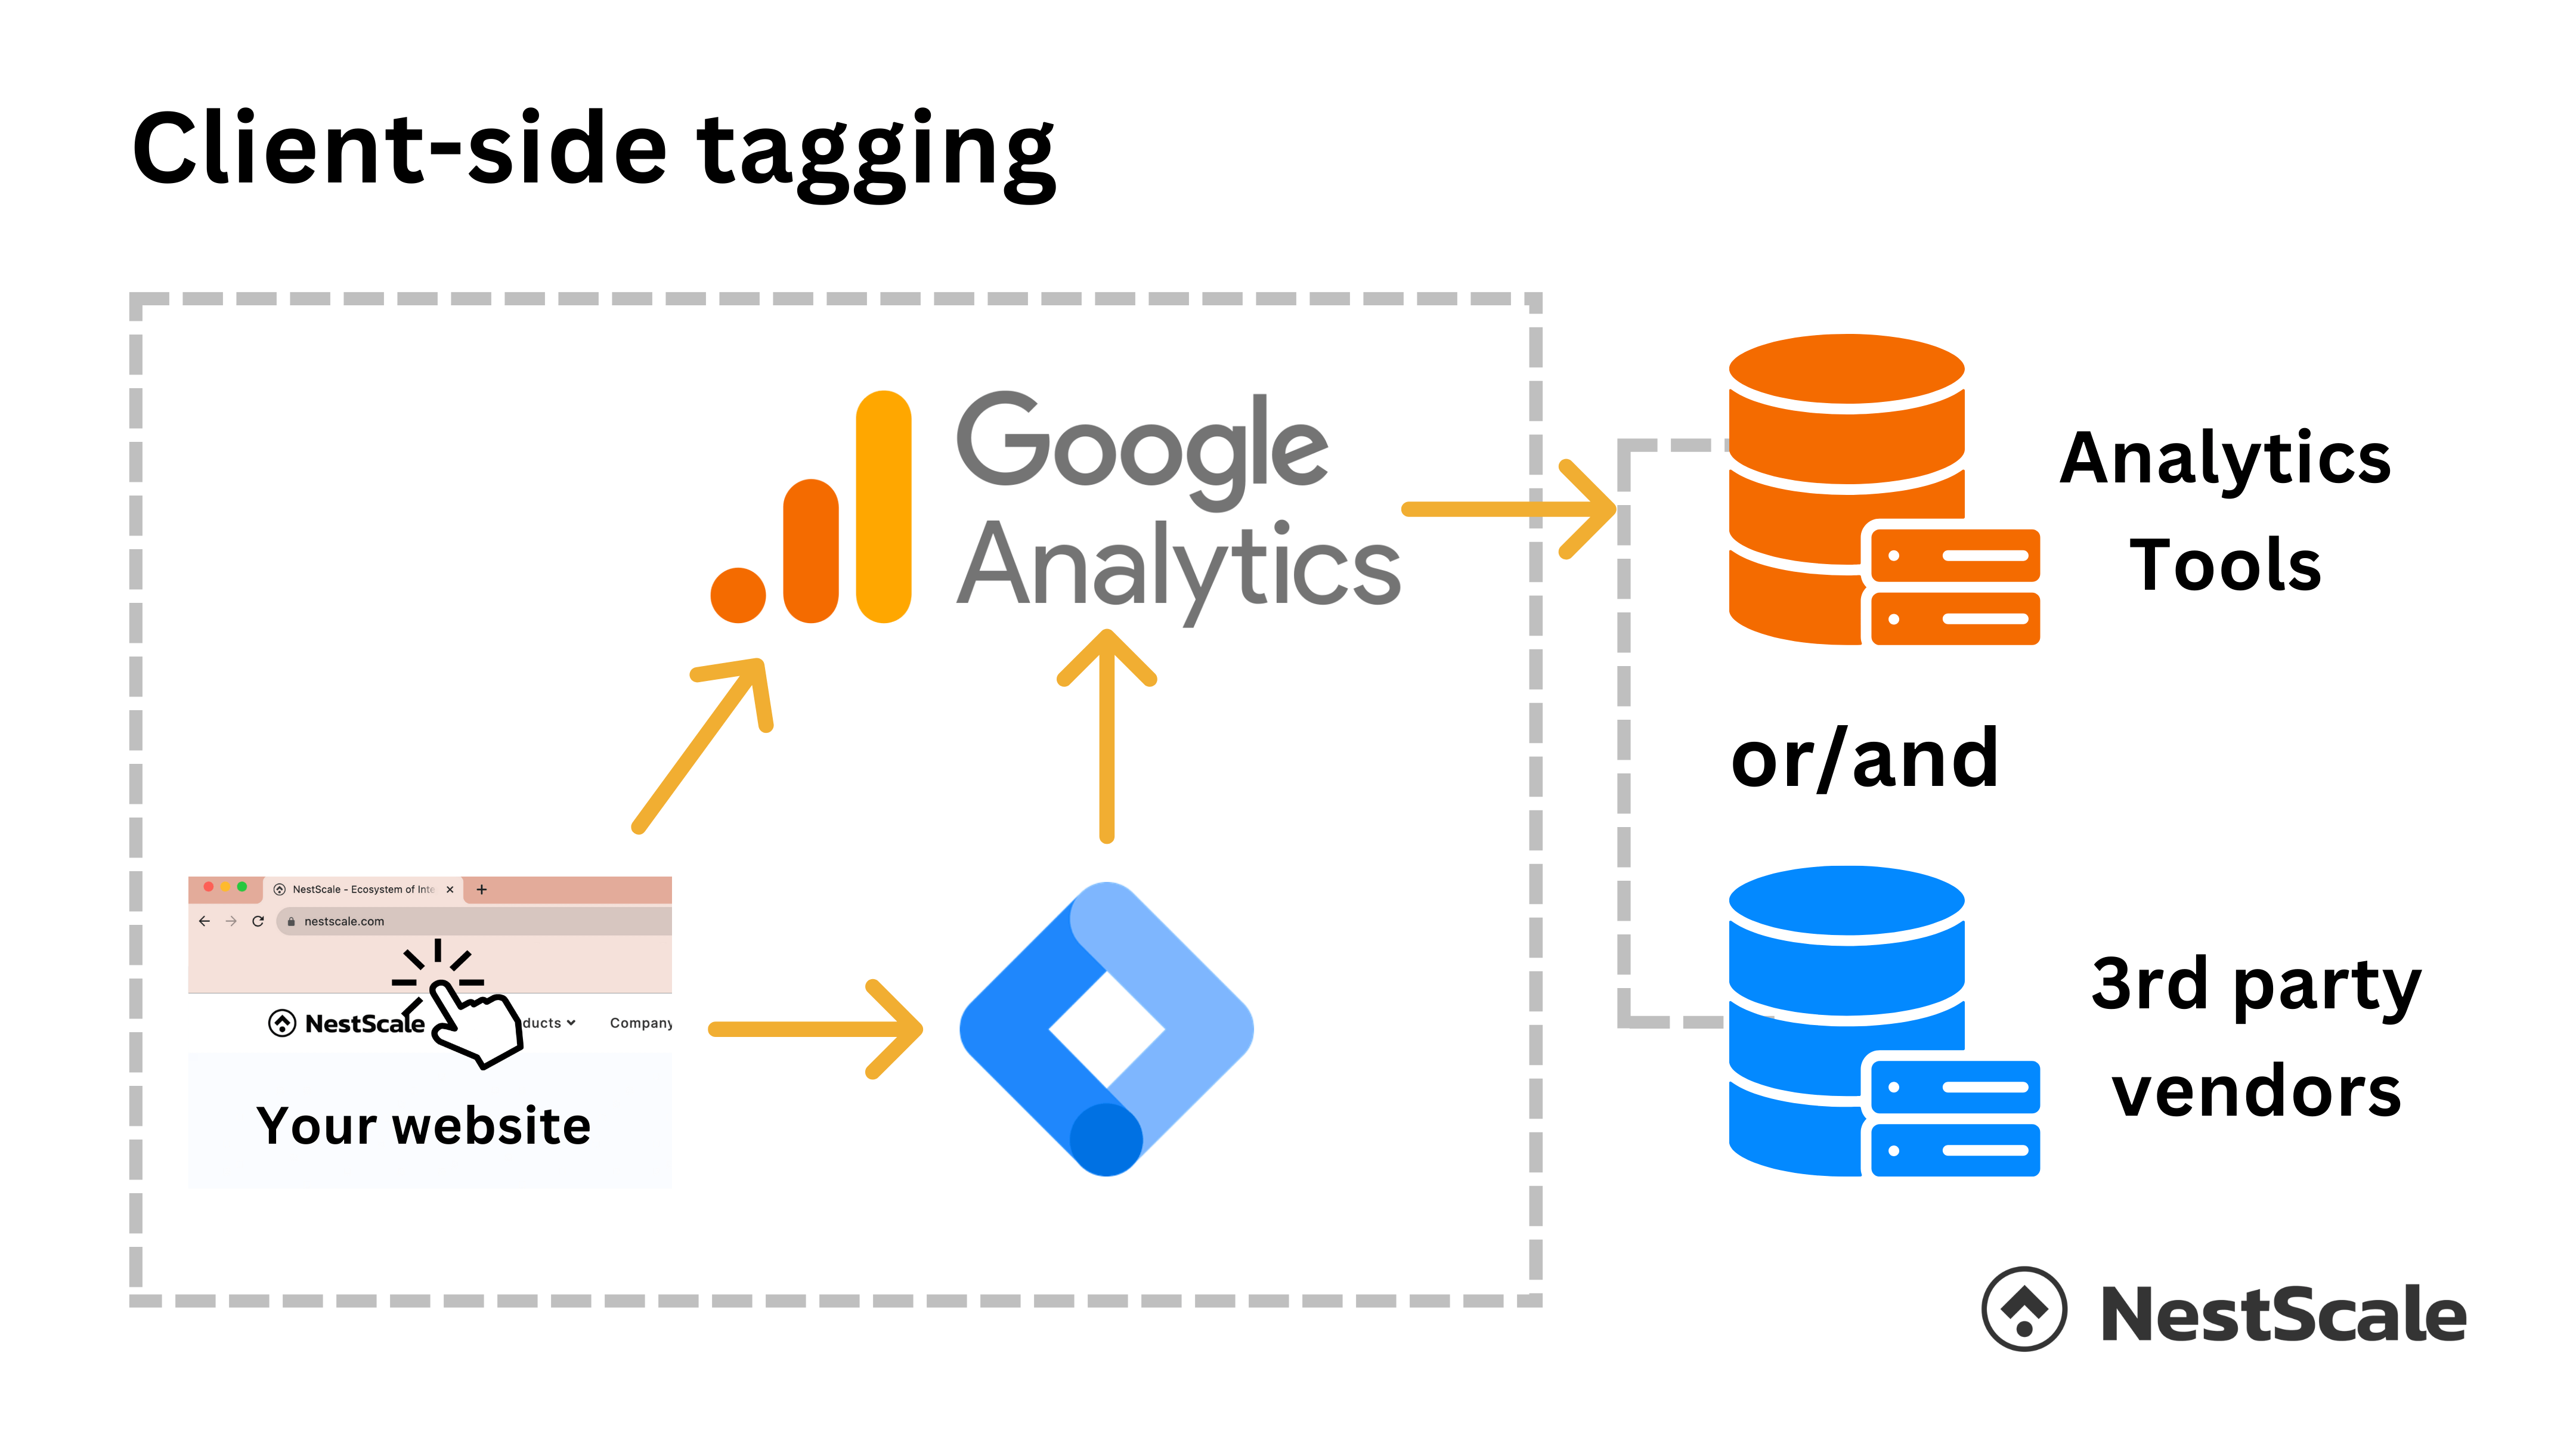
In terms of how Google Tag Manager works, there are a few steps that you need to take. First, you’ll have to install the tracking code (Google tag) to your website’s source code. Then, when the page loads, the GTM snippet will also load and fire tags when a user carries out a desired action. All of this activity happens in the user’s browser (the client side). Afterward, the data collected will be sent to any of your chosen third-party data vendors or analytics systems.
Server-side tagging
Launched on August 12, 2020, server-side tagging in Google Tag Manager (also called SGTM) is a new way to use Google Tag Manager that utilizes an additional layer between your site and analytics systems or third-party data vendors. This layer can be your own server (or servers) that host a server-side GTM container.
Here, the data collected from the Google Tag will go to the server-side GTM container (destination server) first. Here, it can be adapted or processed before going to your analytics tools or third-party vendors.
Why should we use GTM server-side tagging?
You might be wondering, “Why bother with GTM server-side tagging? Why add an extra layer when data can go straight from the Google Tag to your analytics tool?” Well, as we’ve discussed in our previous article on server-side tracking, there are numerous advantages to this innovative tracking approach. Similarly, there are several compelling reasons for making the transition to Google Tag Manager server-side tagging. Some of these reasons include:
More data control
One of the most notable and remarkable benefits of GTM server-side tagging is the level of control we have over our data. The truth is that tracking codes or tags, while serving their intended purpose, often gather additional details such as device information, page specifics, and even personal data to pinpoint visitors with greater accuracy.
In the conventional GTM workflow, all of this information flows directly from Tag Manager to your analytics tools or third-party partners. In this process, you have little to no say in what data is being collected, which can heighten the risk of unintentional exposure to personally identifiable information (PII).
However, when employing server-side tagging, data must first pass through a cloud server before it reaches any third-party entities. This provides businesses with complete control over the data shared with third-party vendors. As a result, this proactive measure acts as a safeguard against potential data breaches and upholds the security of sensitive information.
Extended cookie lifetime
Typically, third-party cookies come with an expiration window of approximately 7 days. In certain cases, this time frame is reduced to just 24 hours. Once this duration ends, all user data and interactions with your website get wiped clean. This situation could potentially pose challenges for businesses, as they may end up wasting their budget targeting the same customers repeatedly.
However, by storing your cookies on the server side, you gain the flexibility to set your own cookie expiration date. This newfound flexibility enables businesses to retain user data for an extended time period, allowing them to plan their retargeting campaigns accordingly.
Reduced page load time
In the typical GTM process, also known as client-side tagging, data is collected and processed directly on the user’s browser or device. While this approach is convenient, it has a downside – it places a considerable burden on the user’s device, leading to longer page load times and slower processing.
On the other hand, the server-side tracking Google Tag Manager operates differently. Data is now processed and adjusted within a separate server-side GTM container before being transmitted to the analytics tools you use. This significantly alleviates the strain on both your webpage and the user’s device, resulting in faster page load times and, ultimately, an enhanced user experience.
How to Set Up Google Tag Manager Server-side Tagging
Now that we’ve gone over the many benefits of GTM server-side and gained an overall understanding of what it can offer, I’m assuming we are ready to move on to the real tricky part of this guide: How to set up Google Tag Manager server-side setup. The process contains 4 parts that you need to follow.
Part 1: Create a server-side Google Tag Manager container + cloud project
- Access your Google Tag Manager account. Once there, go to Admin and click the + icon.
- In the Container Set Up box, fill in the container name (eg., NestScale Demo Server Side Container) and choose “Server” for the target platform.

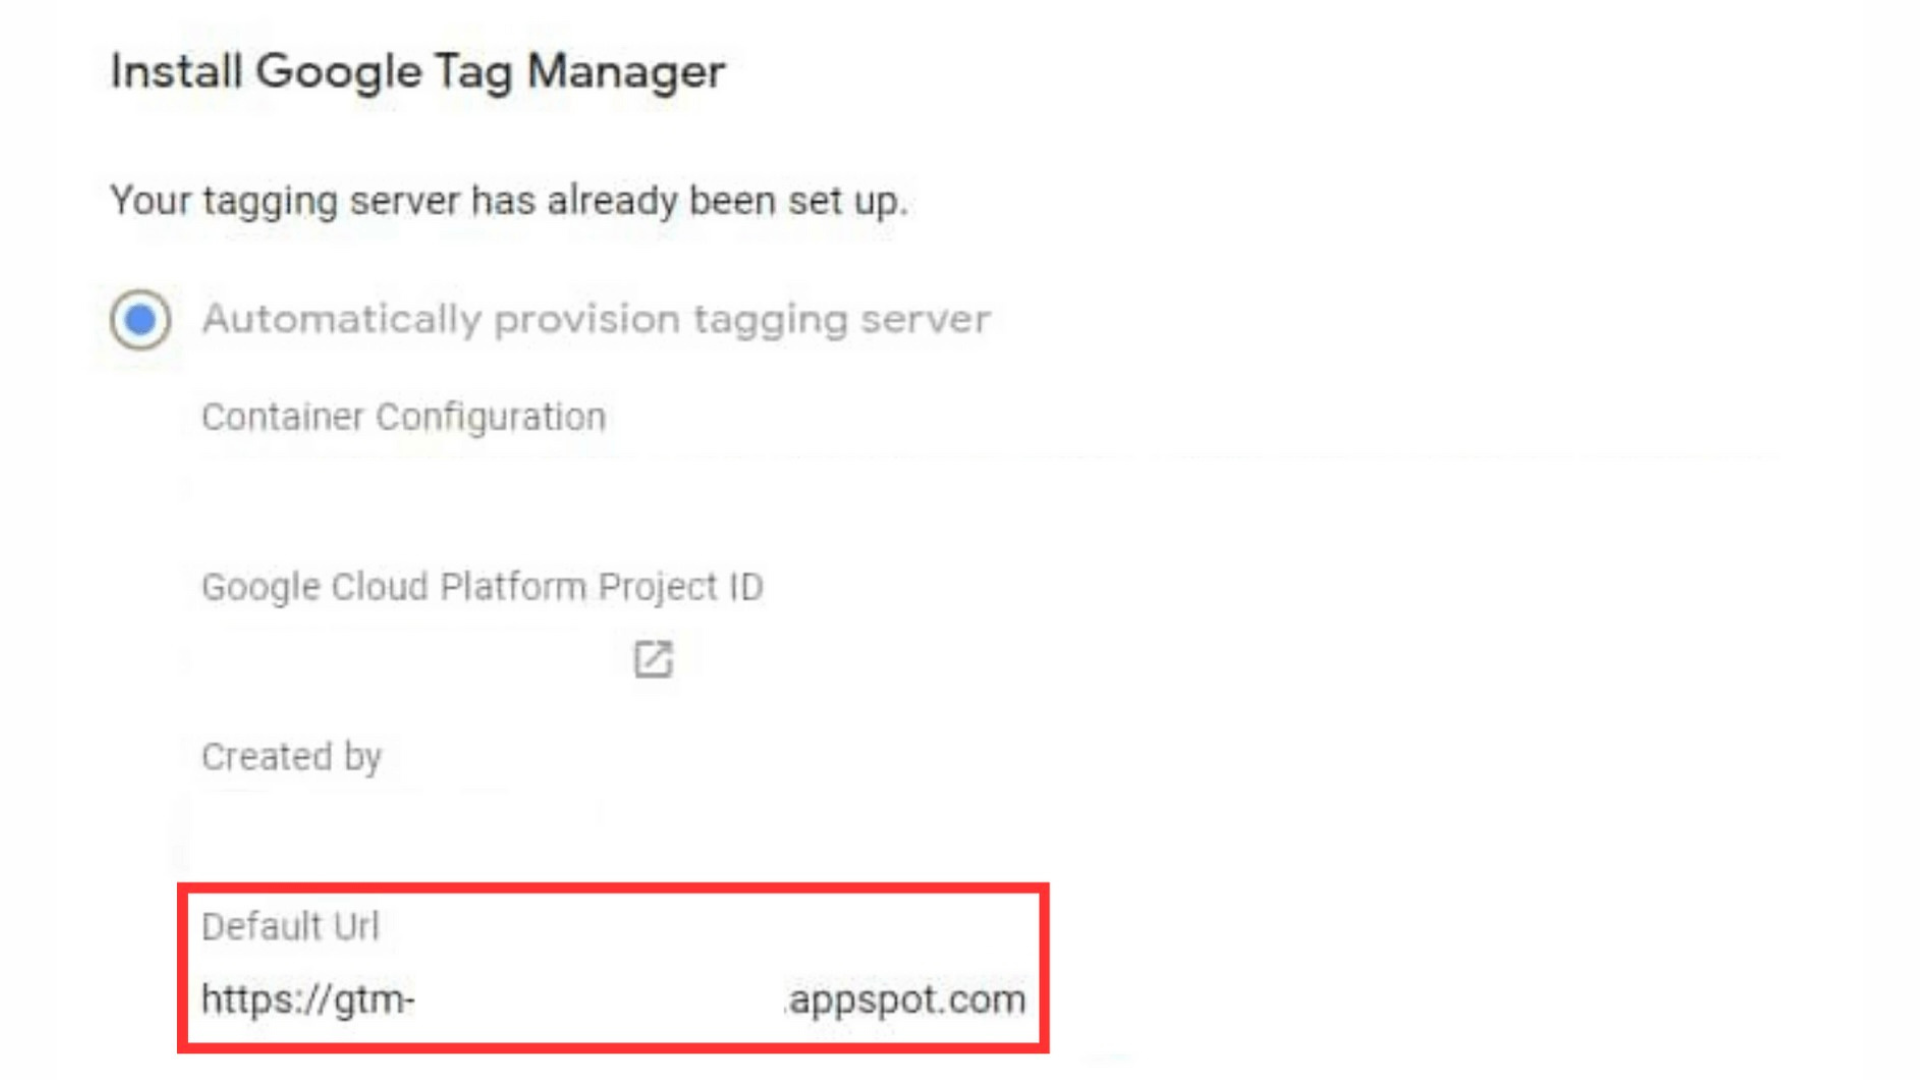
- Now, you’re in the Install Google Tag Manager step. Here, there are 2 options to set up your tagging server (to host the new container you just created). Choose the Automatically provision tagging server option.
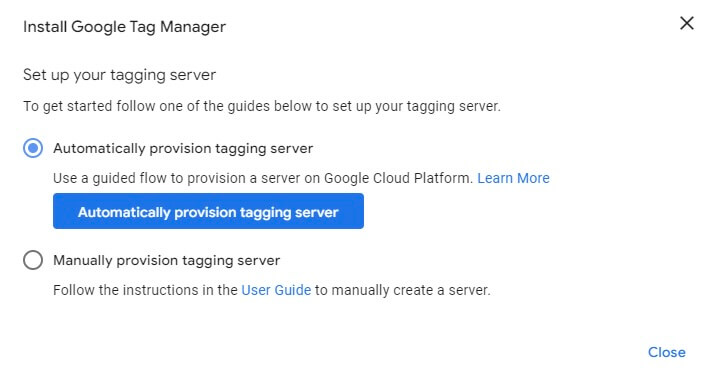
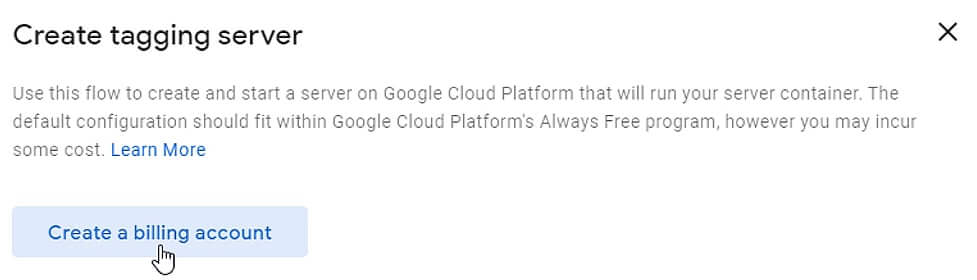
- The tagging server will be a part of the Google Cloud Platform. If you’re new to this, you’ll need to create a billing account and provide your payment details.
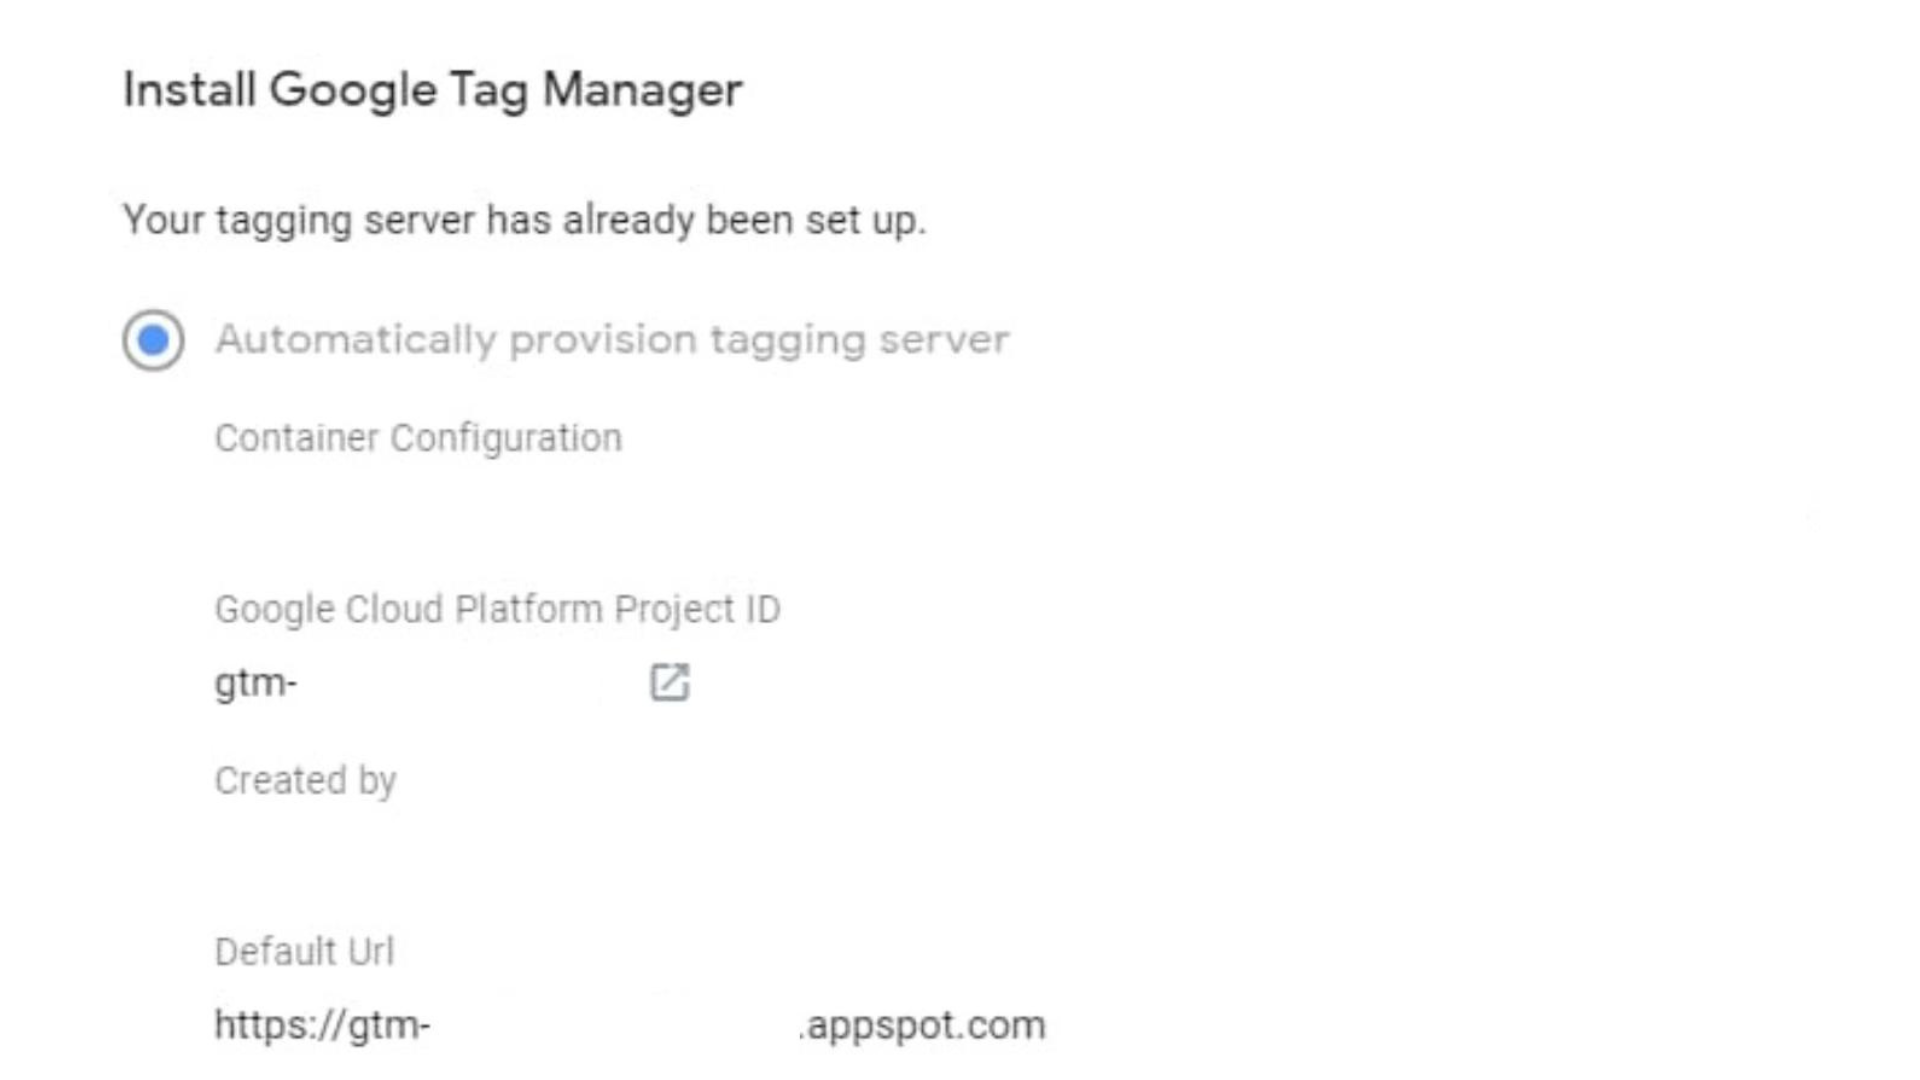
- Once the setup is complete, all the information about the tagging server will be available, including container configuration, Google Cloud Platform project ID, and default URL.
Part 2: Configure tags, triggers, variables, and clients in the server-side container
The next part involves the configuration of tags, triggers, variables, and clients in your server-side container. So you might be wondering, why do I have to deal with tags and triggers again? Well, Google Tag Manager utilizes the tag, trigger, and variable model, and the GTM server-side container is the same. These elements are what will enable you to send data from the server-side container to your destination analytics tools or third-party vendors.
There is a new concept here too – client (and it’s not customer). So in this space, the client’s job is to receive and adapt data received from Google Analytics in the first part. Then, it makes the data available to the other elements within that server container: tags, triggers, and variables. Afterward, Tag will pick up that processed data and send it to your destination, whether it be an analytics tool or a third-party vendor.
So, to get your GTM server-side container up and running, there are a few set-up steps that you’ll have to go through. These are:
Step 1: Set up your client
- When you create a new server container, two clients will automatically be generated – Universal Analytics and GA4. Here, we’ll be using the GA4 client.
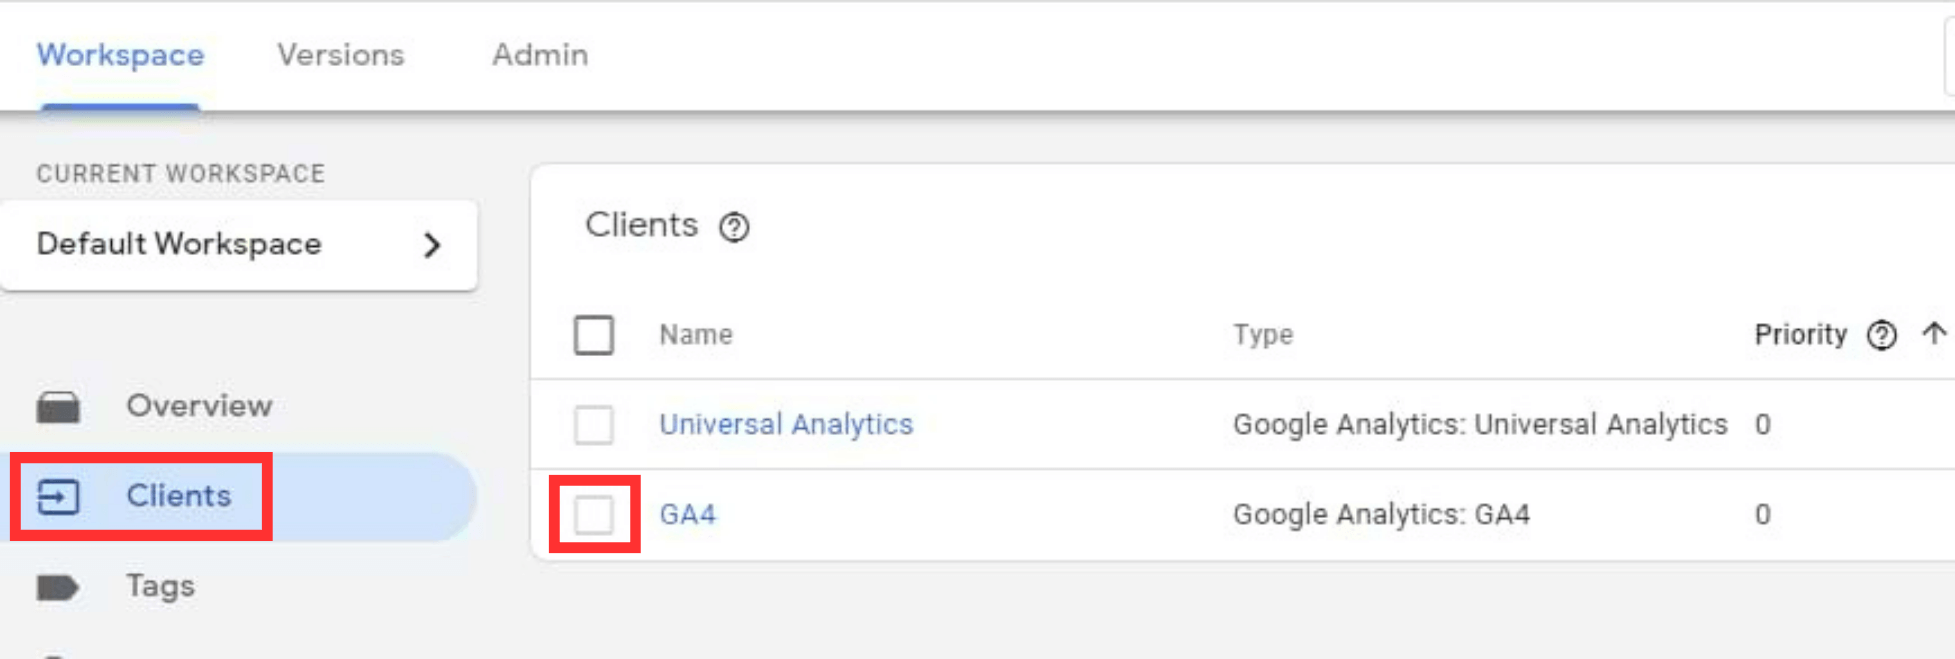
Note: You can also manually create more clients. However, as of now, the number of client templates is still limited. Not to mention, this will require in-depth expert knowledge about coding, so it might not be for everyone.
Step 2: Set up your GTM server-side tag
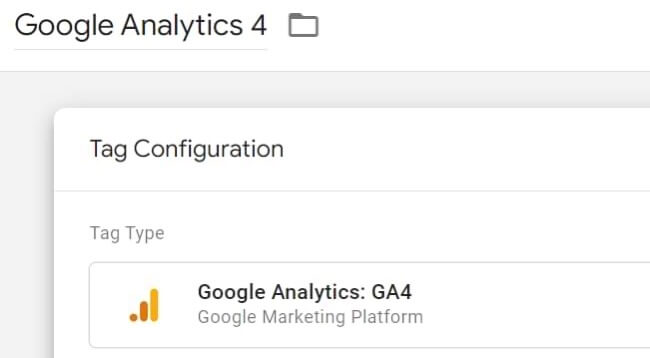
Normally in the GTM container, you’ll need to create different tags for different conversion events (eg., page views, purchases, clicks.). However, with the GTM server-side container, we’ll only need one GA4 tag (now changed to Google Tag). This one tag is enough to receive data about your Google Analytics events and forward them to the destination servers.
- In your GTM server-side container setting, go to Tags and hit New
- Choose the Google Analytics 4 option
Step 3: Set up your trigger
A trigger basically provides the condition for tags to fire. So here, if you want to your tag to fire and receive any GA4 events data, you’ll have to make some adjustment to the trigger variable.
- In your GTM server-side setting, go to Triggers.
- There are 3 trigger type options – Custom, Custom Event and Page View. Choose Custom.

- Now you’re in the trigger configuration. Choose the Some Events option for the trigger to fire on.
- In the next section, you have to set up the custom condition for firing the tag. From the first drop-down, choose the variable Client Name. In the next drop down, choose contains. In the third box, type in GA4.
- Hit save to save all your changes.

Now, your Google Tag will fire when it receives any data of events from the GA4 client. This ensures that you are only recording relevant data from GA4 in case there are more than one clients running at the same time.
Part 3: Send the data to your GTM server-side container
Now that we are finished with most of the prior set-up, it’s time to actually send data to the GTM server-side container that you created. There are various ways as to how you can do this, such as editing the Google Tag code snippet in your website’s source code or writing a different code. However, there’s another easier method – configuring your tag in the GTM web container (the container in the first stage to receive data from your website).
- Go to Google Tag Manager, and visit your regular web container setting.
- Click on Tag. In the Tag Configuration page, tick the box next to Send to server container
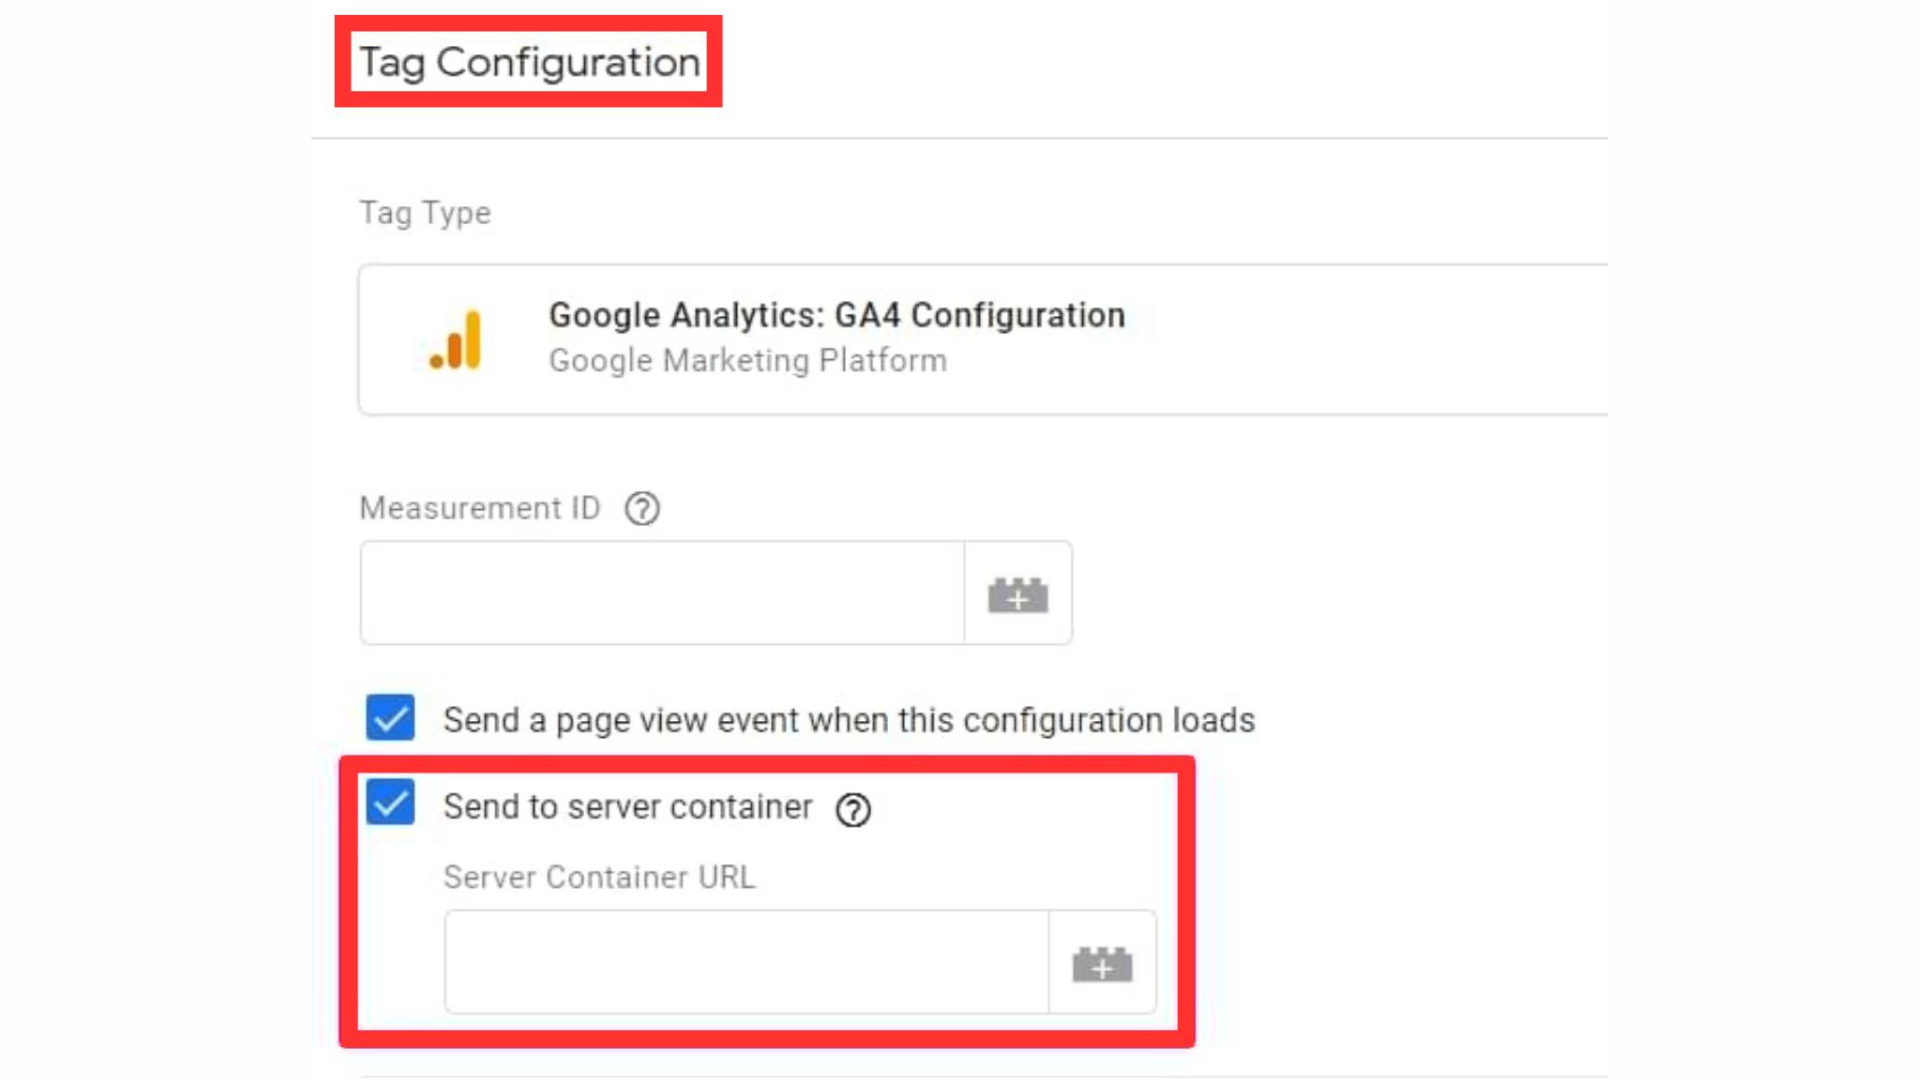
- In another tab in your browser, revisit your server-side container and copy the default URL.
- Navigate back to your Tag Configuration tab, and paste the URL into the Server Container URL box.
Part 4: Final testing
Once you’ve finished all the setup, now’s the time to see if it’s working properly as we expected. Here’s how you can check for yourself. However, you need to enable the Preview mode in your GTM container first. Once you’re done with that, move on to these steps.
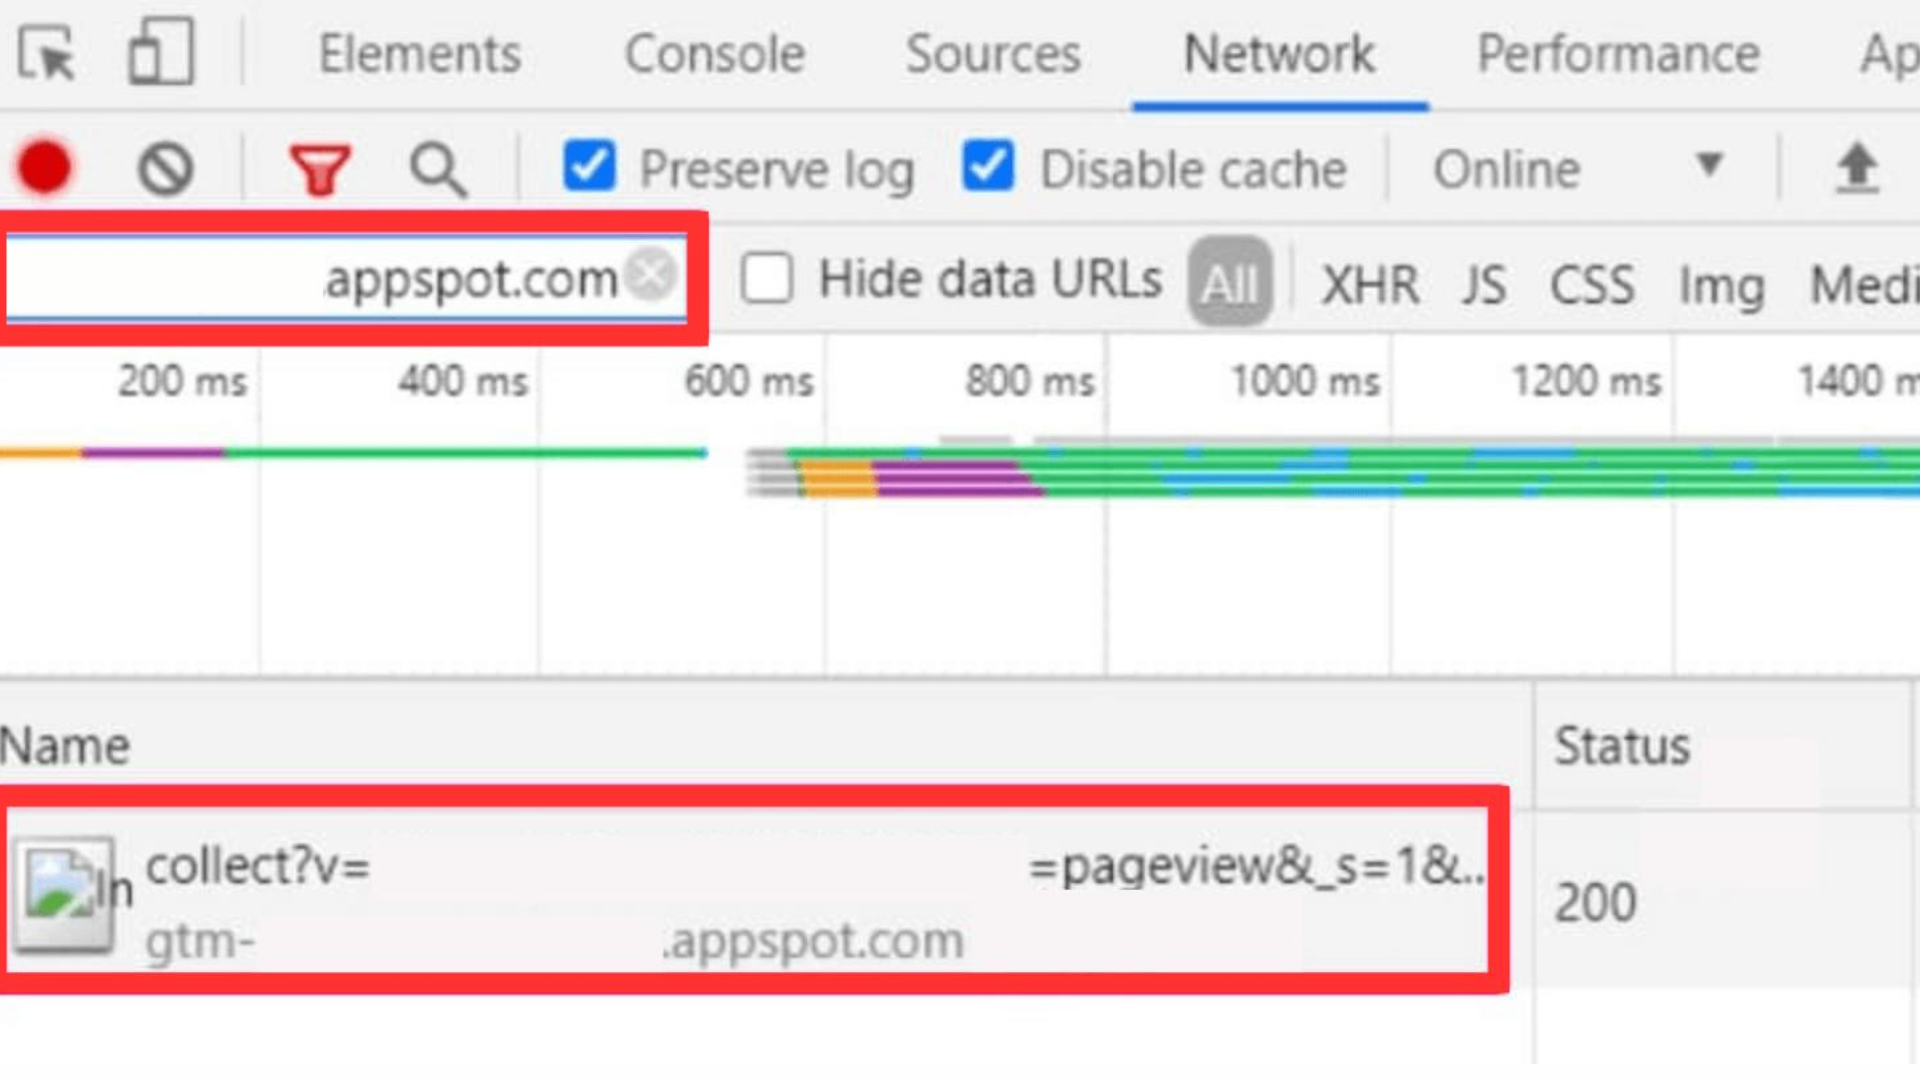
- Right-click your screen and click on Inspect.
- Navigate to the Network tab. In the Filter search box, type in /collect to find the request.
- Check the URL destination. The request should be sent to your container’s domain (…appspot.com), instead of google-analytics.com. Also, look for the request status. If it says 200 then you’re good.
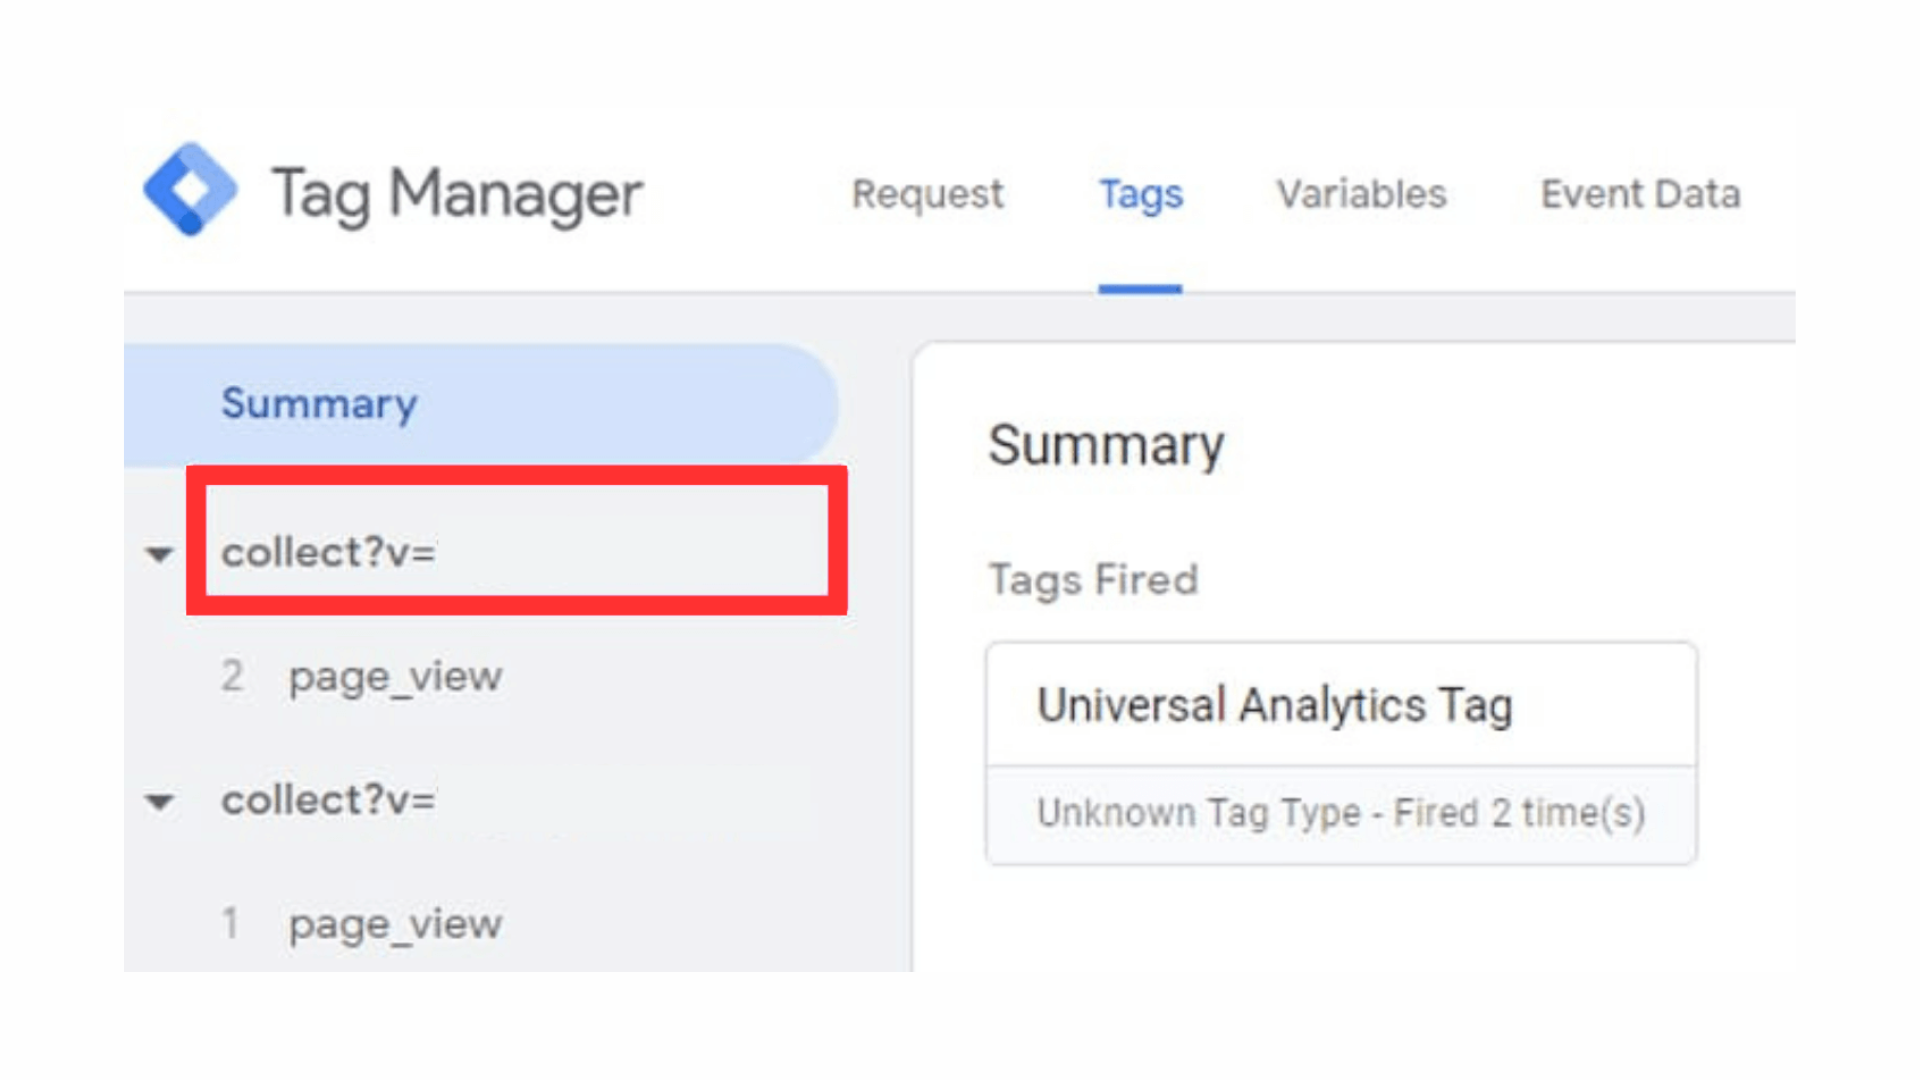
- Go to the preview mode of your server-side GTM container. Look for the request, which will be on the left-hand side menu. Here, you’ll be able to see if your tag was fired.
- Lastly, visit your GA4 real-time reports and check for the data as it should be available now.
Some limitations of Google Tag Manager server-side
While it is true that there are undeniable advantages when it comes to Google Tag Manager server-side tracking, it is in no way perfect. In fact, there are certain limitations and entry barriers that still prevent businesses from migrating to server-side GTM completely. Some drawbacks that you should keep in mind are:
Preserving web tracking expertise
- Complementary skills: Your existing knowledge of configuring tags, triggers, and variables within GTM’s web container remains invaluable. Server-side tagging enhances, rather than replaces, this foundation.
- Collaborative containers: In many cases, the server-side container works alongside the web container, creating a robust tracking strategy that leverages the strengths of both.
- Adapting to industry shifts: As digital marketing moves towards predominantly first-party tracking, the relevance of server-side tagging will grow. However, initiating data collection will still largely depend on interactions captured by the web container.
Ethical use and compliance
- Responsibility and misuse: With the power of server-side tagging comes the responsibility to use it ethically. Be cautious of potential misuse by bad actors seeking to bypass ad blockers or collect data without consent.
- Regulatory compliance: Server-side tagging does not inherently solve for compliance with privacy laws such as GDPR or CCPA. However, it’s worth mentioning that server-side does not always mean policy compliance. At its core, ethical data tracking & collection are all about the user’s consent. So consent management is critical, irrespective of the data collection method employed.
Debugging challenges
- Complex debugging processes: The shift to server-side introduces more complex debugging scenarios. You can’t just inspect your browser extensions or network requests. You will need actual access to the server-side container to start debugging and see what’s wrong with it.
- Access for analysis: For those in client-facing roles, server-side tagging can present hurdles for preliminary analyses and demonstrations of expertise without direct access to the GTM container.
Implement server-side tracking with NestAds
Fortunately, there’s a quicker and more efficient way to embrace server-side tracking without the need for a complex server-side container – NestAds. With our NestAds pixel, which facilitates server-side tracking, you can count on a reliable and sustainable data source. Another exciting feature is NestAds pixel’s flexible attribution window, allowing businesses to analyze past performance data dating back up to 90 days.
Another attribute that sets NestAds apart is its use of first-party data, ensuring user consent and compliance with privacy policies. Additionally, our dedicated support team is readily available to assist with any implementation issues, making the initial setup and synchronization a breeze.
If you’re just venturing into the world of server-side tracking, we genuinely believe that NestAds is the way forward. So, what do you say? Take a leap of faith and elevate your tracking capabilities with NestAds today. Success awaits!
FAQs
How can I upgrade my server-side container’s domain?
Upgrading your server-side container’s domain in GTM to a custom subdomain can enhance branding and may improve cookie acceptance rates, among other benefits. Here’s a step-by-step guide on how to do it:
- Access your GTM account where your server-side container is located
- Navigate the “Admin” tab, usually found in the navigation menu at the top or left side of the page
- Under the “Container” column in the Admin tab, find and click on “Container Settings”
- Replace or edit the default domain URL with your created subdomain
- Click a “Save” or “Submit” button to save changes
- Note: Using a subdomain may cause additional configuration and costs
What is the difference between GTM client-side vs server-side?
In a GTM client-side setup, the tracking data is directly transmitted from the user’s browser or mobile app to the analytics or marketing platforms. This direct path means that scripts are executed within the user’s device, collecting and sending data straight to services like Google Analytics, Facebook Pixel, etc.
In contrast, a server-side setup involves sending the tracked data to an intermediary server (hosted by GTM or another cloud provider) before it reaches the analytics or marketing platforms. This intermediary server acts as a middleman, processing and forwarding the data. This method offers enhanced data privacy, reduced client-side load, and better control over data handling and integration.
What are the costs of switching to GTM server-side?
Transitioning to server-side GTM involves several expenses, such as server hosting fees, data transfer charges, and developer engagement costs. The server hosting expense will depend on your chosen provider. For example, opting for Google Cloud Platform to host your GTM server-side container might lead to an estimated monthly cost of around $120.