Accurate data is essential for making informed business decisions in E-Commerce. For Shopify store owners, Google Analytics 4 (GA4) is a powerful tool for tracking customer behavior, particularly Add to Cart events. By setting up Shopify GA4 Add to Cart event correctly, you can gain valuable insights into your store’s performance, understand customer buying patterns, and optimize your marketing strategies.
However, setting up Shopify GA4 Add to Cart event tracking can be complex. This guide will simplify the process, from creating a GA4 property and integrating it with Shopify to configuring Google Tag Manager (GTM) and troubleshooting common issues. Let’s get started!
What is the Shopify GA4 Add to Cart event?
Shopify GA4 Add to Cart is one of the essential events for performance analysis that tracks when a customer adds a product to their shopping cart. This event is crucial for performance analysis as it helps store owners understand customer preferences, identify high-potential products, and detect issues in the purchase process.
By examining the event, you can pinpoint which products are attractive to your customers and identify drop-off points in the sales funnel. Eventually, you can optimize the user experience and boost conversion rates. Integrating GA4 with Shopify enables automatic tracking of this event, providing detailed insights into customer behavior and aiding in data-driven decision-making for inventory management, marketing strategies, and overall store performance enhancement.
Shopify GA4 Add to Cart event parameters
When analyzing the Add_to_cart event, it’s important to consider various parameters that offer additional insights. So, here’s a list of the key parameters involved in a Shopify GA4 Add to Cart event:
| Parameter | Definition | How it works |
| items | The name of the product added to the cart. | Captures details of each product added, including essential properties like item ID, name, and quantity. |
| item_id | An array of items added to the cart. | Identifies the specific product, ensuring accurate tracking and inventory management. |
| item_name | Tracks the number of units added is useful for understanding purchase intentions and stock management. | Provides the product name for better reporting and analysis of popular items. |
| item_quantity | The quantity of the product added to the cart. | Tracks the number of units added is useful for understanding purchase intentions and stock management. |
| item_variant_id | The ID of the product variant added to the cart | Identifies specific variants (e.g., size, color) to analyze variant popularity. |
| item_price | The currency of the product added to the cart. | Captures the price to analyze revenue potential and average order value. |
| item_currency | Allows tracking of user sessions to understand the context of the add-to-cart action within the shopping journey. | Ensures accurate financial reporting by specifying the currency used in the transaction. |
| user_id | The ID of the user who triggered the event. | Helps in identifying and analyzing individual user behavior and shopping patterns. |
| session_id | The ID of the session in which the event was triggered. | The ID of the product is added to the cart. |
How to set up a Shopify Add_to_cart event in GA4?
To set up the Shopify add-to-cart event in GA4, you have two options: you can either automatically set it up by connecting through the Google & YouTube app, or manually set it up through GTM.
Automatic setup by connecting through Google & Youtube app
The Add_to_Cart is a default event that is tracked automatically when integrating your Shopify store with GA4 using the Google & Youtube app. Once you’ve implemented the setup, you can easily see the Add to Cart event being tracked in the GA4 reports.
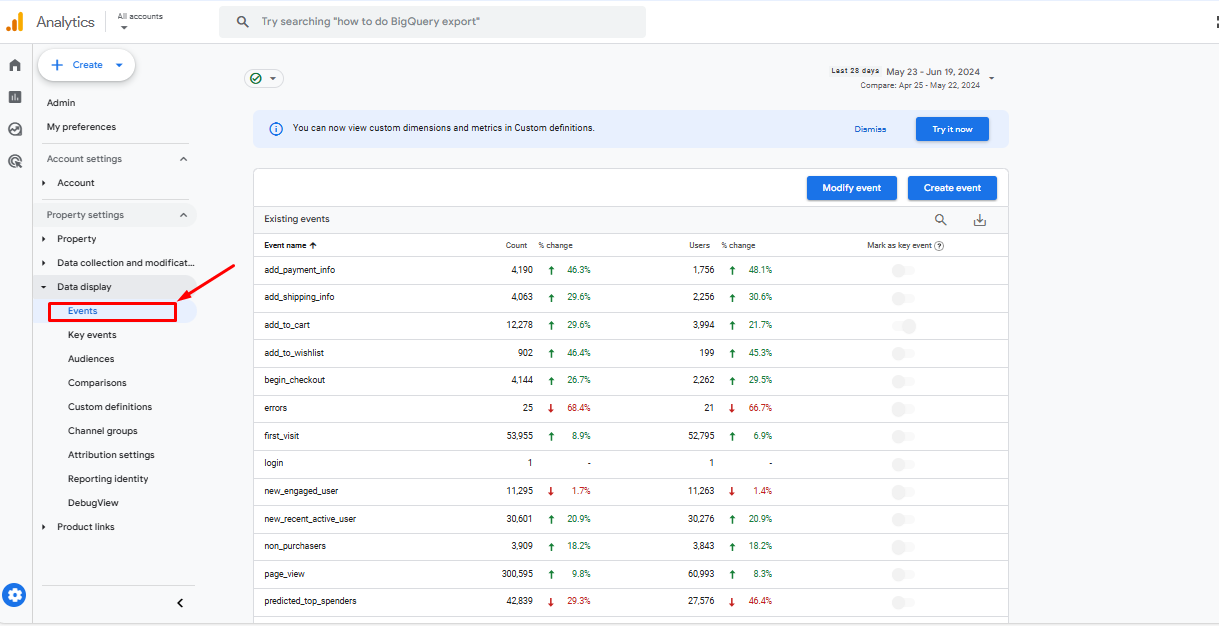
To verify whether you’ve already configured the Add to Cart event within your GA4 property, simply go to the Admin section > Events (under the Property column). This will show you all the events that are currently being captured.
Set up by configuring tags in GTM
However, suppose you want more control over how the event is triggered or customized to your Shopify store. In that case, we recommend configuring the Shopify Add to Cart event through GTM. This might be more complex, but it allows greater flexibility for the event to work with your requirements. Just make sure that you delete the code of the Google & YouTube app to ensure that you won’t be recording duplicate events.
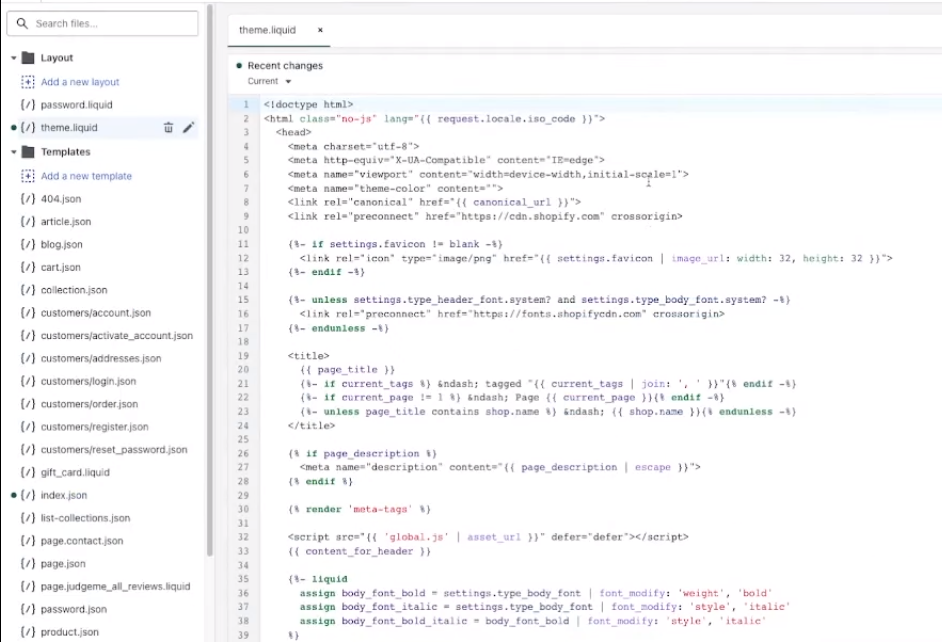
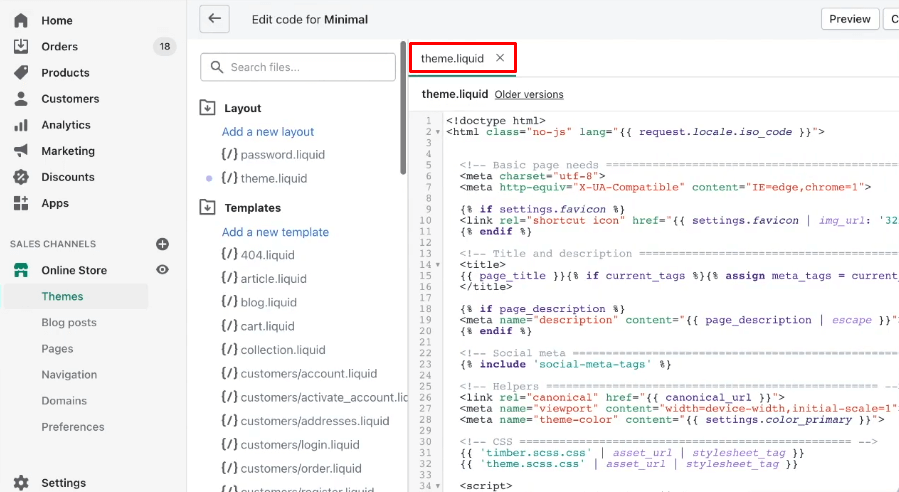
To do this, go to your Shopify store and navigate to Online > Themes > Actions > Edit code. Then, choose theme.liquid file and search Google tag. If you see none of the code, then you’re good to go.
1. Connect your Shopify store to GTM
- In your GTM account, locate your account ID and copy the provided code. You’ll need this for the next step.

- Go to your Shopify store and navigate to Online > Themes > Actions > Edit code. Find the theme.liquid file and paste the GTM container code you copied earlier.
- Return to your GTM account and click on the Preview button. This will open a popup where you should paste the URL of your Shopify store website.
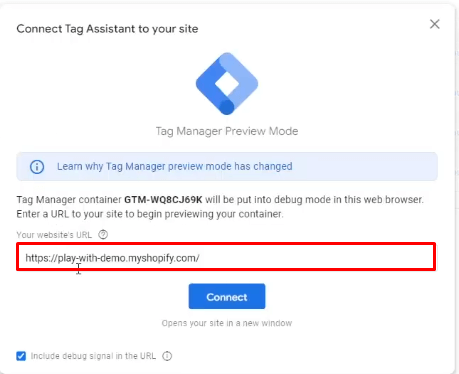
- Click Connect, and your Shopify store will now be linked to GTM and Tag Assistant. You’ll be able to see the events being tracked within GTM.
2. Check your data layer
- Test the your data layer by going to your Shopify store and adding an item to the cart. This will trigger an event that Google Tag Assistant should record. Go back to the Tag Assistant and navigate to the Data Layer. Check if you can see the data for the add_to_cart event you just performed.
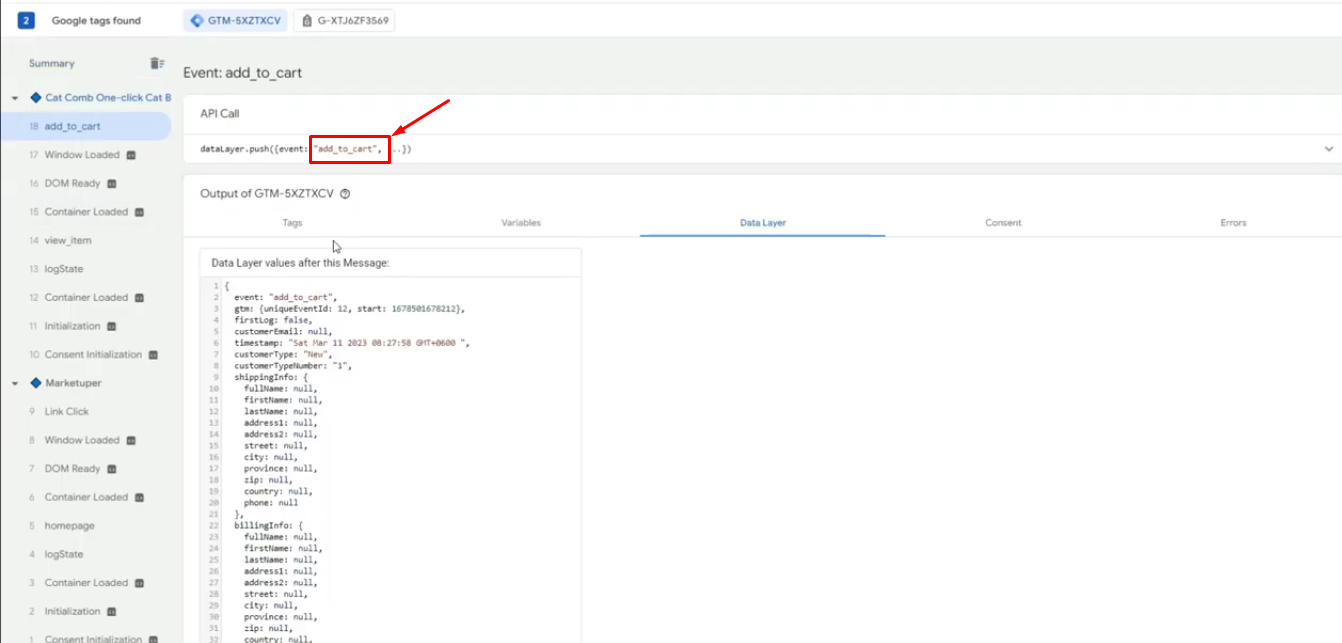
- Copy the name of the add_to_cart event from the Data Layer.
3. Create a new trigger in GTM
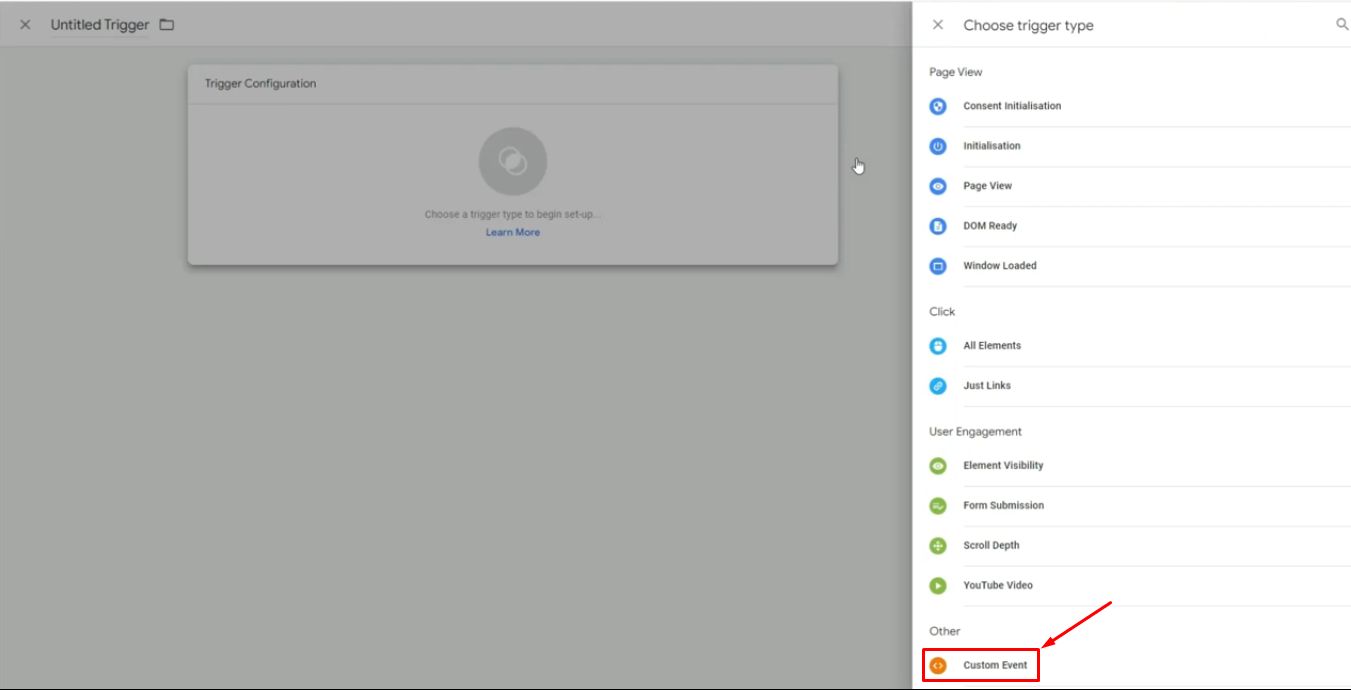
- In GTM, go to Triggers > New and create a new trigger.

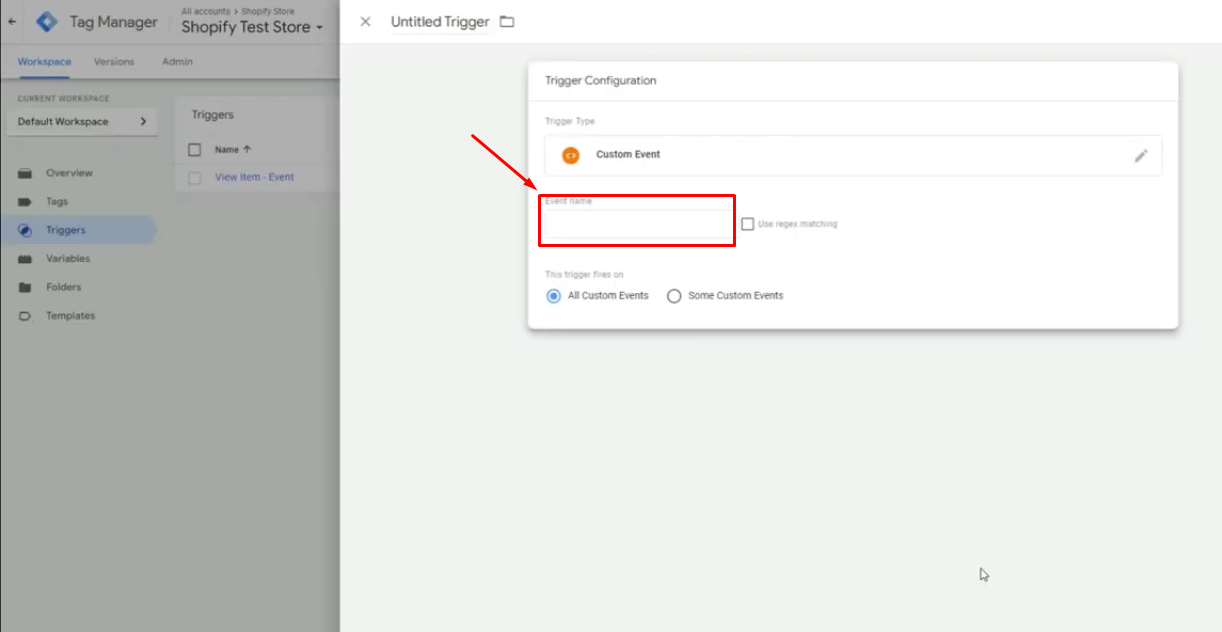
- Choose Custom Event as the trigger type
- Paste the event name you copied in the previous step.
4. Create variables for the parameters
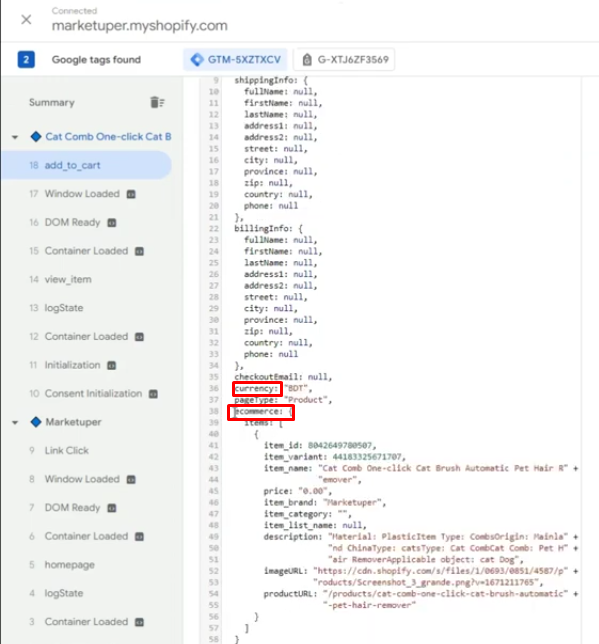
You can create as many parameters as you like. However, there are two specific parameters you must set up for the “Add to Cart” event: ecommerce.item and currency. Go to your Google Tag Assistant and navigate to the Data Layer. Search within the code to find the names of these two parameters. Once you’ve located them, copy these names – you’ll need them for the next step.
- In GTM, go to Variables > User-defined Variables to create new ones.
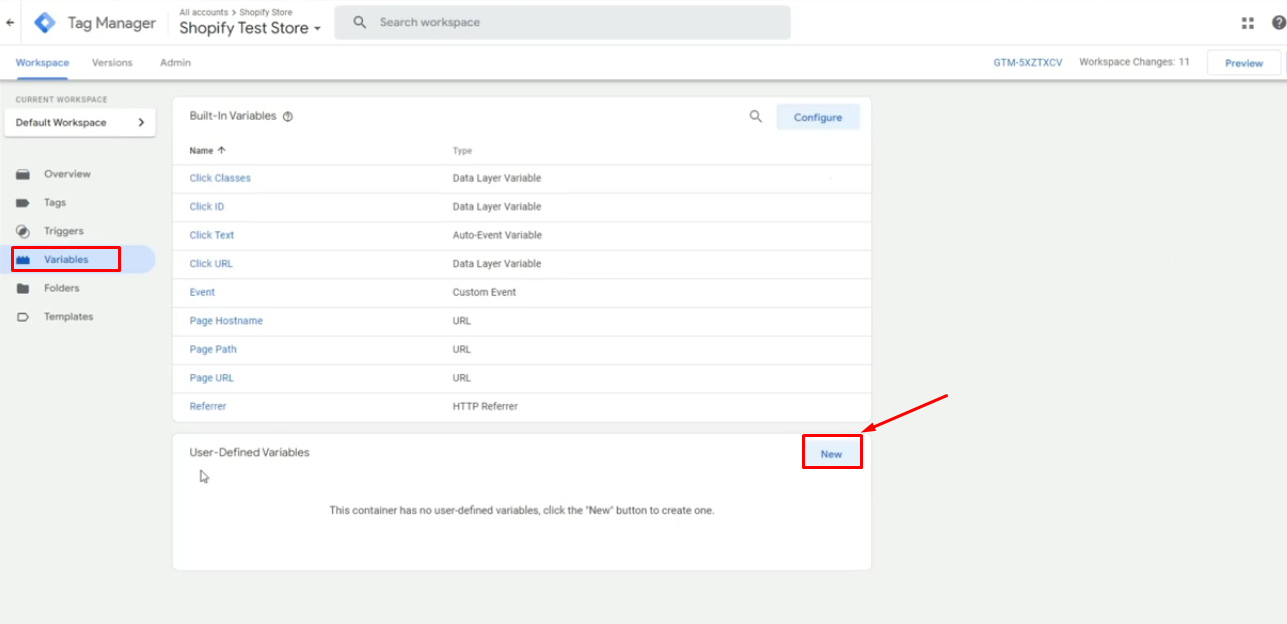
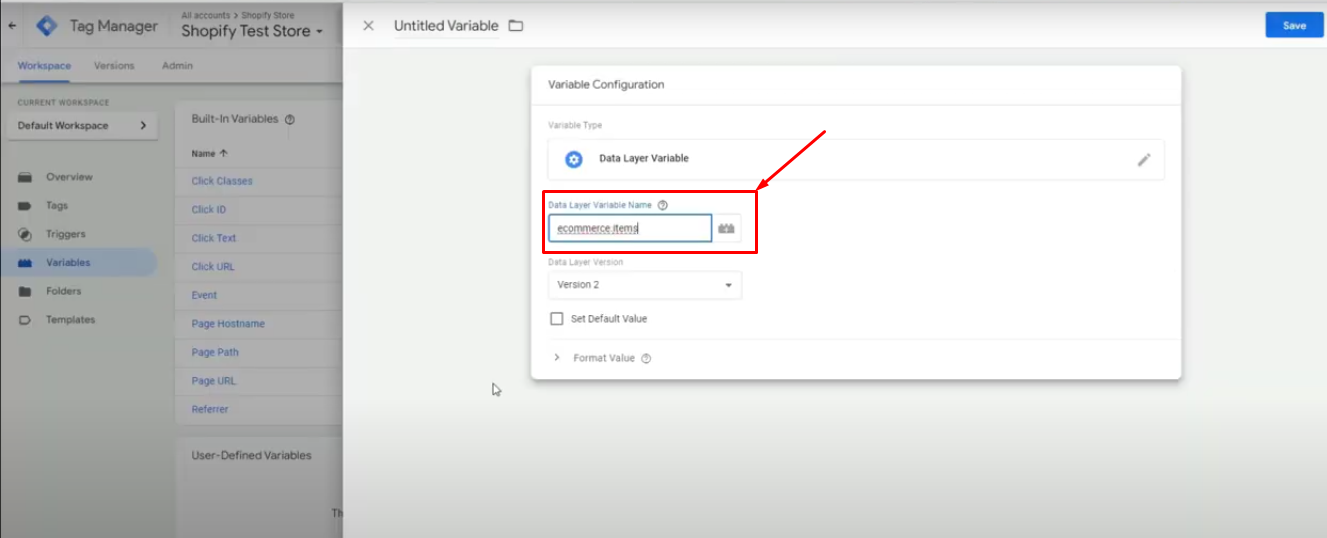
- Choose the variable type as Data layer variable
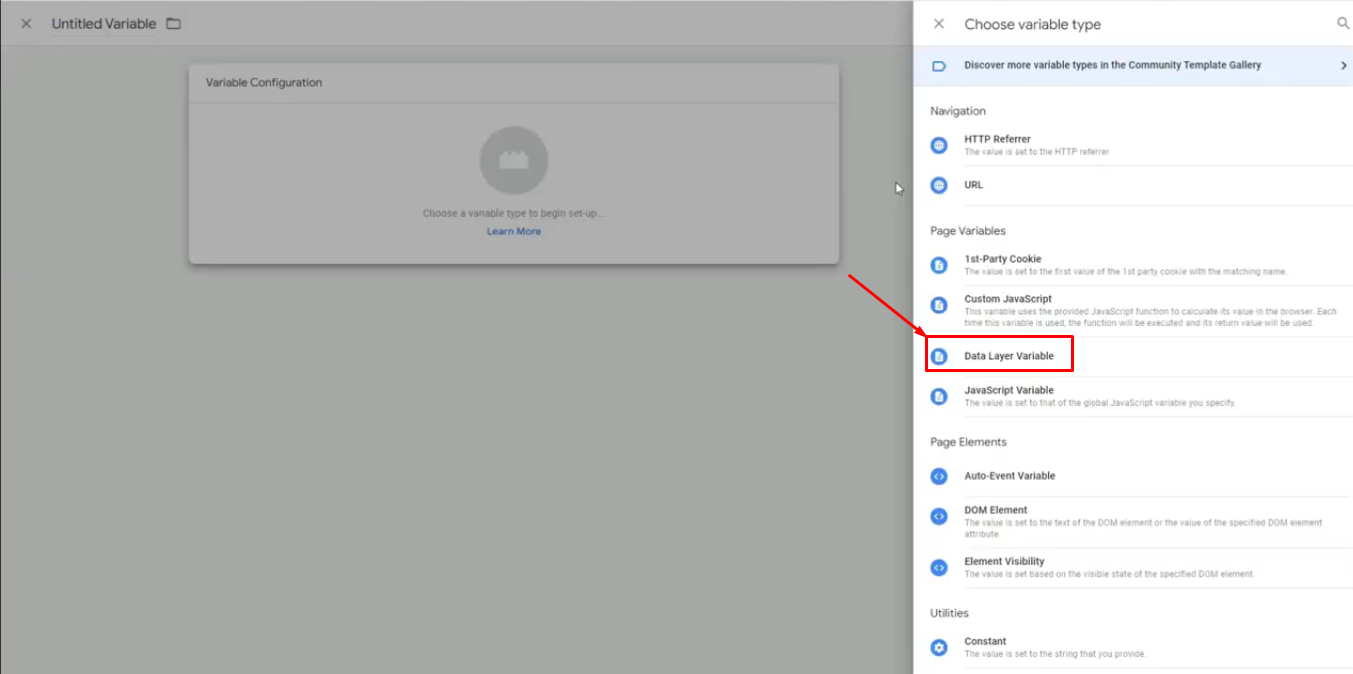
- Assign them the data layer variable names you copied in the previous step.
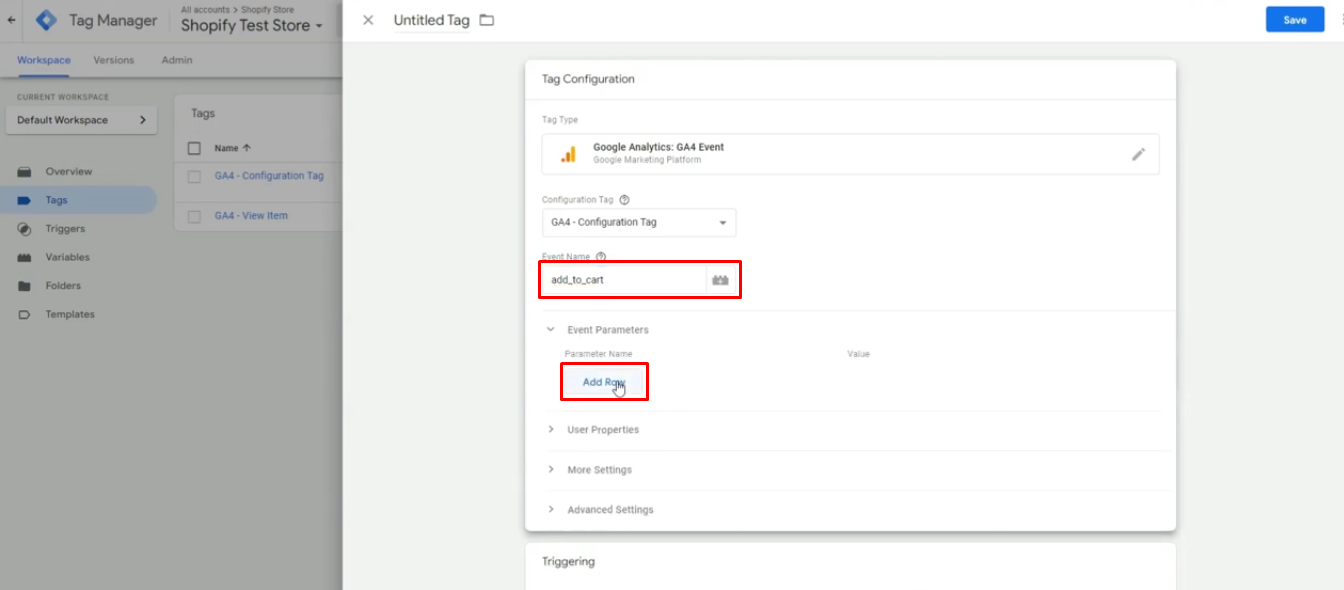
5. Create a new tag for your event
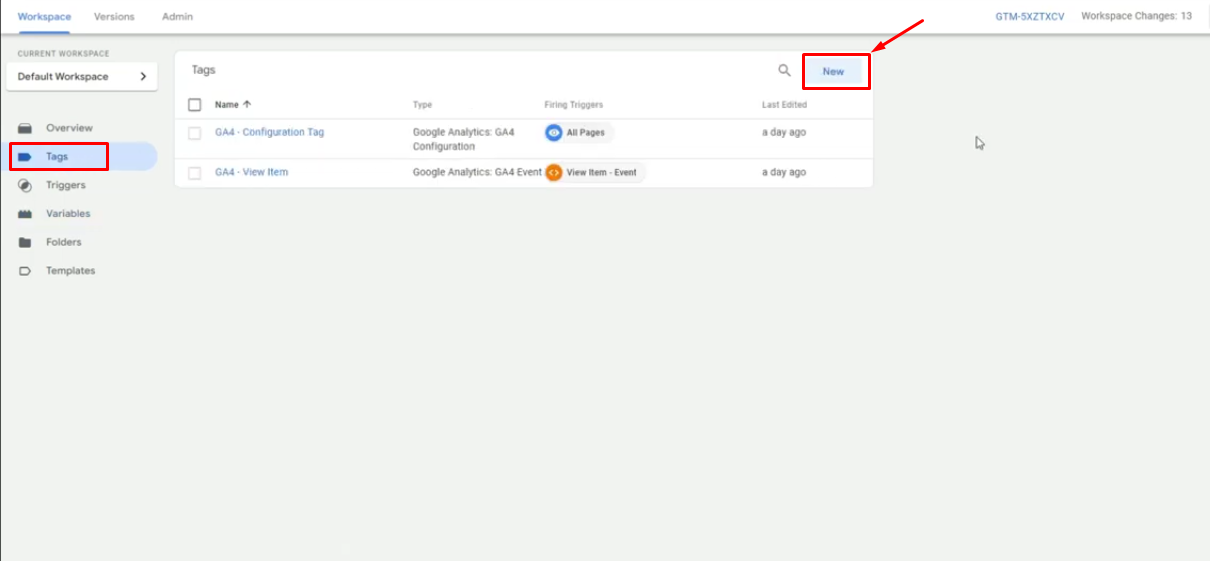
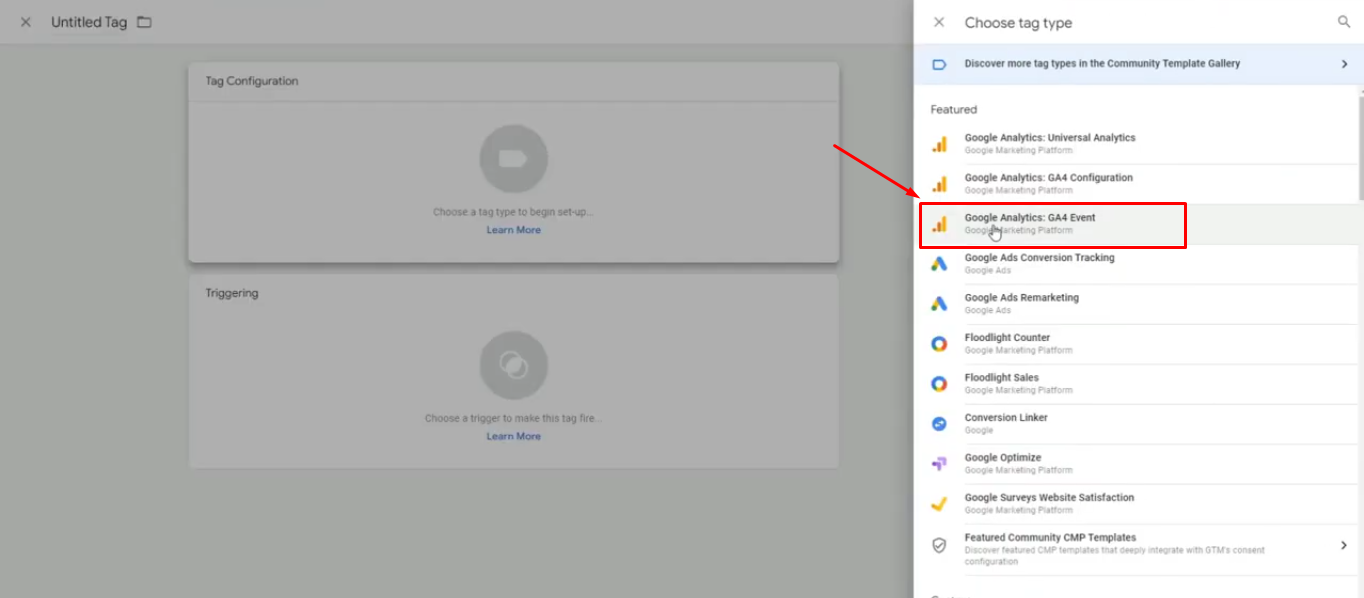
- Go to Tags > New and create a new tag.
- Choose Google Analytics: GA4 Event as the tag type.
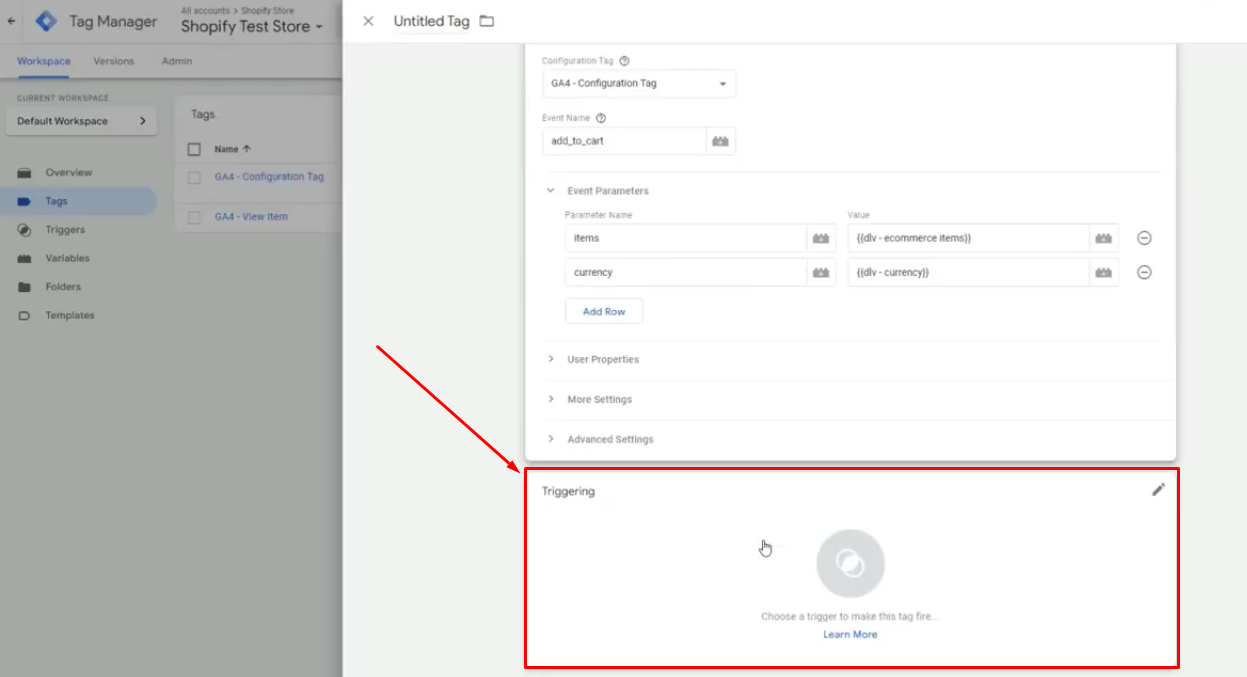
- In the tag settings, enter the event name and select the variables you created for the ecommerce.item and currency parameters.
- Finally, add the trigger you created earlier to the tag, and you’re all set! Your add_to_cart event is now set up for tracking in GTM and Google Analytics.
Key GA4 Reports for Tracking Add to Cart Events on Shopify
In GA4, tracking reports can help you track and analyze the Add to Cart events for your Shopify store. Understanding these reports can provide valuable insights into customer behavior and help optimize your e-commerce strategy.
Realtime report
The real-time report is one of the main tools you can use to track your add-to-cart events on Shopify. It shows which products are being added to carts in real-time, along with information about the users performing these actions.
This report helps you quickly identify trending products, observe the impact of ongoing campaigns or promotions on add-to-cart behavior, and diagnose potential tracking issues immediately.
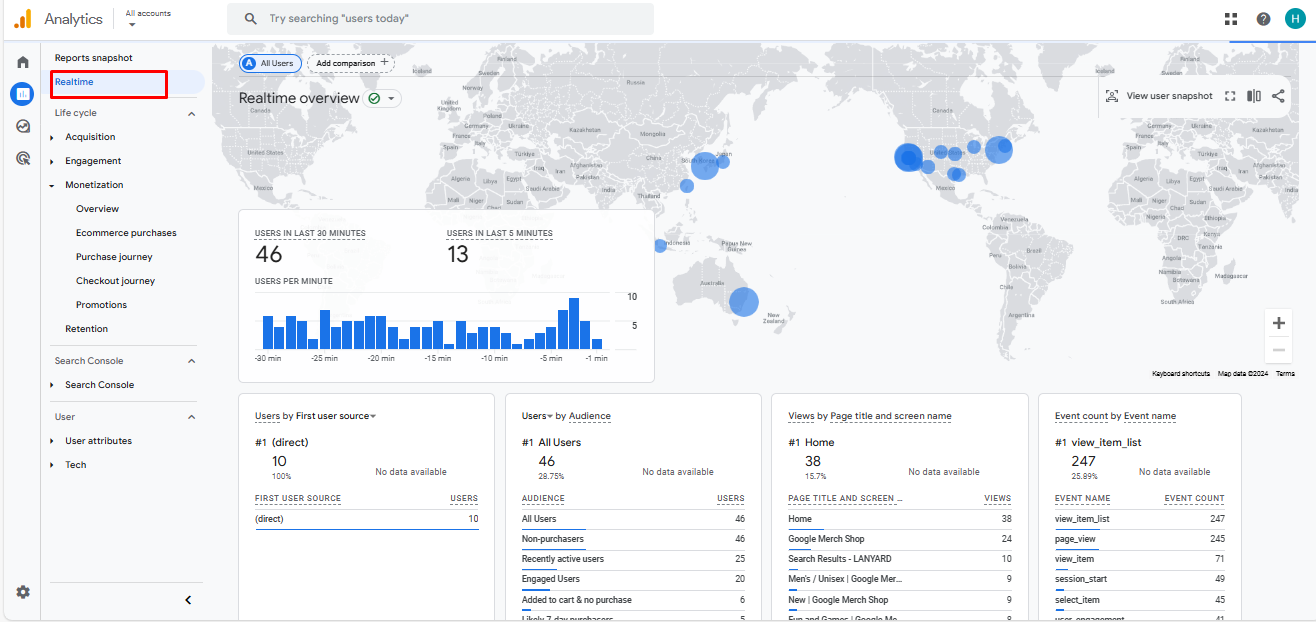
You can use this report to monitor the effectiveness of flash sales or limited-time promotions. It also allows you to verify that your add-to-cart events are firing correctly whenever a user clicks the button.
E-commerce Purchase report
The e-commerce purchase report is crucial for any online store and is especially useful for tracking how your add-to-cart events are performing. This report provides a comprehensive view of your sales funnel, detailing products added to carts, those that moved to checkout, and those that ultimately resulted in a purchase.
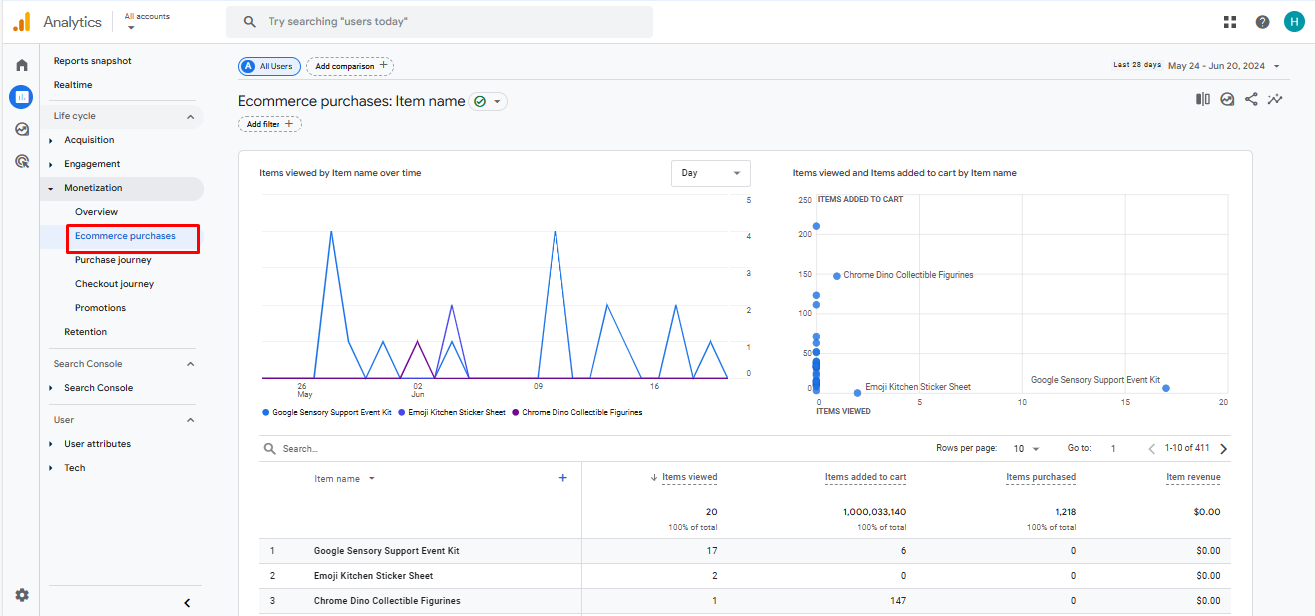
Using this report, you can understand the conversion rate from add-to-cart to purchase, identify potential drop-off points in the funnel, and analyze product performance in terms of cart additions and conversions.
Some issues of Shopify GA4 Add to Cart event
Tracking the Add to Cart event in GA4 is crucial for understanding user interactions on your Shopify e-commerce site. However, several common issues can impact data accuracy and reliability.

Missing or incorrect enhanced e-commerce implementation
If enhanced e-commerce tracking is not correctly implemented on your Shopify store, Add to Cart events may not be captured or recorded accurately in GA4.
Duplicate Add to Cart events
Duplicate Add to Cart events occasionally get recorded in GA4, leading to inflated data and inaccurate analysis. You can review your implementation to ensure that the tracking code fires only once when a user adds an item to their cart.
Cross-domain tracking issues
If your Shopify store and GA4 tracking are on different domains, you must configure cross-domain tracking correctly. Otherwise, Add to Cart events may not be attributed correctly to the user’s sessions.
Is there a better way to bypass these problems?
Setting up and managing GA4 Add to Cart events on Shopify can provide valuable insights but often comes with challenges and complexities. If you’re seeking an alternative to GA4, NestAds offers a powerful solution. NestAds is designed specifically for Shopify merchants, offering seamless integration without the need for coding expertise. It consolidates your ad data from major advertising platforms like TikTok, Facebook, and Google in one simple dashboard. With its wide range of metrics, NestAds simplifies monitoring ad performance across various channels, giving you a holistic and thorough understanding of customer journeys.
Moreover, NestAds allows you to easily modify attribution models to compare channel performance and identify top sales drivers, helping you optimize your marketing efforts effectively. This flexibility ensures you can adapt your strategies based on accurate data, avoiding the common pitfalls of GA4’s complex setup. Don’t let the intricacies of GA4 setup hinder your business growth. Embrace the simplicity and efficiency of NestAds to enhance your Shopify store’s ad tracking and marketing attribution.