In the competitive world of e-commerce, having accurate and insightful data is crucial for making informed business decisions. For Shopify store owners, Google Analytics 4 (GA4) provides a powerful platform to track and analyze customer behavior, especially purchase events. By effectively setting up GA4 to capture purchase events, you can gain deep insights into your store’s performance, understand your customers’ buying patterns, and optimize your marketing strategies to drive growth.
However, setting up Shopify GA4 purchase event tracking can be complex, involving several technical steps to ensure data accuracy and completeness. In this guide, we will walk you through the entire process, from creating a GA4 property and integrating it with your Shopify store to configuring Google Tag Manager and troubleshooting common issues. Let’s dive in!
What is GA4 purchase event on Shopify?
The Shopify GA4 purchase event is a crucial e-commerce event that triggers when a customer completes a purchase on your Shopify store. This event captures comprehensive data about the transaction, providing valuable insights into your store’s performance and customer behavior.
By tracking the purchase event in GA4, you gain valuable insights into various aspects of your e-commerce performance. This includes your conversion rate, revenue, average order value, and product sales. Such data is essential for understanding how well your store is performing and identifying areas for improvement. It allows you to make data-driven decisions to enhance your sales strategy and overall business growth.
Another important aspect of the purchase event is its interaction with other key events, such as “view product” and “add to cart”. By examining how these events influence the purchase event, you can pinpoint any friction points or drop-offs in your customer journey. Understanding where potential customers are abandoning their shopping carts or losing interest in products helps you optimize these stages, improving the overall shopping experience and increasing conversion rates.
Shopify GA4 purchase event parameters
When analyzing the purchase event, you will need to consider other parameters that provide additional information about the transaction and the item purchased. Here’s a list of the parameters involved in a GA4 purchase event:
| Parameter | Definition | Advantages |
| Transaction_id | A unique identifier for each transaction | Help in tracking and differentiating individual purchases, allowing for accurate sales and conversion tracking |
| Value | The total monetary value of the transaction | Essential for calculating revenue, average order value, and overall financial performance of your store |
| Currency | The currency in which the transaction was made | Ensures revenue data is correctly interpreted, especially for stores operating in multiple currencies |
| Item | An array containing details about each item in the transaction. Each item typically includes item_id, item_name, price, quantity, etc. | Provide a granular view of what products are being sold, enabling detailed product performance analysis |
| Coupon | The name or code of the coupon applied to the transaction | Allow for the assessment of coupon effectiveness and the impact of promotional campaigns on sales |
| Affiliation | The affiliation or association with a supplier, company, or store location | Useful for analyzing sales performance by different affiliations, such as suppliers or store branches |
| Shipping | The cost of shipping for the transaction | Help in understanding the total cost incurred by customers and the impact of shipping costs on purchase decisions |
| Tax | The tax amount applied to the transaction | Important for financial reporting and understanding the total cost to the customer |
How to set up Shopify purchase event in GA4?
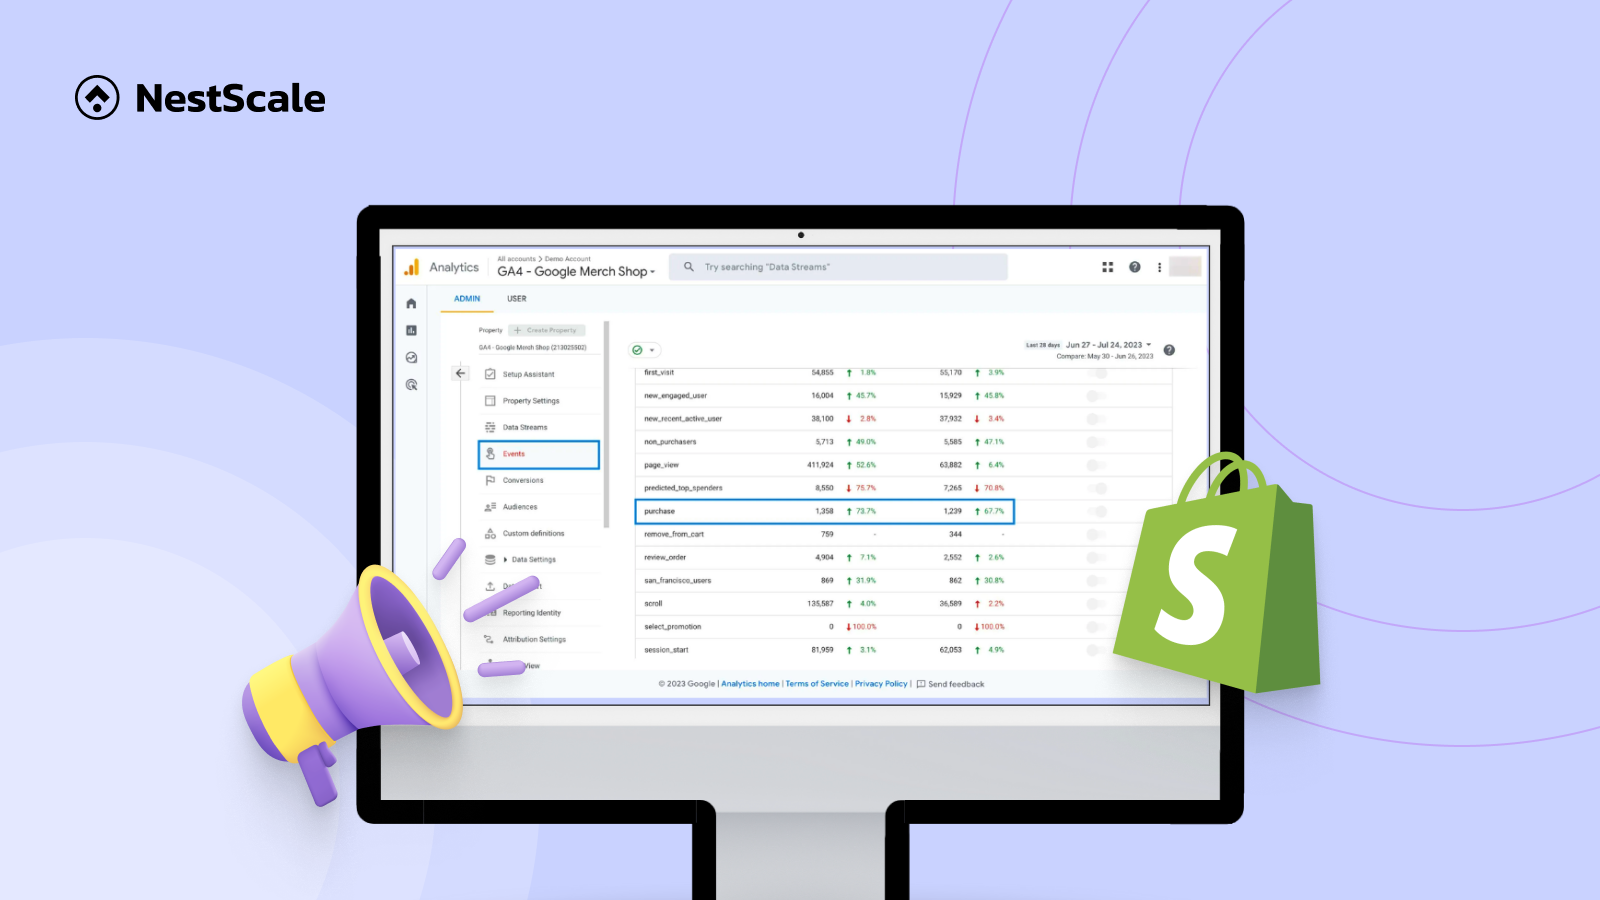
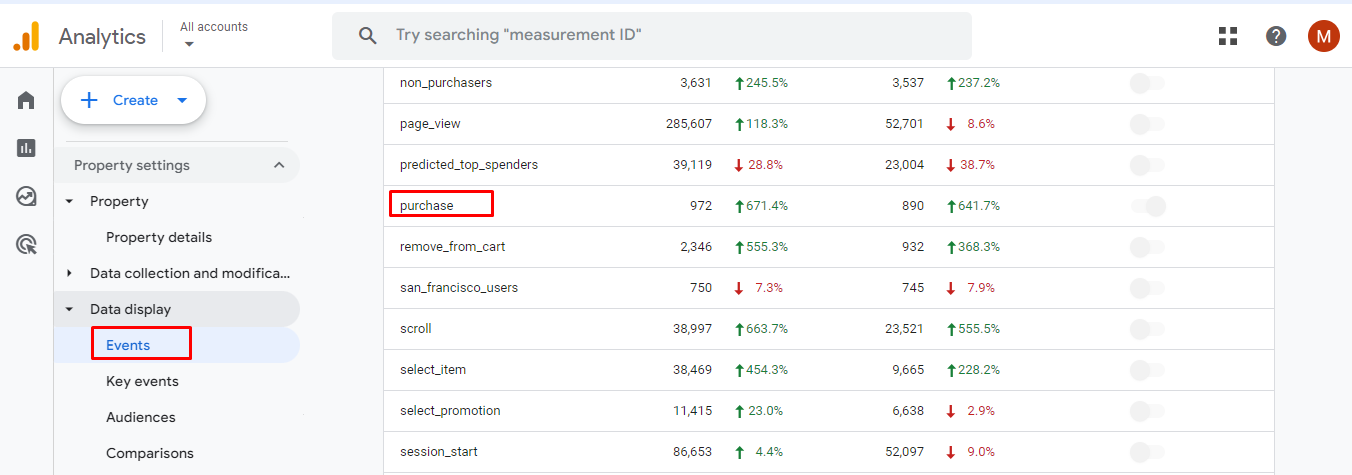
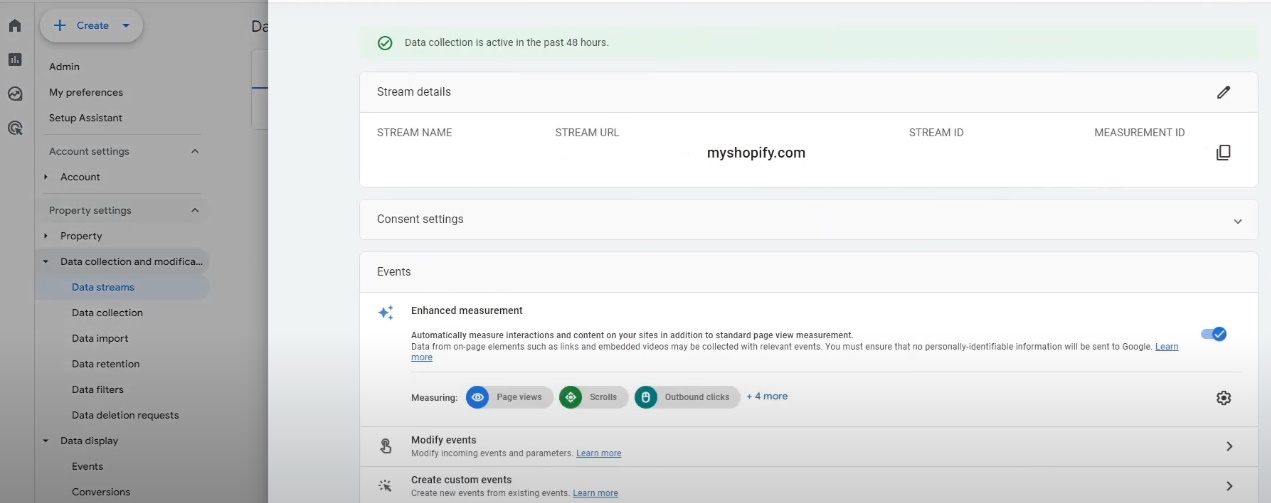
Since March 2023, Shopify has seamlessly integrated with GA4 through the Google Sales Channel, allowing you to easily connect Shopify with GA4 with just a click. By default, GA4 automatically tracks some of the main e-commerce events, including purchases. To verify whether GA4 has tracked your purchase event, go to Admin > Events (Under Property) in your GA4 dashboard.
However, if you haven’t connected Shopify to GA4, the first step is to complete the integration between Shopify and GA4. Setting up GA4 on your Shopify store involves several steps. These include creating a GA4 property, integrating it with Shopify, and configuring the purchase event using GTM. Now, let’s walk through a step-by-step guide to help you integrate GA4 on Shopify to track purchase event effectively.
Set up Google Analytics 4 property
First, you need to create GA4 property:
- Log in to your Google Analytics account.
- Navigate to the Admin section.
- Under the Property column, click Create Property.
- Follow the prompts to set up your new GA4 property.
- Copy the Measurement ID (looks like G-XXXXXXXXXX) for later use.
Then you add GA4 to Shopify by Direct Integration or Using Google Tag Manager (Recommended).
- Direct Integration: Log in to your Shopify admin panel. Then go to Online Store -> Preferences. In the Google Analytics section, paste your GA4 Measurement ID.
- Using Google Tag Manager (Recommended):
- Create a Google Tag Manager account and container if you don’t already have one. Then copy the GTM container code below the opening <head> tag.
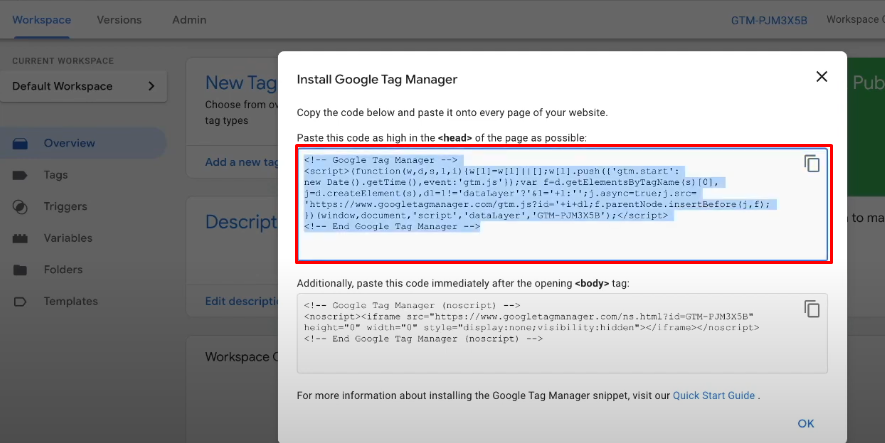
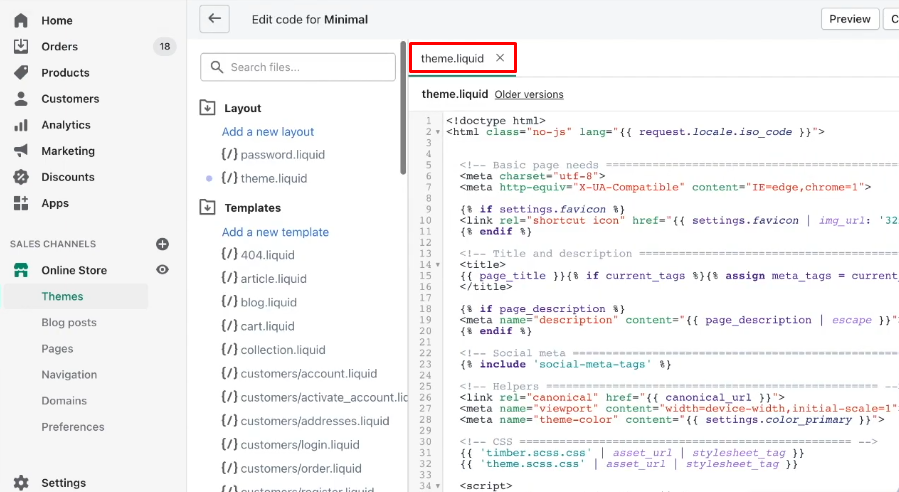
- In Shopify, go to Online Store -> Themes -> Actions -> Edit Code.
- In the theme.liquid file, add the GTM container code that you copied before.
Configure GA4 tags in GTM
- Log in to Google Tag Manager.
- Create a new tag and select Google Analytics: GA4 Configuration.
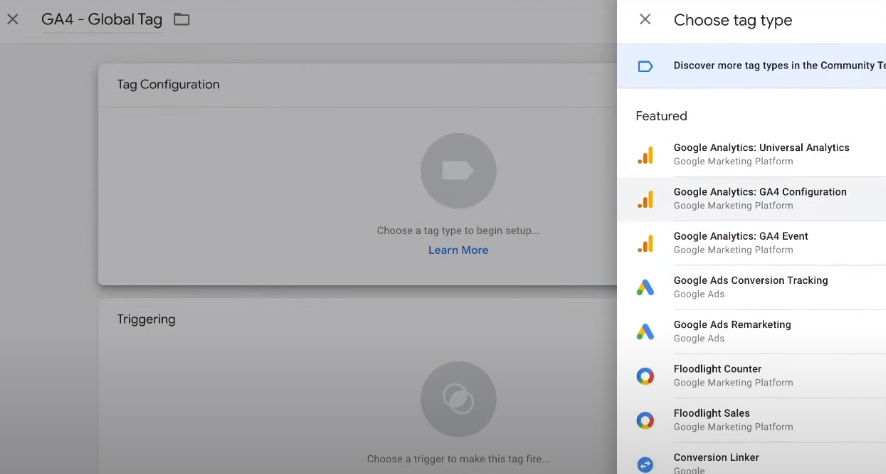
- Enter your GA4 Measurement ID.
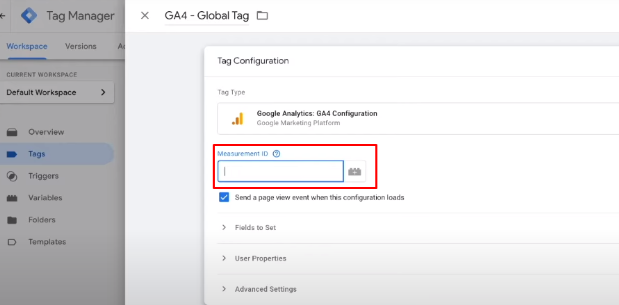
- Set the trigger to All Pages.
- Save and publish the tag.
Configure the GA4 purchase event tag
Now, you need to set up purchase event tag:
- Create a new tag and select Google Analytics: GA4 Event.
- Paste the Measurement ID and name the event purchase.
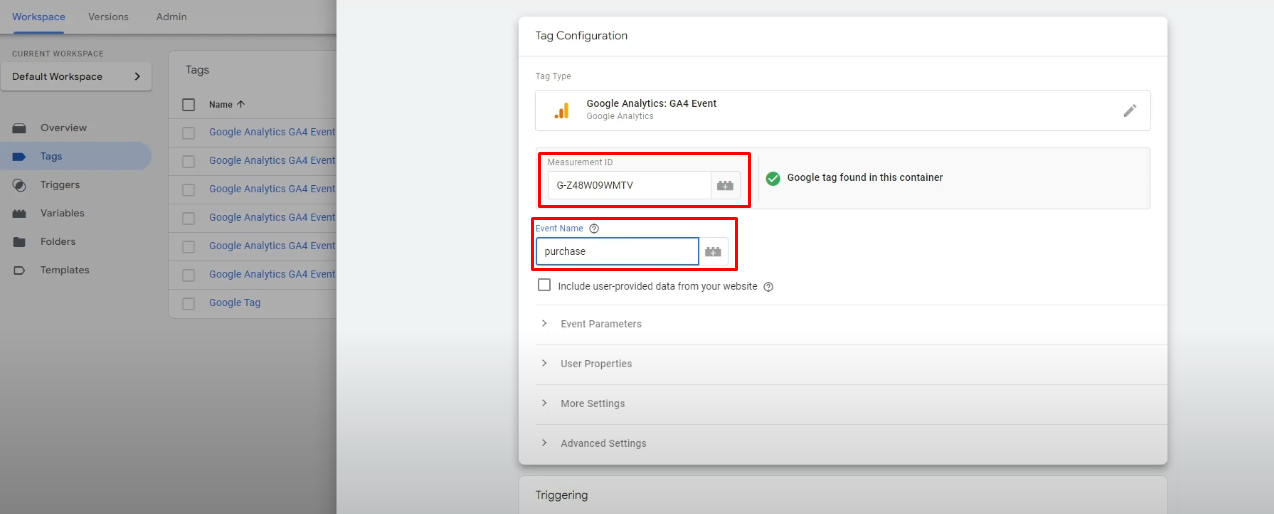
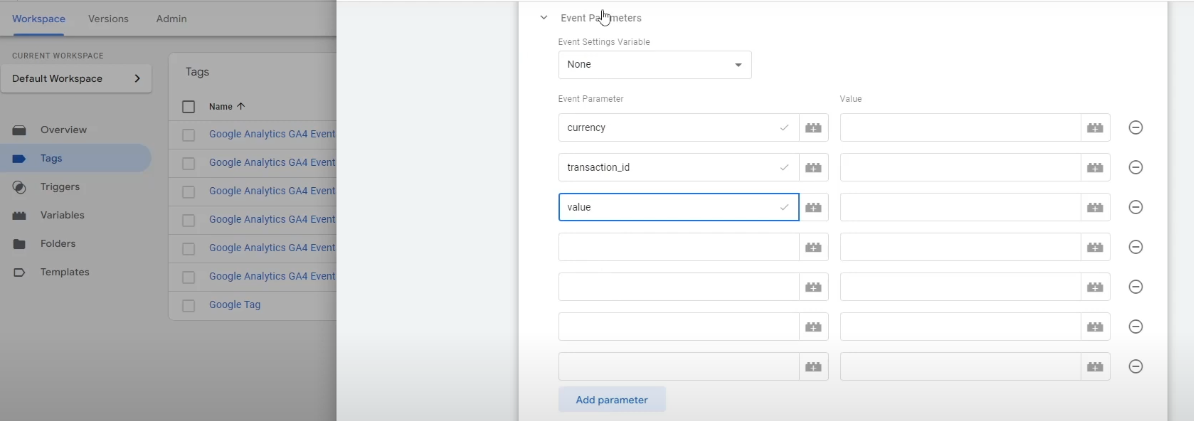
- Add the following parameters to capture detailed purchase information:
- transaction_id: {{transaction_id}}
- value: {{value}}
- currency: {{currency}}
- items: {{items}}
- coupon: {{coupon}}
- affiliation: {{affiliation}}
- shipping: {{shipping}}
- tax: {{tax}}
The next action is to configure the Trigger:
- Set the trigger to fire on the purchase confirmation page.
- Go to Trigger Configuration -> Click + -> Custom Event, and enter the event name.
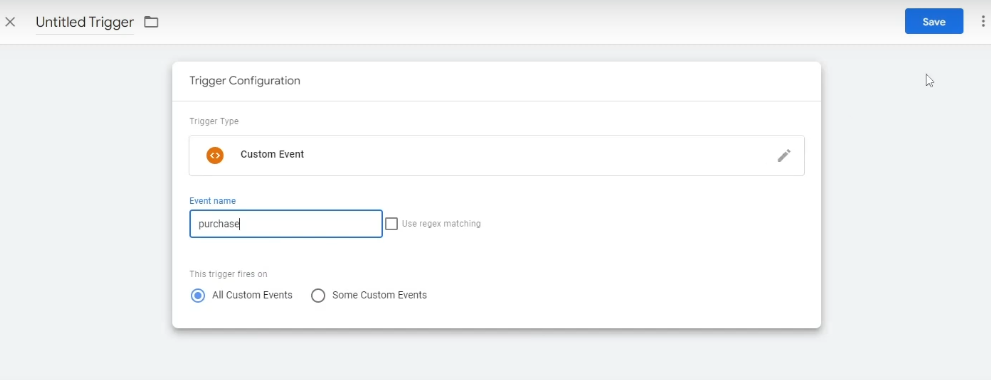
- Typically, this is the “Page View” trigger with a condition for the URL path containing checkout/thank_you.
Implement Data Layer for Shopify
In Shopify, ensure your checkout page pushes transaction data to the data layer. This requires editing your Shopify theme or using apps/plugins that support data layer integration.
Verify your setup
Use GTM Preview mode:
- In GTM, click Preview to open the Debugger.
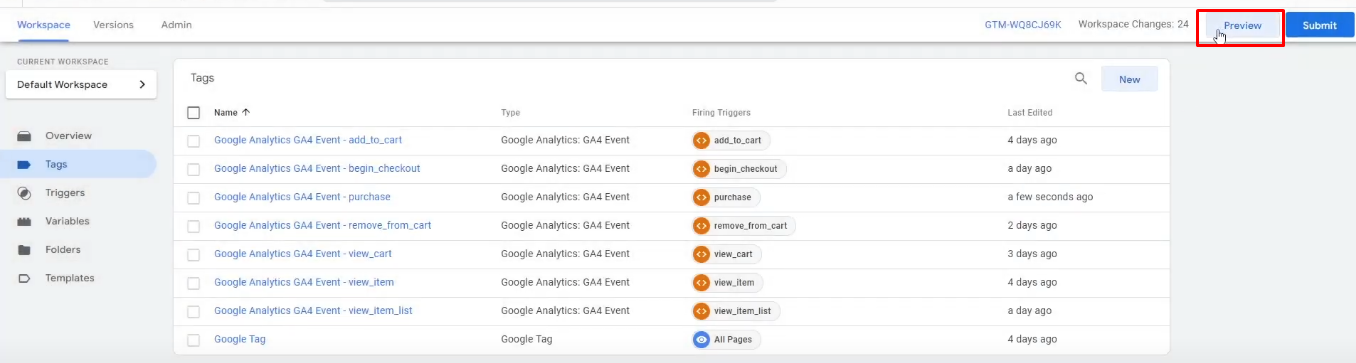
- Perform a test purchase on your Shopify store.
- Verify that the purchase event fires correctly and that all parameters are populated.
Check GA4 DebugView:
- In GA4, navigate to Configure -> DebugView.
- Confirm that the purchase event is being recorded with all relevant parameters.
Shopify GA4 purchase event problems
While tracking and analyzing Shopify Google Analytics 4 purchase event can provide valuable insights into your e-commerce performance, you may encounter some issues or challenges along the way. Here are some common issues and how to troubleshoot them:
Missing/Inaccurate data
Product and purchase events may lack critical information such as brand, category, variant, or coupon code. This can happen if the Shopify data layer is not set up correctly, or if your GTM tag is not mapping the data layer parameters to the GA4 event parameters properly.
Solutions:
- Verify Shopify data layer: Ensure that the Shopify data layer includes all necessary information for the product and purchase event. Use browser developer tools to inspect the data layer on your site during a purchase event. Look for parameters such as brand, category, variant, and coupon code.
- Check GTM tag configuration: Ensure that your GTM tags are correctly configured to use the right parameter names and values for GA4. In GTM, review the purchase event tag settings to confirm that it maps the correct data layer variables to GA4 event parameters. Correct any mismatches.
Consistency issues
Some purchase events may not be tracked, or some may be tracked multiple times. This can occur due to delays or errors in sending the purchase event data from Shopify to GA4, or due to conflicts between different tracking methods.
Solutions:
- Single GA4 property ID: Ensure you connect your Shopify store to only one GA4 property ID to prevent data inconsistencies. In Shopify admin, navigate to Online Store -> Preferences and verify that only one GA4 Measurement ID is used.
- Check GTM settings for duplicate tags: Review your GTM setup to ensure no duplicate purchase events are being sent. In GTM, check all tags and triggers associated with the purchase event. Ensure that there are no overlapping triggers causing multiple tags to fire for the same event.
- Use GTM preview mode: Test your GTM setup in preview mode to see how tags are firing in real-time. Perform a test purchase in GTM preview mode to observe and debug the firing of purchase event tags.
Incorrect or missing transaction data
Transactions might not be recorded correctly, showing incorrect values or missing key information such as transaction ID, total value, or items purchased.
Solutions:
- Verify e-commerce settings in GA4: Ensure that e-commerce tracking is correctly enabled in your GA4 property. In GA4, go to Admin -> E-commerce Settings and verify that e-commerce reporting is enabled and configured correctly.
- Check data layer variables: Ensure that all required transaction details (e.g., transaction ID, value, items) are present in the data layer. Inspect the data layer on your purchase confirmation page to ensure all necessary details are being pushed correctly.
- Validate GTM implementation: Ensure your GTM tags are correctly capturing and sending all necessary transaction details. In GTM, review the purchase event tag and its associated variables to confirm they are correctly set up to capture and send the required data to GA4.
Duplicate transactions
Duplicate transactions might be recorded, inflating your revenue and other key metrics.
Solutions:
- Avoid multiple triggers: Ensure that the purchase event is not being triggered multiple times for a single transaction. In GTM, carefully review the triggers associated with your purchase event tag to avoid multiple triggers firing for the same event.
- Implement deduplication logic: Add logic to prevent duplicate transactions from being recorded. Use custom JavaScript in GTM to set a flag once the purchase event has fired, preventing it from firing again for the same transaction.
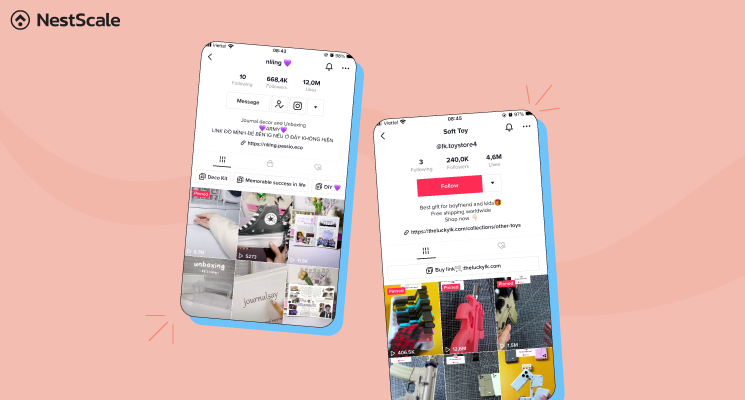
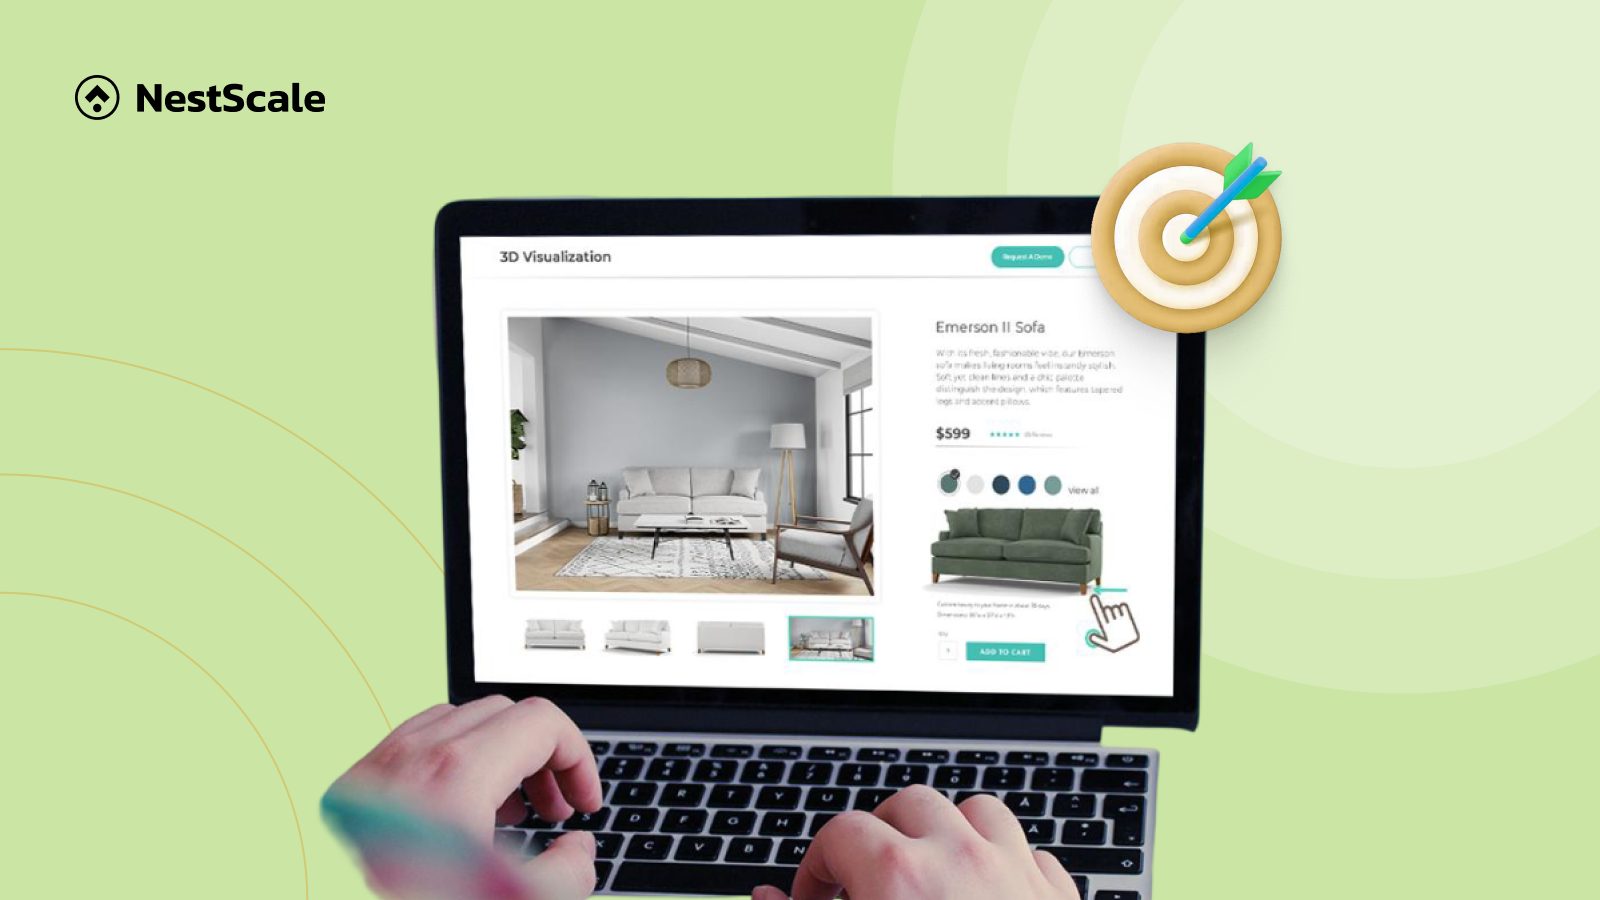
Overcome the GA4 purchase event problems with NestAds
While setting up and managing GA4 purchase event Shopify can provide valuable insights, it often comes with its own set of challenges and complexities. If you’re looking for a GA4 alternative, consider using NestAds – our powerful ad tracking and marketing attribution software designed specifically for Shopify e-commerce businesses.
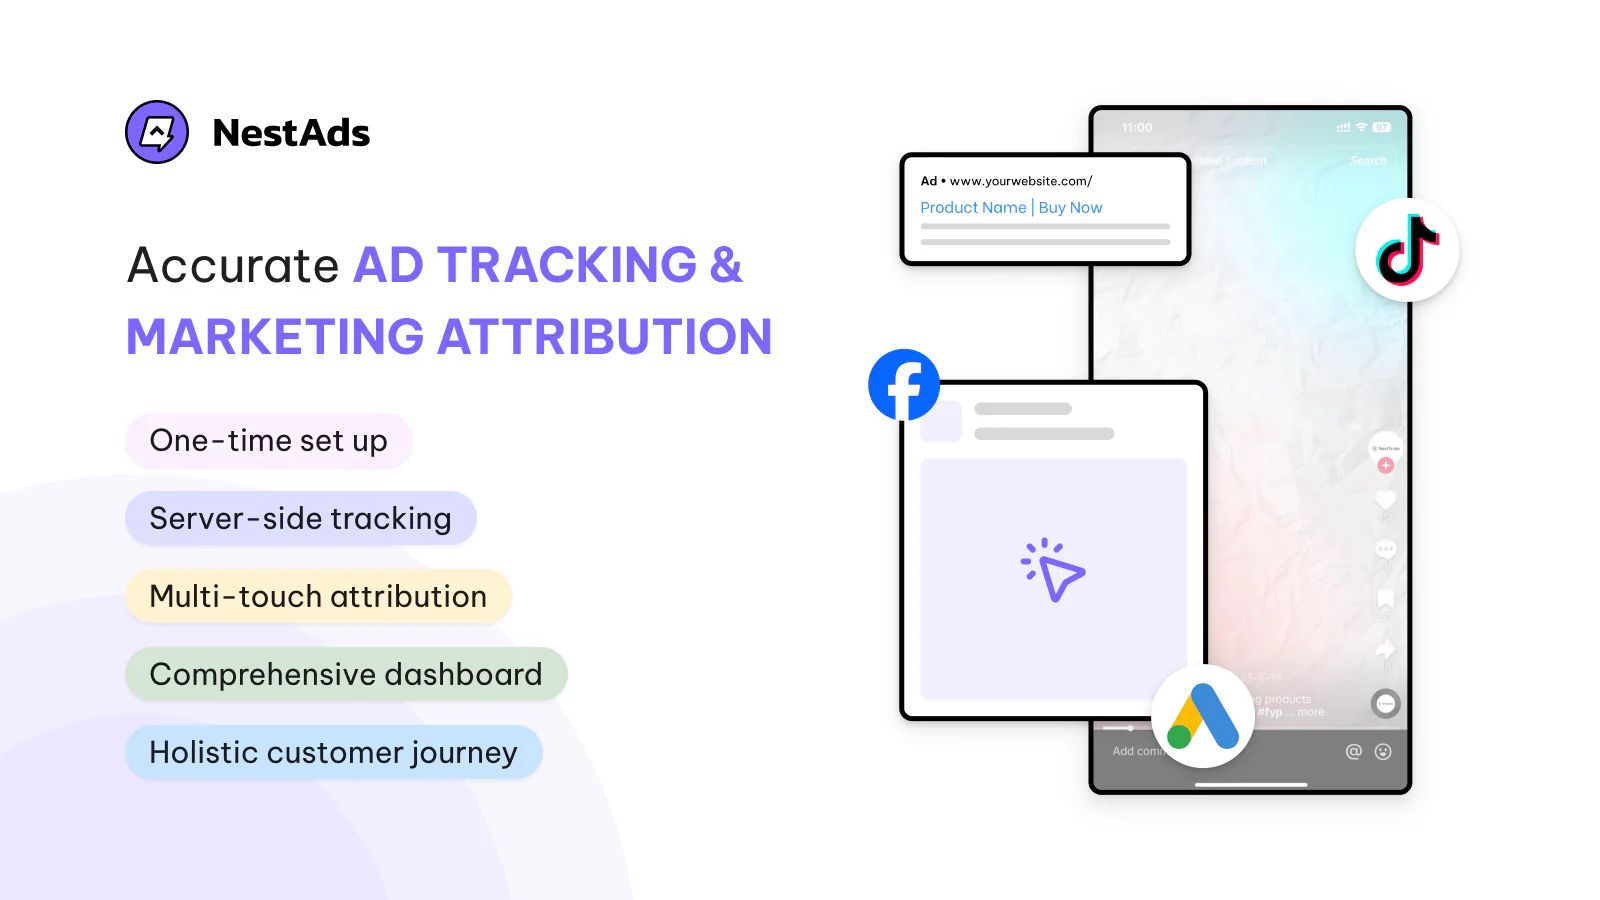
Here’s how NestAds simplifies the setup process for Shopify store owners:
- Easily connect your Shopify store with NestAds through a straightforward integration process that requires no coding expertise.
- NestAds effortlessly integrates with major advertising platforms like TikTok, Facebook, and Google, centralizing your ad data in one place.
- Access a holistic view of your marketing strategies and sales channels with detailed metrics such as ROAS, CPA, and conversion rates.
- Monitor ad metrics across channels to create both a comprehensive overview and detailed individual customer journeys.
- Modify attribution models easily to compare channel performance and identify top sales drivers.