
Welcome back to our ongoing series exploring the intricacies of server-side tracking in the digital marketing landscape. Today, we embark on a new chapter in our journey by diving into the world of Google Analytics 4 (GA4) server-side tracking.
But before we delve into the specifics of GA4 server-side tracking, let’s take a moment to reflect on our last blog, where we explored the intricacies of Google Ads server-side tracking. As one of the leading advertising platforms, Google Ads plays a pivotal role in the digital marketing ecosystem. By implementing server-side tracking with Google Ads, businesses gain greater control over their data and insights, enabling more accurate attribution and optimization of advertising campaigns.
In this blog, we’ll build upon the foundation laid in our exploration of Google Ads server-side tracking and delve deeper into the nuances of GA4 server-side tracking. From best practices and advanced configurations to practical insights and real-world examples, we’ll equip you with the knowledge and tools needed to leverage GA4 server-side tracking effectively. Let’s dive in!
What is GA4 server-side tracking
Google Analytics 4 server-side tracking is a method of collecting and sending data to GA4 through your own server, instead of directly from the user’s browser or app.
There are some things to consider when it comes to server-side tracking vs client-side tracking. In traditional client-side tracking, the GA4 tracking code (usually JavaScript) is embedded in the website or app. When a user interacts with the site/app, the tracking code running on the client-side collects data about the user’s actions and sends it directly to Google Analytics servers.
With GA4 server-side tracking, however, the website or app first sends the event data to your own server. Your server then forwards this data to Google Analytics using the GA4 Measurement Protocol API. So instead of the client communicating directly with GA4, your server acts as an intermediary.
Why implement Google Analytics 4 server-side tracking?
Here are some key reasons why you should implement GA4 server-side tracking on your Shopify store:
- Enhanced data accuracy: Client-side tracking can be affected by ad blockers, browser extensions, and other factors that block or manipulate the tracking code. GA4 server-side tracking circumvents these issues, providing more accurate and reliable data.
- Improved data control and security: With server-side tracking Google Analytics, you have complete control over the data collected and sent to GA4. This allows you to filter out sensitive information, comply with data privacy regulations, and ensure data security.
- Integration with Shopify’s server-side APIs: Shopify provides server-side APIs for tracking events like checkouts, orders, and more. By implementing GA4 server-side tracking, you can seamlessly integrate with these APIs for more accurate and complete data capture.
While GA4 server-side tracking requires more technical implementation effort, the benefits it provides in terms of data accuracy, control, and future-proofing make it a valuable investment for Shopify merchants serious about their analytics and data-driven decision-making.

How to implement server-side tracking with GA4 on Shopify
In this section, we instruct you on how to implement Google Analytics 4 server-side tracking through Google Tag Manager. Here are the detailed steps:
Prerequisites
Before you can set up GA4 server-side tracking on your Shopify store, there are a few prerequisites and requirements that need to be in place:
- Shopify store: You’ll need an active Shopify store where you plan to implement server-side tracking. This can be a new store or an existing one.
- Google Analytics 4 Property: You must have a Google Analytics 4 property set up and configured for your website/app. If you don’t have one already, you’ll need to create a new GA4 property in your Google Analytics account.
- Server-Side tagging integration: In your GA4 property, you’ll need to enable and configure a new “Server-side tagging integration.” This integration allows you to send data server-side to GA4 using the Measurement Protocol API.
- Server environment: Since server-side tracking involves sending data from your server, you’ll need access to a server environment that can run the necessary code.
Once you have all of these prerequisites ready, you can proceed with the actual setup and implementation steps for Google Analytics 4 server-side tracking on your Shopify store.
Step 1: Set up GA4 via GTM server-side tagging
The first step is to set up GA4 via Google Tag Manager server-side tagging. This is an important and complicated step that you need to consider.
1. Set up GTM web container
Firstly, to set up Google Analytics server-side tagging, you have to create a GTM web container:
- Go to the Google Tag Manager dashboard.
- Click Create Account and set up a new account for your website.
- Create a container and select Web as the container type.
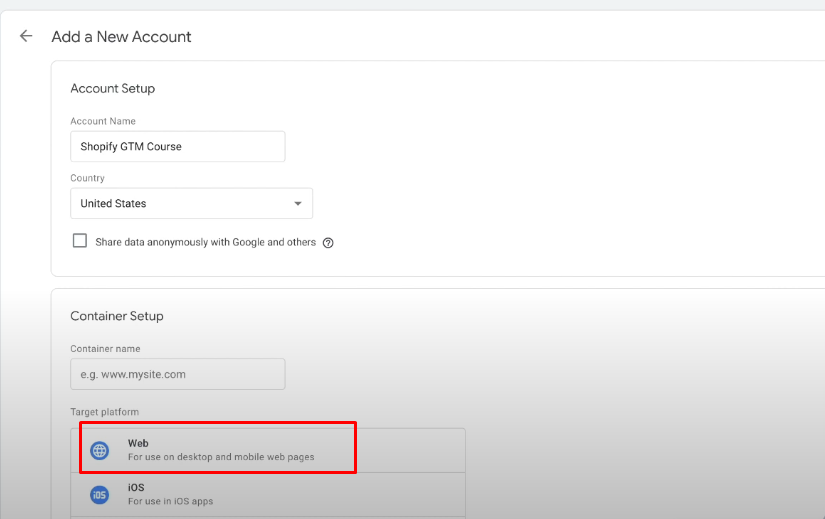
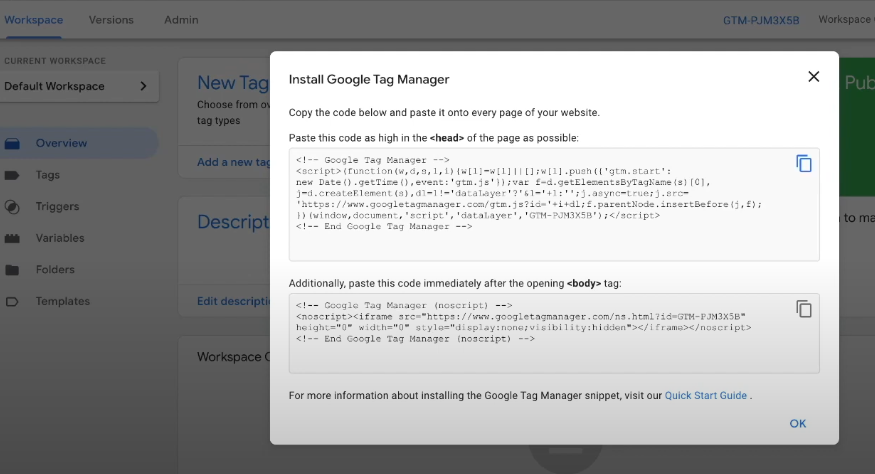
- Follow the prompts to get your GTM container code snippets.
The next step in server-side tracking GA4 is to install GTM on Shopify:
- Log in to your Shopify admin panel.
- Navigate to Online Store -> Themes.
- Click Actions -> Edit Code for your active theme.
- Find the <head> section of your theme.liquid file and paste the GTM container snippet.
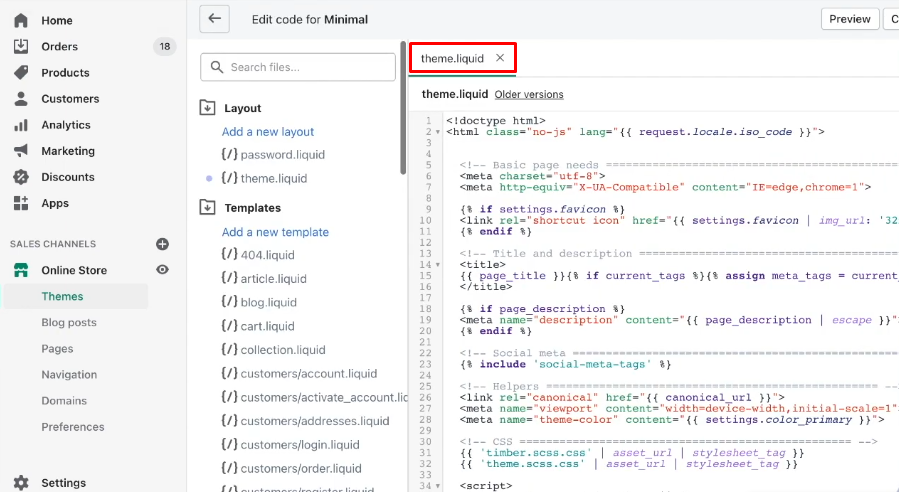
- Save the changes.
2. Set up GTM server-side container
You have to create a GTM server-side container first:
- In the GTM dashboard, click Admin.
- Under Containers, click Create Container and select Server as the container type.
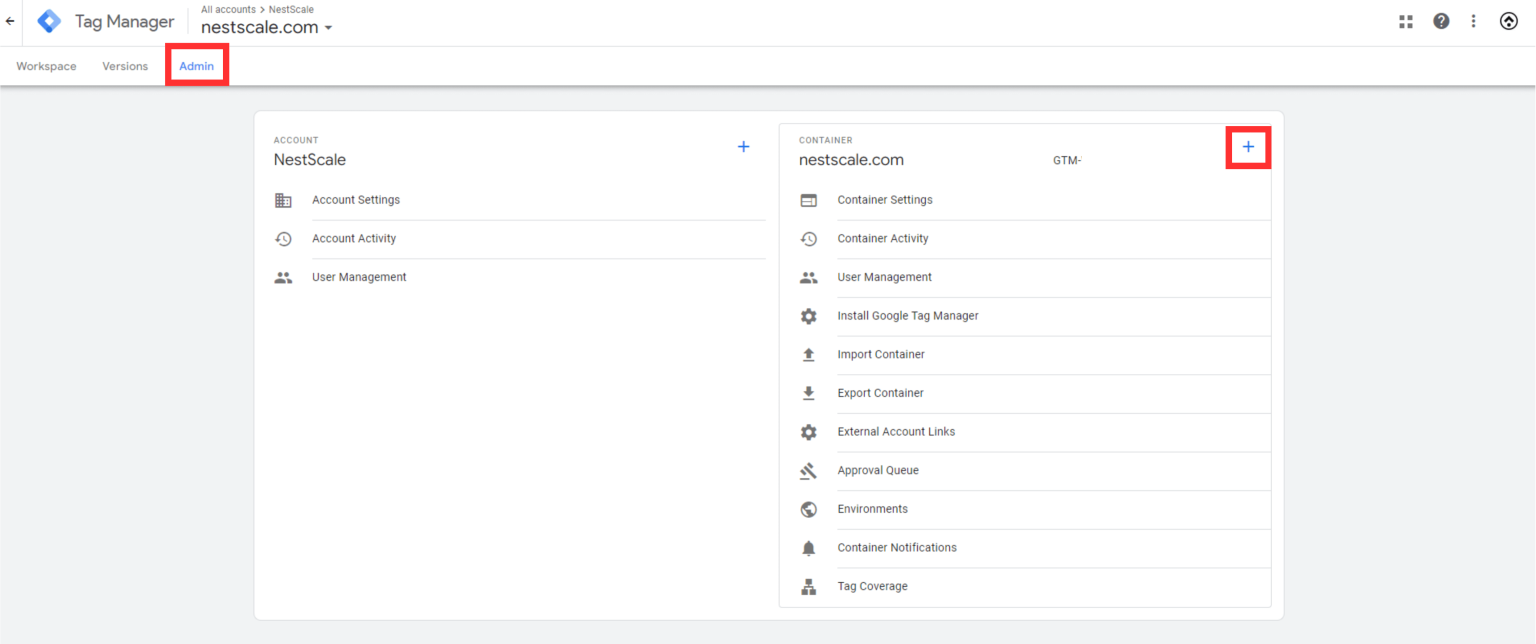
- Follow the prompts to set up the server-side container.
After creating the server container, you need to deploy a tagging server. To return to this setup later, click your container ID in the top bar or navigate to Admin -> Container Settings -> Set up your tagging server.
You can choose one of the following deployment options:
- Automatic provisioning (recommended): If you choose to Automatically provision tagging server, Google Tag Manager will set up a new GCP project and a Cloud Run tagging server for you. If you prefer to use an existing GCP project, follow the Cloud Run setup guide.
- Manual provisioning on non-Google infrastructure: If you want to use your own server solution, follow the steps in the manual setup guide.
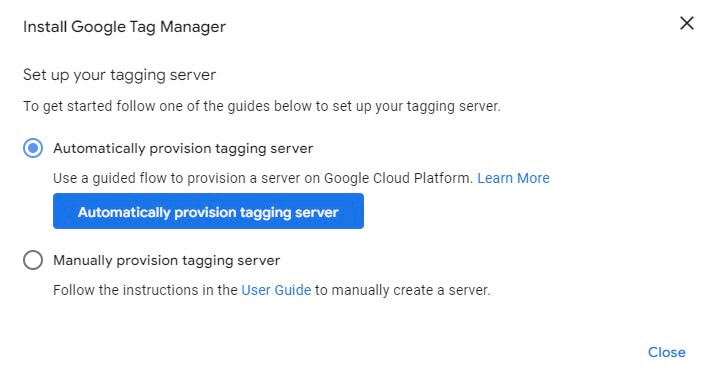
- Follow these instructions to deploy the tagging server.
- Once the setup is complete, you will have access to all the information about the tagging server, including the container configuration, the Google Cloud Platform project ID, and the default URL.
3. Configure GA4 Tags in GTM
The next step in GA4 server-side tracking is to configure tags in GTM. You will start by creating a GA4 Configuration Tag in the GTM Web Container.
- In GTM, go to your web container.
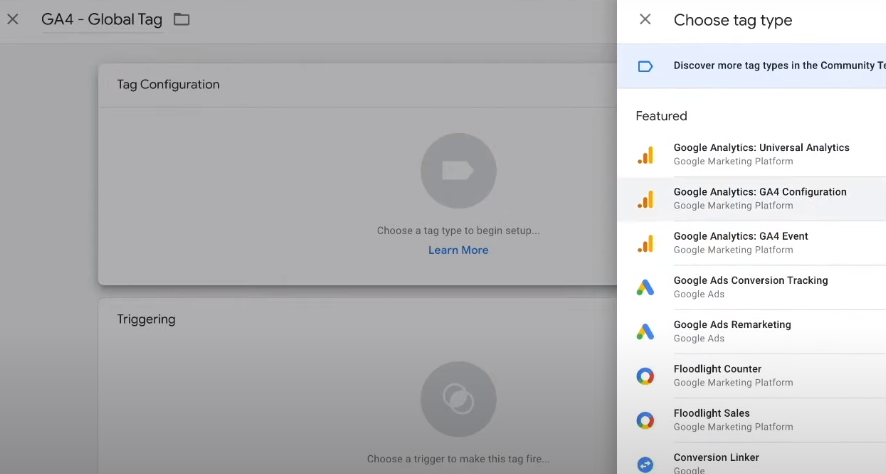
- Click Tags -> New and enter the name.
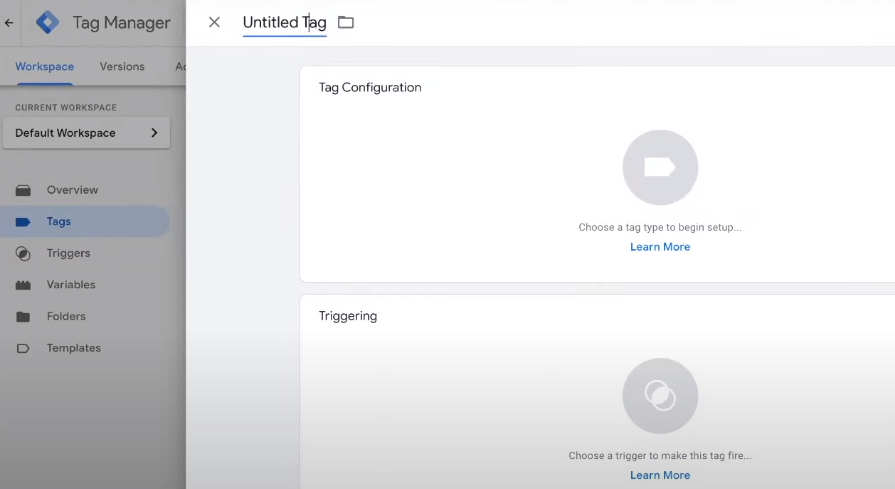
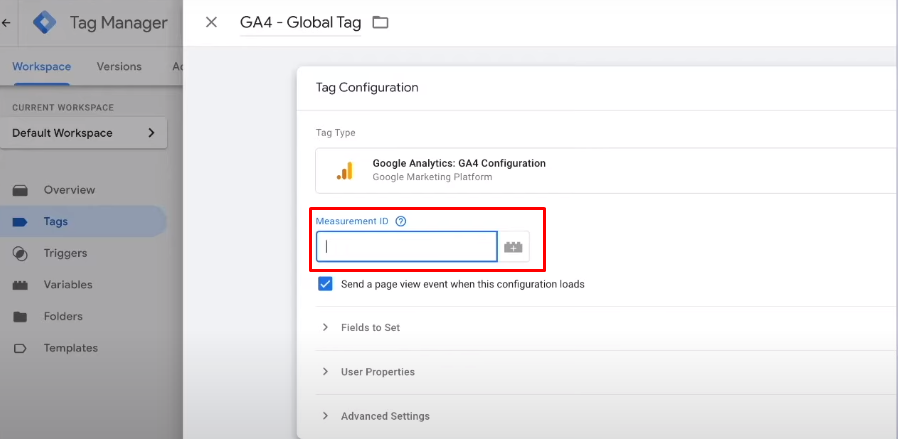
- Choose Tag Configuration -> Google Analytics: GA4 Configuration.
- Find the Measurement ID in your GA4 data stream settings and copy it.
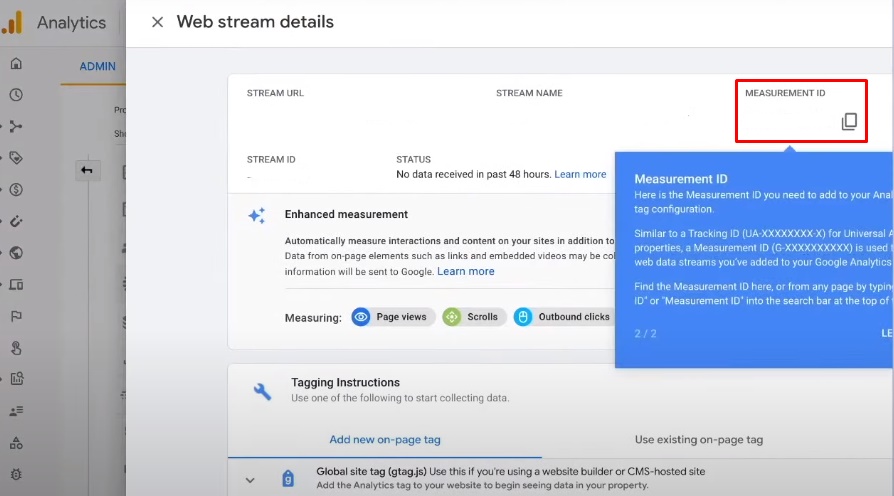
- Enter your GA4 Measurement ID.
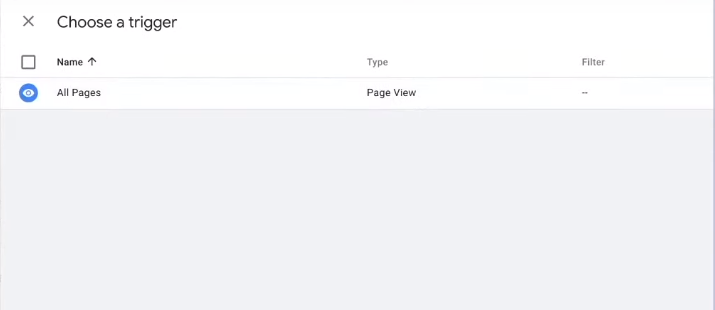
- Set the trigger to All Pages.
- Save the tag.
4. Send data from a website to your server-side container
You can route data through a server-side implementation using Tag Manager. To set up a Google tag for server-side processing, firstly, you need to create a configuration variable for the server container URL:
- Open the Google Tag Manager dashboard.
- Select the web container you want to configure.
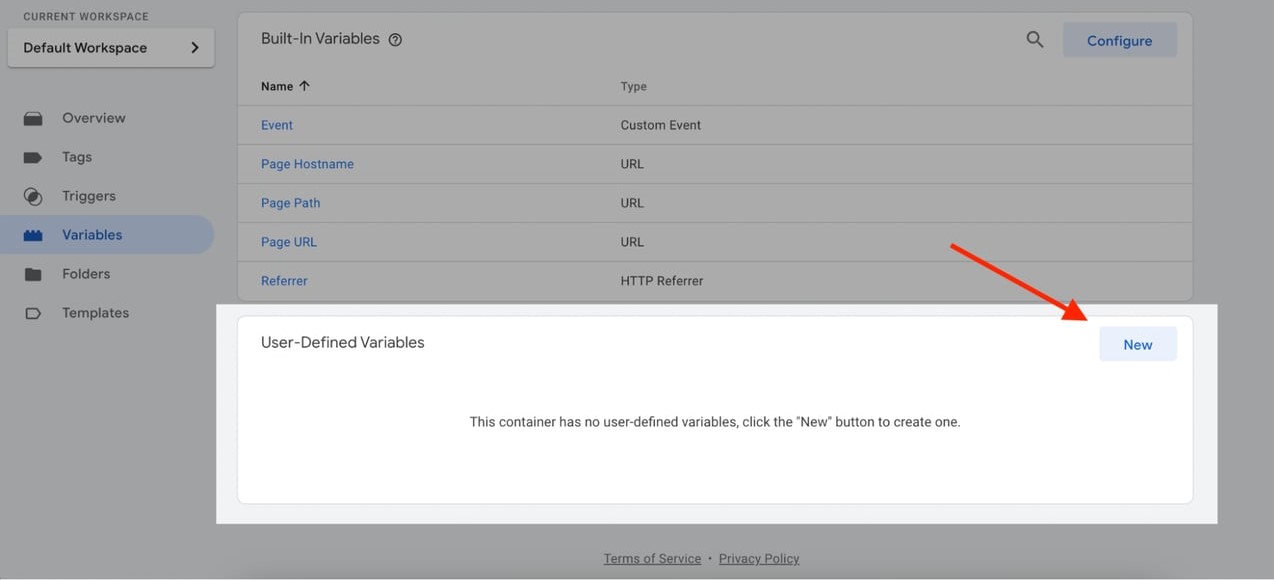
- Open the Variables menu.
- Create a new user-defined variable.
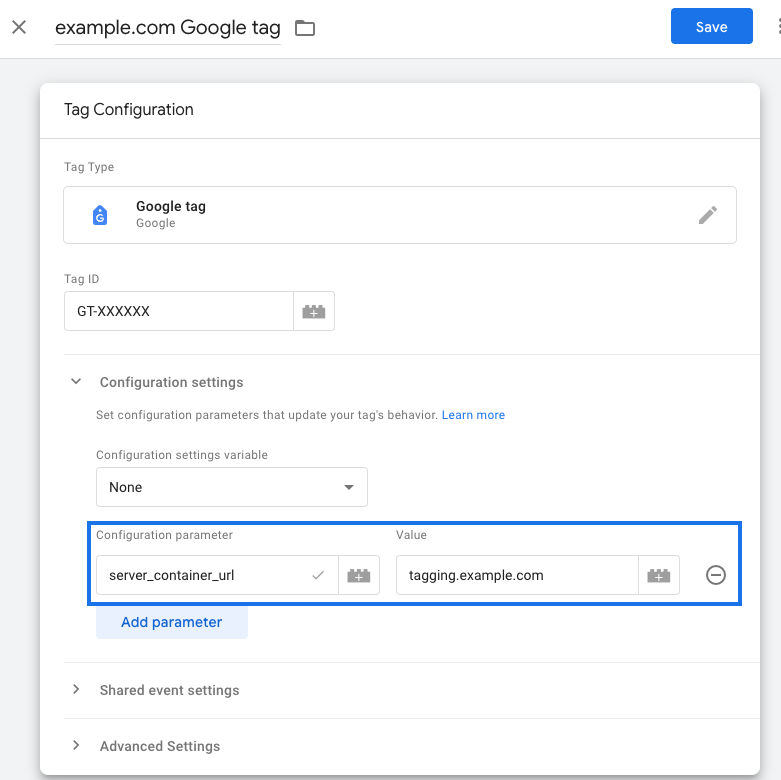
- Set the variable type to Google tag: Configuration settings.
- Add the following parameters:
- Name: server_container_url
- Value: Your server container URL (from the server container setup)
- Name your variable (e.g., “Server URL”) and save it.
Then you have to assign the server container URL to a Google Tag:
- Open the Tags menu.
- Add a new Google tag or edit an existing one.
- In Configuration settings, select the server container variable you just created.
- Click Show inherited settings to see what parameters were inherited from the settings variable.
- To ensure that the Google tag fires before other triggers, click Triggering and use the Initialization – All pages trigger.
- Save the tag and publish the container.
5. Set up Conversion Linker
Follow these steps to set up the Conversion Linker tag:
- Open the Tags menu on the left side of the page.
- Click New to add a new tag.
- Select the Conversion Linker tag type.
- Set up the trigger that will cause the Conversion Linker server-side tag to fire. In most cases, the All Pages trigger is the best option.
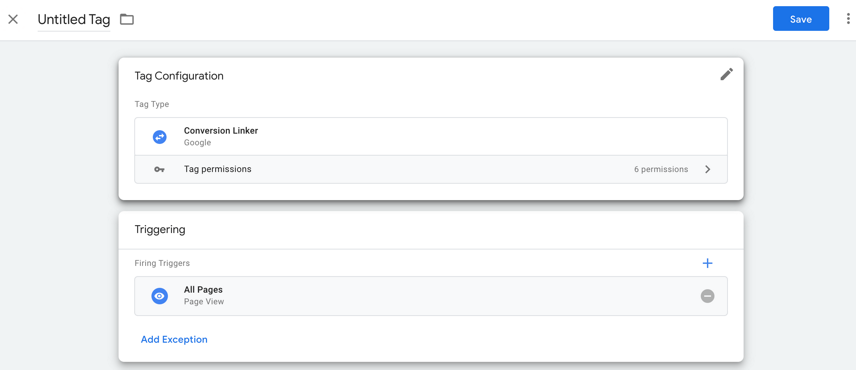
- Name the tag and click Save.
6. Set up the key event
To set up a key event, follow these steps:
- Configure Google Analytics to recognize an event as a key event action.
- Create a Google Analytics: GA4 Event tag in the Tag Manager web container to send key events.
If you have already set up key events and only need to implement the server tag, skip ahead to the step Set up the Ads Key Event Tracking tag in the server container.
First, you need to set up Google Analytics to recognize custom key events. To define a new key event in Google Analytics:
- Open Google Analytics 4 -> Admin -> select Key Events.
- Click the New key event button.
- Add the key event name. This can be a recommended event name or a custom event.
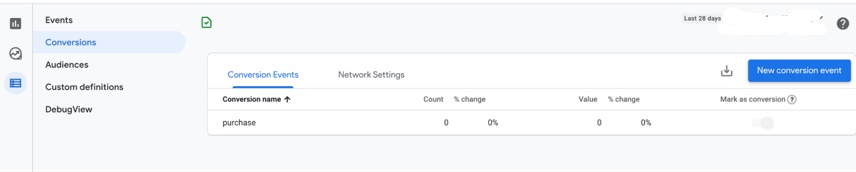
- Click Save.
Next, you set up a key event in GTM. If your key event is triggered by a Page View event, skip ahead to the next step Set up the Ads Key Event Tracking tag in the server container.
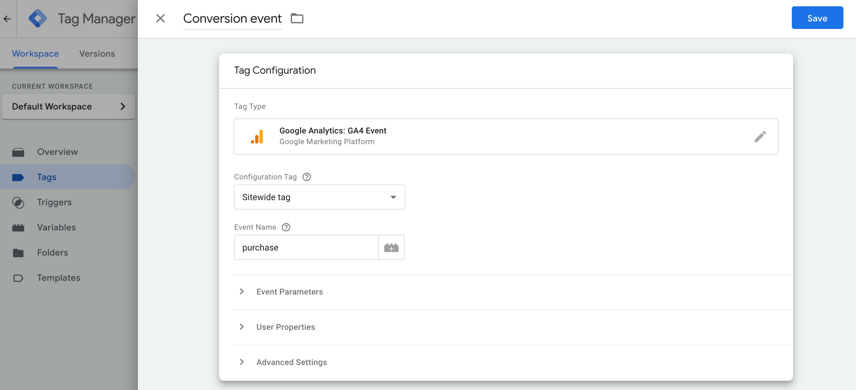
To set up a key event:
- Open Google Tag Manager.
- In your web container workspace, add a Google Analytics: GA4 Event tag.
- In the Configuration tag, select the Google tag.
- Enter the event name that corresponds to the key event.
7. Set up the Ads Key Event Tracking tag in the server container
- In your server container workspace, open Tags -> New to add a new tag.
- Choose the Google Ads Conversion Tracking tag type.
- Enter the required conversion information such as Conversion ID and label (These values are in your Google Ads account).
- In the Triggering menu, select an existing trigger if it fits your use case. If no existing trigger meets your needs, create a new custom trigger by clicking the + icon.
- To trigger the tag on a custom event:
- Select the Custom Event trigger.
- Enter the event name that matches the one used in the Google Analytics: GA4 Event tag.
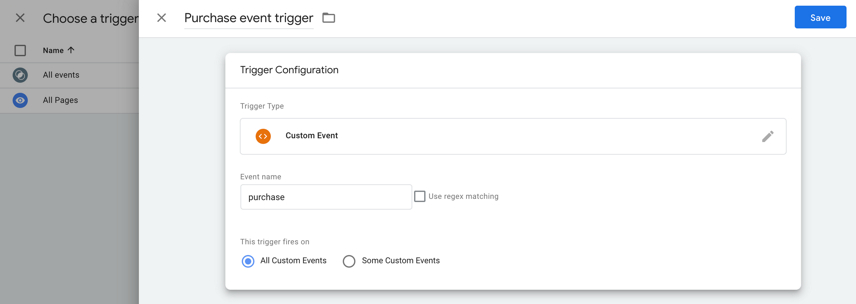
- To trigger only on specific URLs:
- Select the option to trigger on Some Custom Events.
- Add the Page URL variable and set it to the URL where the tag should trigger.
- Name the tag and Save.
Step 2: Set up Enhanced Conversions
The second step in implementing Google Analytics server-side tracking on Shopify is to set up Enhanced Conversions. You should follow these instructions:
1. Set up a user-provided data variable
There are 3 ways that you can implement enhanced conversions in Tag Manager: Automatic collection, Manual configuration, and Code configuration. Choose one option to collect user-provided data and you can find more information about Enhanced Conversions.
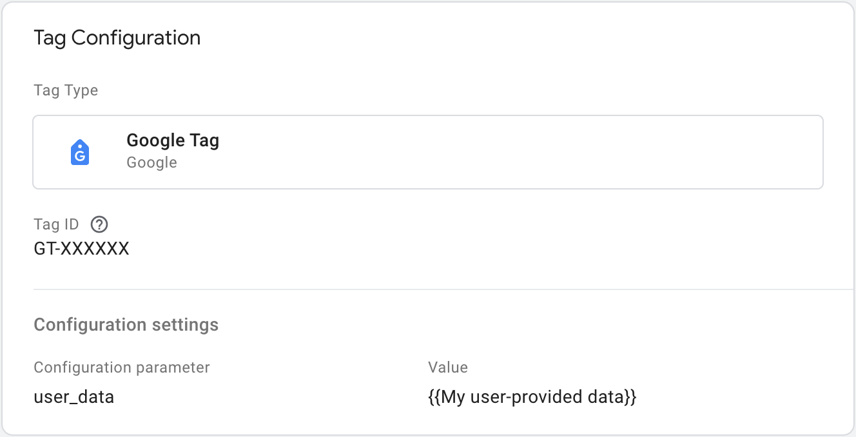
2. Assign the variable to Google tag
- In your web container, open Tags
- Edit the Google tag
- Under Configuration settings, add a new configuration parameter called user_data.
- Set the value to the User-provided Data variable.
- Click Save.
3. Configure Server-side Ads Conversion Tracking tag
- Open Tags -> edit the Google Ads Conversion Tracking tag.
- Check the checkbox: Include user-provided data.
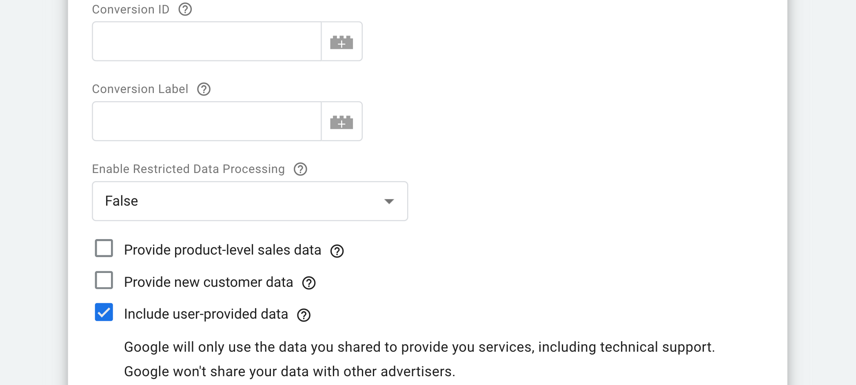
- Save changes.
Step 3: Implement Server-Side Tracking on Shopify
Now, you need to set up Shopify GA4 e-commerce tracking to send server-side events:
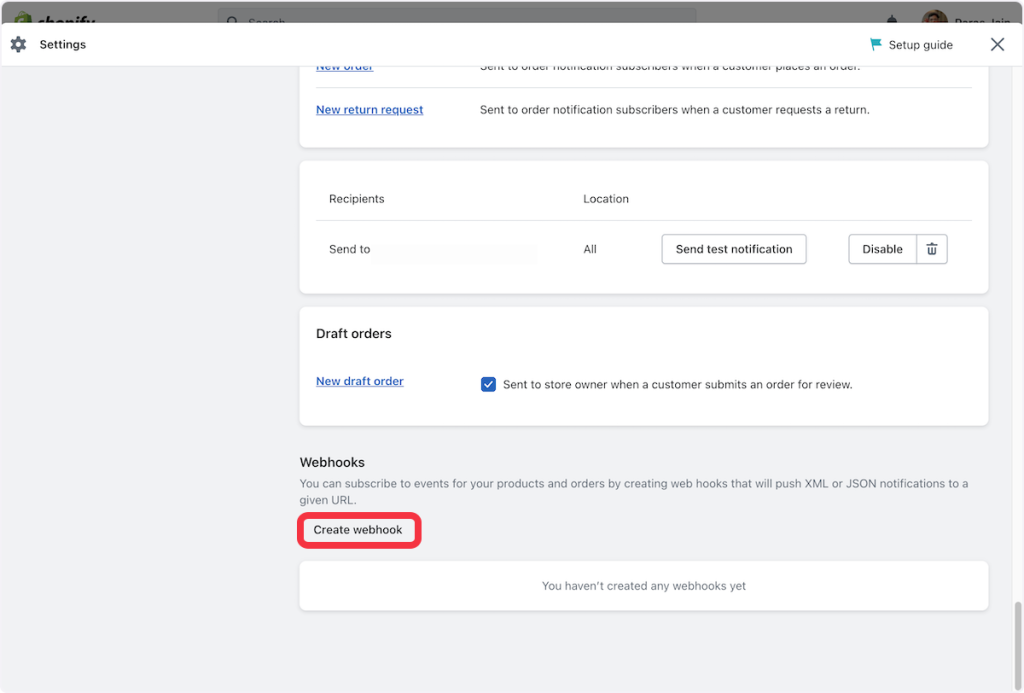
- Use Shopify’s webhooks or a third-party app to capture events and send them to your GTM server-side container.
- For example, you can configure webhooks for order creation, cart updates, etc., in your Shopify admin under Settings -> Notifications -> Create Webhook.
Then, the next step is setting up server-side tracking tags:
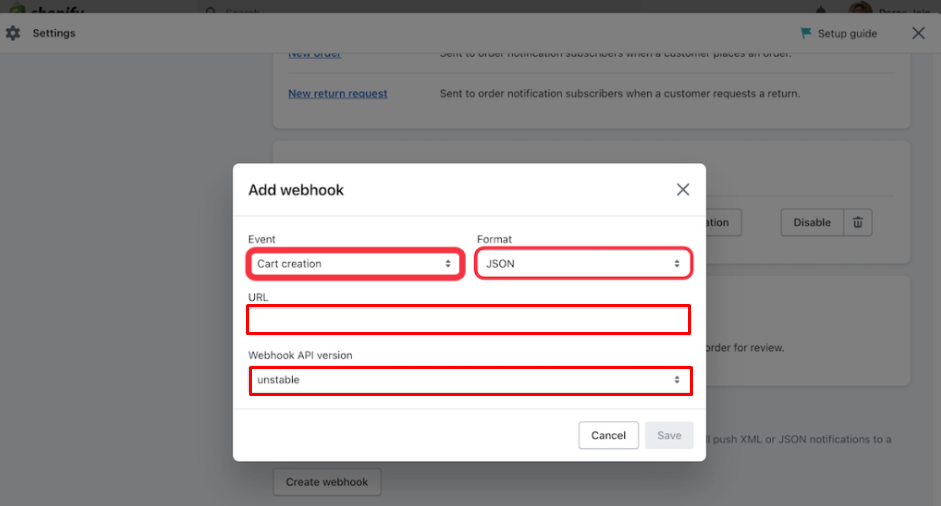
- In your GTM server-side container, create tags to handle incoming events from Shopify. For each event, create a corresponding GA4 event tag.
- Select the required event type (JSON)
- Copy the webhook URL and paste it into the URL field.
- Choose the latest Webhook API version -> Save.
- Ensure the event data is correctly mapped and sent to your GA4 property.
Step 4: Test and Debug
Use GTM Preview Mode:
- In GTM, use the Preview mode to test your tags and triggers.
- Verify that events are firing correctly on your website.
Use GA4 DebugView:
- In GA4, navigate to the DebugView (under the Configure section) to monitor incoming events in real-time.
- Ensure all expected events are being tracked accurately.
Best practices and advanced configurations
When it comes to best practices and advanced configurations in Google Analytics 4 server-side tracking, several key considerations can help optimize data collection and analysis.
Enhancing data quality and privacy compliance
One critical aspect involves enhancing data quality and ensuring compliance with privacy regulations. This includes measures such as configuring data retention and anonymization settings within GA4, which are vital for maintaining data accuracy and integrity while adhering to regulations like GDPR and CCPA.
Advanced event tracking
Advanced event tracking is another area where businesses can leverage server-side tracking capabilities to gain deeper insights into user behavior. This involves tracking custom events and parameters relevant to specific business objectives, as well as setting up user properties and custom dimensions/metrics to capture additional context about user interactions. E-commerce tracking is also crucial for businesses looking to gather detailed transaction data, allowing them to analyze sales performance and customer behavior effectively.
Monitoring and analyzing data in GA4
Monitoring and analyzing data in GA4 is essential for extracting meaningful insights from server-side tracking efforts. Utilizing GA4 reports and analysis tools enables businesses to monitor server-side tracking data in real time and identify trends or anomalies. Moreover, creating custom reports and dashboards tailored to specific KPIs and objectives can provide stakeholders with actionable insights to drive decision-making. Additionally, leveraging GA4’s predictive metrics and insights can further enhance the understanding of user behavior and facilitate data-driven strategies for business growth.
Set up server-side tracking easier with NestAds
Setting up GA4 server-side tracking can pose significant challenges, particularly for those new to the process. However, with NestAds, these difficulties are a thing of the past. With our platform, the cumbersome setup process typically associated with server-side tracking is streamlined, freeing businesses from the technical complexities of integration with just one click. NestAds offers a user-friendly, robust system that seamlessly integrates with existing tools, empowering businesses to focus on growth and campaign optimization.
As an all-in-one solution for ad tracking and marketing attribution, NestAds leverages first-party data and server-side tracking to ensure a steady stream of accurate data. This not only allows businesses to navigate around obstacles like iOS 17 blockages and Google’s third-party cookie phase-out but also eliminates the hassle of the setup process.
If you want to find more server-side tracking solutions, discover our next blog now!